Our next meeting on the 18th April 2019 has been organized by David Hay, his topic for the meeting is going to be working with wood that has defects and how in most cases this can be overcome and indeed even enhance the appearance of an item. In addition to what David is doing himself, he has arranged for 3 other members to be doing their own things, 2 are going to be turning, David Hutcheson and Mark Sutton, and for a special treat Mark Dale is going to do some carving. Mark Sutton’s attendance is still to be confirmed, after contacting him today his attendance will depend on his workload, but if he is there he will be making a Japanese inspired tea bowl.
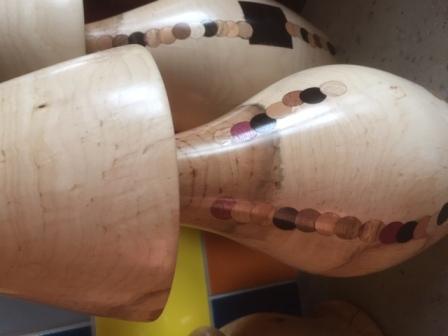
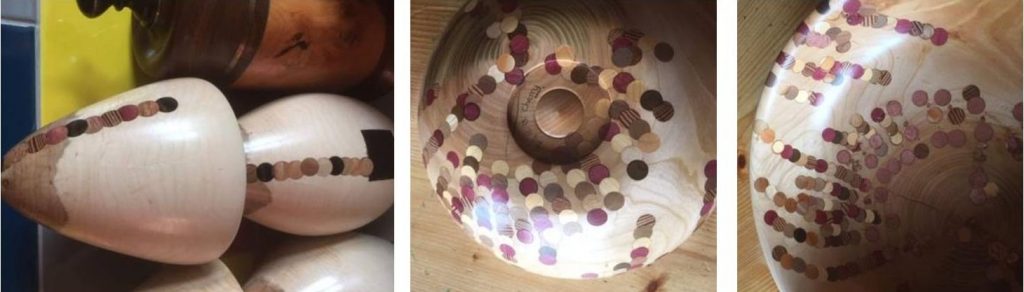
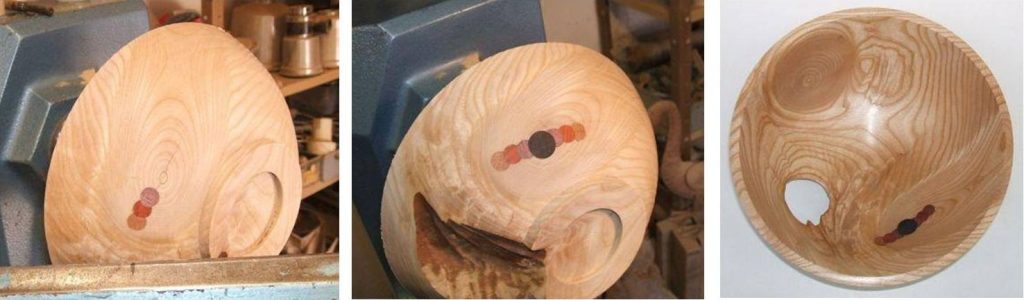
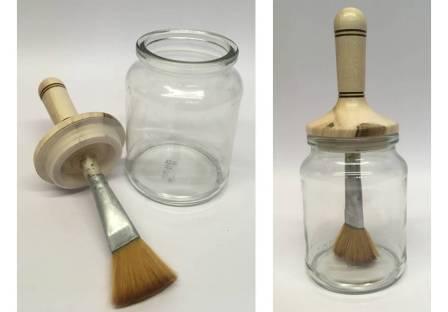
This is the type of thing David Hay is going to demonstrate, the one on the left had 2 long shakes running lengthwise and David has used a series of plugs to hide the defects.The 2 other pictures show a whole series of cracks had to be hidden resulting in dozens of plugs being inset to hide the cracks.This is a bowl of my own that was treated in exactly the same way,the picture on the left shows the crack being repaired with the plugs, the middle picture shows the extent of the plugs used, and the picture on the right shows the finished bowl, I had no problem accepting there would be a hole (or as we turners like to call it,”a natural element”) in the finished bowl, you will see that the plugs have been exposed on the inside as well, that’s something you need to take into consideration if applying this method to a bowl, you need to make the plugs long enough to be able to reveal them on the inside too.After doing the original post I got an email from David Hutcheson with what he is going to do at the club this Thursday, he is going to make a sealer pot from a jam jar, this is a very useful item to have as it gives you the ability to judge the amount of thinning you put into your sealer much better than just guessing how much to put in the tin. An excellent project to do and you should all make one.
If I get any more changes to the programme before the meeting I will update the post, but if not we look forward to a good turnout and we hope you find the meeting interesting and informative.
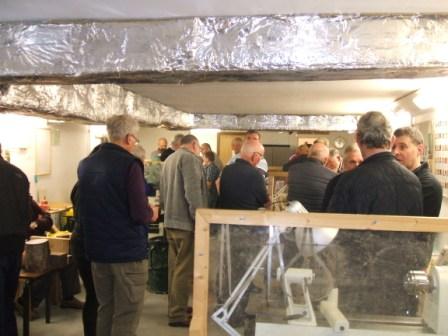
Our meeting on the 4th April 2019 was mainly about the use of a bowl saver tool, this tool gives the user the ability to take more than 1 bowl out of a single blank making it a very useful tool especially if the blank is quite unusual or expensive. David Hay was the demonstrator and he did an excellent job of demonstrating exactly how it worked. In addition to the bowl saver demonstration, David had also arranged for 3 more turners to work the lathes, all of these turners were doing different things on the lathes, Colin MacKenzie was making a shallow platter in native Elm, Douglas Stewart was making wooden fruit, he did an apple in Yew wood and a pear in Cherry wood, David Hobson was making finials out of a piece of Mahogany. The turnout was very good, the evening started with the committee having one of their regular meetings prior to the start of the main meeting.
If you want to see a larger picture and some text click on any picture.
Our next meeting on the 4th April 2019 is going to be about using a bowl saver tool, this tool allows the user to make more than 1 bowl out of a piece of wood, David Hay is going to demonstrate it’s use and will be the main interest for the meeting, however David has organized 3 more turners to work the lathes, they are David Hobson, Douglas Stewart and Colin MacKenzie, they will all be doing their own thing but I’m sure they will be creating lots of interest themselves.
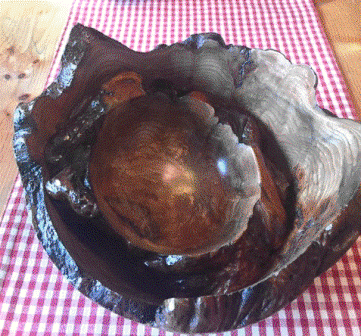
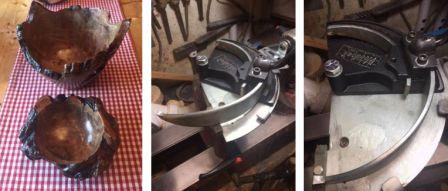
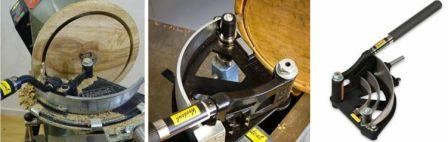
The picture on the left shows 2 bowls having been made with the use of the bowl saver tool from 1 piece of wood. The picture in the middle shows the actual tool mounted on the lathe, this is the Woodcut tool, it’s not a cheap option but if you are making quite a lot of bowls from expensive blanks it’s well worth the investment, another advantage of this tools use is you can create a nest of bowls 2,3 or even 4 out of 1 piece of wood and they will all be almost the same except for the size. The picture to the right is a closer view of the bowl saver tool. These pictures were provided by David Hay for this post.These 3 pictures I took off the internet, all are bowl saver tools in the Woodcut range, these are not the only type of bowl saver tools available, there are quite a wide range of these tools on the market.
We look forward to seeing you all at the meeting and hope you find the subject matter interesting and informative, if you have any questions on the use of the bowl saver tool please feel free to ask David about anything you want to know.
Our latest meeting on the 21st March 2019 was all about working with natural edges. There were 5 turners working the lathes, Bill Munro, John Ruickbie, Bob Chisholm, David Hutcheson and myself. The turnout for the meeting was very good and John Cheadle did all the introductions . The pictures were taken by Mike Day and Phil Moore.
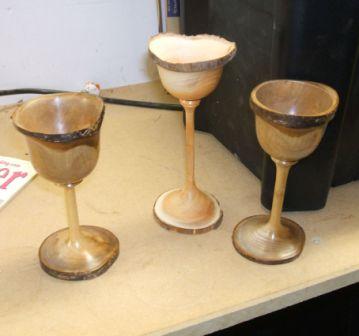
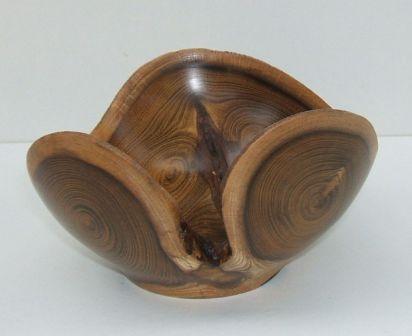
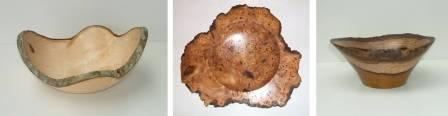
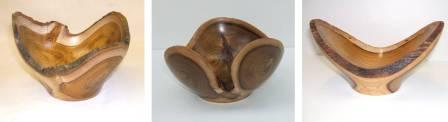
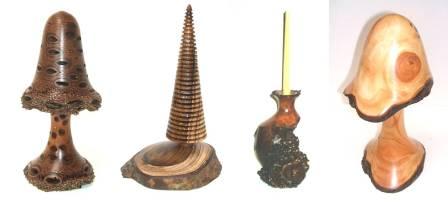
Our next club meeting on the 21st March will be all about making things with natural edges, there should be 5 turners working the lathes, Bill Munro, David Hutcheson, John Ruickbie , Bob Chisholm and myself. Using wood where the natural edges are left intact lends itself well to bowl making and I’m sure there may be more than one turner doing exactly that, but natural edges can be left on a variety of turnings in both bowl work and spindle work. Below are a few of the different items that can be made with natural edges.
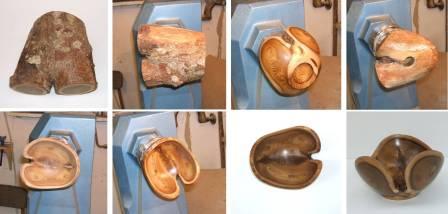
Here are 3 very different types of things made using the natural edges, left, is an Ash bowl made from a log where more than 1 branch intersected the main stem, centre, an Elm burr that has been turned into a shallow bowl leaving all the irregular shape round the outside, right, a Laburnum bowl that has been made making use of the end grain, this gives the appearance of 3 different woods, when in fact what you are seeing is the heart wood at the bottom, a middle layer of sap wood and the bark layer on top.These 3 are all made from Laburnum, left, is a bowl made from the intersection of 2 branches that grew away from the main branch, centre, this one is also from an intersection but this time I cut it further away from the meeting point to create the gap at the front of the bowl, right, this one comes from a straight log of about 150 mm in diameter and cut in length to about 200 mm, giving you the boat shape when turned.These are examples of natural edges being left on some spindle work. Far left, a Banksia nut turned into a Mushroom with the natural edges left on both the base and the head of the Mushroom, Left, a Christmas tree decoration made from a piece of Laburnum with the natural edge being left on the base, you will note the tree has been turned off centre, Far right, another Mushroom, this time made from a branch of Yew with the natural edges left on both the base and the head. Right, a piece of Elm burr made into a Candlestick, the only turning on this item was to level out the base and a small amount of turning to the top where the brass candle cup was fitted.These 8 pictures show the piece of Laburnum I started with and the sequence of events in turning the bowl and the finished article.
I hope these pictures give you some idea of what can be done with some very unpromising pieces of wood, it is my conclusion that there are no unpromising pieces of wood, there is something that can be made from anything, it’s thinking what can be done that’s difficult.
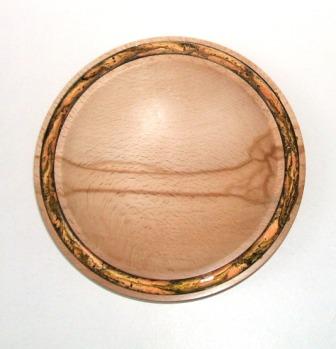
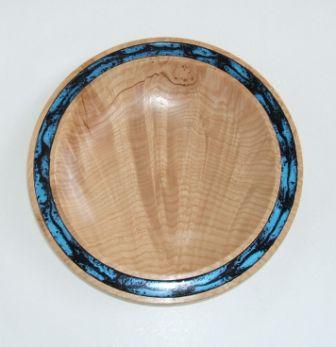
Our club meeting on Thursday 7th March 2019 was a demonstration by Alec Mutch on the use of Pebeo paints in woodturning. These paints can be used to enhance the appearance of an otherwise plain or bland piece of wood, making their use very valuable. The following set of pictures will take you through the making of a shallow plate and also the paints being put to use. Most of the pictures were taken by Richard Comfort with a few of my own taken at my workshop. The turnout for the meeting was excellent.
This weeks meeting on the 7th March is a demonstration by Alec Mutch on the use of Pebeo paints in woodturning, mainly used on small to medium sized plates or platters. These paints can be used to enhance the look of a fairly bland piece of wood making it a very useful product to use.
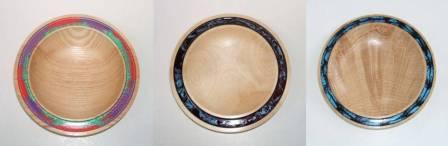
Here are some examples of small shallow plates where I have used the Pebeo paints, the plate on the left is Ash and I have used Pebeo Prisme in 3 different colours to create the decoration. The middle plate is Sycamore and here I have used PebeoVitrail black for a base coat with spots of Pebeo Moon in blue on top, the plate on the right is Sweet Chestnut and here I have used Pebeo Ceramic black for the base with Pebeo Moon in blue on top. All these paints are reactive paints and need to be left to develop for a period of time after use, they will not look anything like they are on application but will develop into something quite different with some time, the drying period can be as long as 3 days and they need to stay flat during that time.Here are samples of the 4 different Pebeo paints I use, these are all solvent based paints that require white spirit as a cleaning agent. Some of these are available in the Hobby shop in Inverness but with a very limited range of colours and only available in handy packs of ready made up colours in 15ml jars. For a wide range of colours in all 4 types and in bigger jars of 45ml go to, www.pullingers.com, they are also a lot cheaper in the bigger size and the choice is better. You will require pipettes and spatulas for applying these paints as some of them need some depth to react fully.
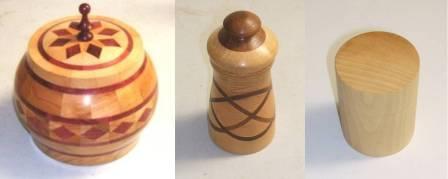
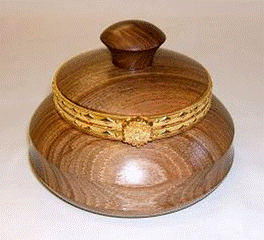
Our competition on the 21st February 2019 was all about making a turned box. The number of entries for the novice group were very good, as was the number of entries for the experienced group, however the intermediate group had far fewer entries, this has a lot to do with the way the groupings are arrived at and that is something the club is going to address for future competitions. The standard of work in all 3 groups was excellent which made the judging very difficult, it was hard to pick a winner, the judging was done by Alec Mutch and Gordon Leitch. The pictures for the competition were taken by Alec Mutch. In addition to the competition all of our 5 lathes were in operation during the whole event with the turners doing their own things, 2 of those turners were on the lathes for the first time at the club. The pictures for these turners were taken by Alec Mutch and Phil Moore.
For a larger picture and some more information click on any picture.
You only have a few days left to make a box for this week’s competition on Thursday 21st February 2019. We want to see lots of entries from all 3 categories, if you need any inspiration, there are quite a lot of box designs and ideas on this web site , good luck with your entry and do remember there is a £25 prize for each of the winners in all 3 categories. There will also be all 5 lathes in operation during the evening whilst the competition judging is going on, there should be something for everyone to see and enjoy.
Our AGM on Thursday 7th February 2019 went very well. We had a very good turnout of members and all the existing committee members were present. The chairman made an opening statement, followed by the secretary presenting the minutes of the previous AGM. The chairman did a report on the years events, that was followed by the treasurer giving a report on the financial status. Topics discussed were , the constitution, skype and the internet, membership fees and training fees. As the committee had shrunk to just 7, we voted a few more members onto the committee taking it back up to 12. There were a few items raised under A.O.B. that the chair announced would be discussed at the first committee meeting.
The committee would like to thank all of you who attended the AGM. For a larger picture and some more information, click any of the pictures.
This website uses cookies to improve your experience. We'll assume you're ok with this, but you can opt-out if you wish.AcceptRead More
Privacy & Cookies Policy
Privacy Overview
This website uses cookies to improve your experience while you navigate through the website. Out of these, the cookies that are categorized as necessary are stored on your browser as they are essential for the working of basic functionalities of the website. We also use third-party cookies that help us analyze and understand how you use this website. These cookies will be stored in your browser only with your consent. You also have the option to opt-out of these cookies. But opting out of some of these cookies may affect your browsing experience.
Necessary cookies are absolutely essential for the website to function properly. This category only includes cookies that ensures basic functionalities and security features of the website. These cookies do not store any personal information.
Any cookies that may not be particularly necessary for the website to function and is used specifically to collect user personal data via analytics, ads, other embedded contents are termed as non-necessary cookies. It is mandatory to procure user consent prior to running these cookies on your website.


 is reading his financial report to the meeting, copies of his report were handed out to the meeting.")

