
Our meeting on the 1st April 2021 was organised by Nick Simpson, the theme for the meeting was Green Woodturning (or wet woodturning), this is using wood that has just been fresh cut and not had any time to dry. The meeting had to be changed into a virtual meeting due to the ongoing Covid-19 restrictions. However you were all invited to produce something along these lines and to send your pictures to me. The response was as is usual very disappointing due to the numbers taking part, there were only 2 people who took part, Nick Simpson and myself, I think the members could really do a lot better.
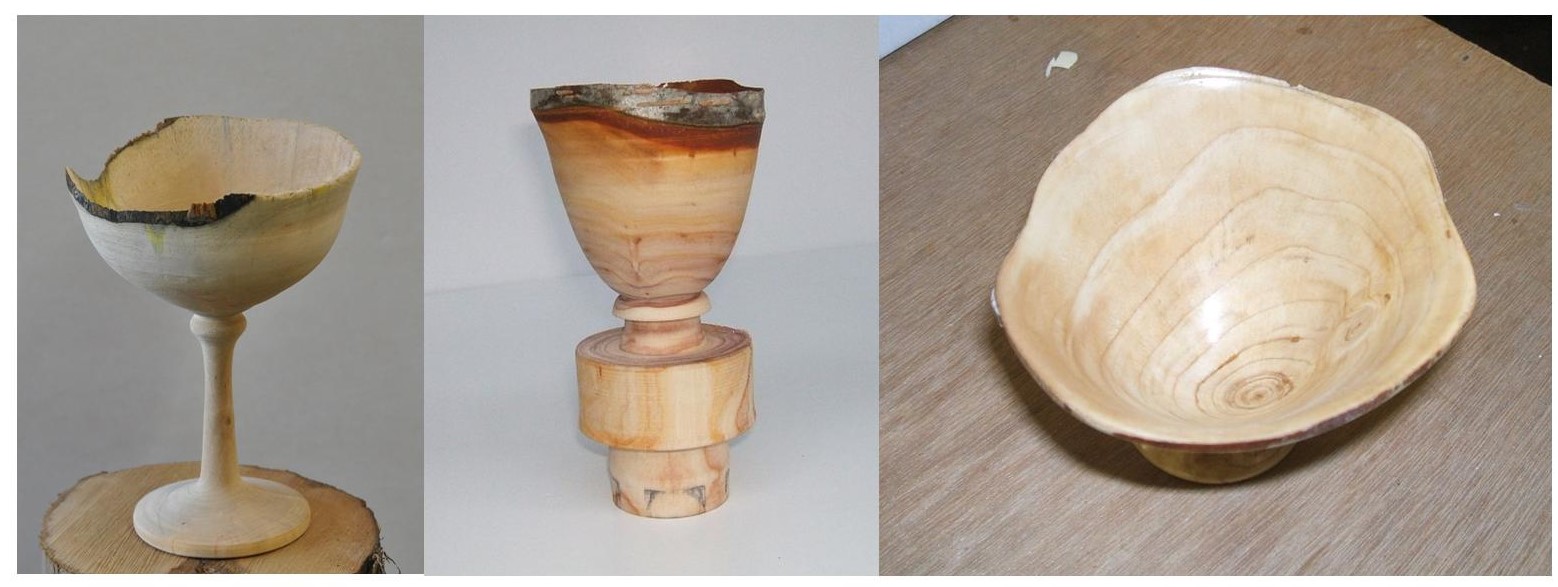
Both entries for this meeting are timeline entries and both have put forward the same type of turning that being making goblets from pieces of green branch wood.
Here is Nick’s entry, but first a short introduction from Nick.
Turning a Goblet from green (freshly cut) wood. Nick Simpson.
This article is in place of a face to face meeting at Highland Woodturners Club.
The subject I was given by Alec is green wood turning so I have chosen to make a small goblet from a branch of Highland Silver Birch from my own small wood.
There are lots of errors in this turning some of which I shall discuss and suggest alternative strategies and some of which you will spot that I have missed.
It is an ‘As it happened’ presentation. I hope it is a help to some members.
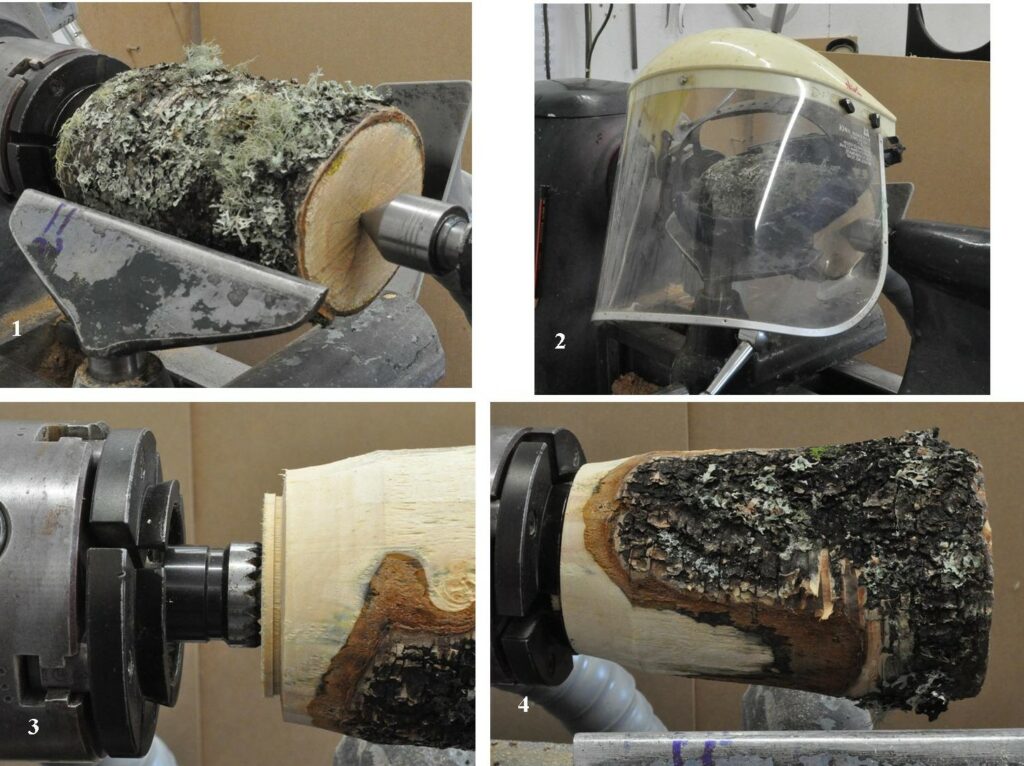
(1) This is the branch about 100 mm diameter (plus lichen) and 160 mm long.
It is mounted between a steb drive centre and a pointed conical live centre in the tailstock
Always rotate the wood before switching on the lathe to avoid catching an irregular piece of the branch on the tool rest or banjo. Always start the lathe at a low speed and increase only when safe to do so.
(2) Always wear a face mask or visor. When turning branch wood, the bark (and lichen) is a serious potential hazard.
(3) Turn the piece to a cylinder at the headstock end and make a tenon. I have used a 3/8” beading/parting tool to create the tenon. I am using Axminster C jaws which are parallel but have 2mm lip at the outer end where the jaws contact the wood. It is necessary to make a 2mm groove for a safe fit as shown here.
(4) Now mounted in the Axminster C jaws. Use the conical live centre in the tailstock to centre the branch in the jaws before tightening them. Make sure the jaws are firmly closed on the tenon but leave the tailstock in place for now.
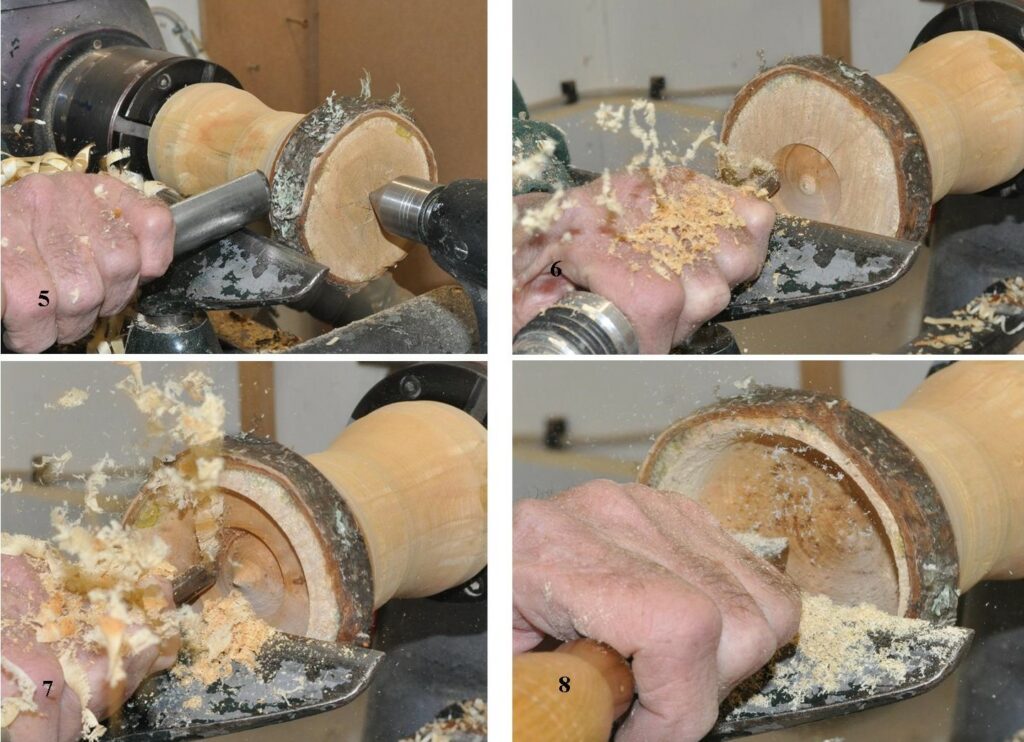
(5) Turn a cylinder but leave 3 cm of bark at the tailstock end. Some of the bulk of the wood can be removed as shown but ensure that a substantial amount remains for stability.
(6) Check that the jaws are tightly clamping the piece and then remove the tailstock. Start to form the bowl of the goblet with a spindle gouge. The flute should be at the 9 o’ clock position and the tool drawn from the centre outwards in a shallow scoping motion. Between 9 and 10 o’clock is a safe aspect for this procedure. If the flute is pointing between 10 and 12 o’clock a catch is possible. The nearer to 12 the more likely this will be.
(7) Now for some fun!! Continue to form the bowl but keep the flute between 9 and 10 o’clock. It is tempting on soft forgiving wood like this to open the flute (twisting the tool clockwise) but be sensible and avoid a catch. A catch at this stage will drag the piece within the jaws and re-centering may not be possible with this soft wet wood.
(8) The final smooth shape to the inside of the bowl can be formed with a scraper. I am using a 1” negative rake round nosed scraper. Remember to keep a scraper’s handle up so that the business end is ‘trailing’ to avoid a catch. This is less important with a scraper which has a negative rake grind.
(9) Now finish the inside with abrasive of your choice but do not let the wood dry out. Abrasive paper strip is often the best solution because the damp wood will clog the mesh of abrading systems like Abranet.
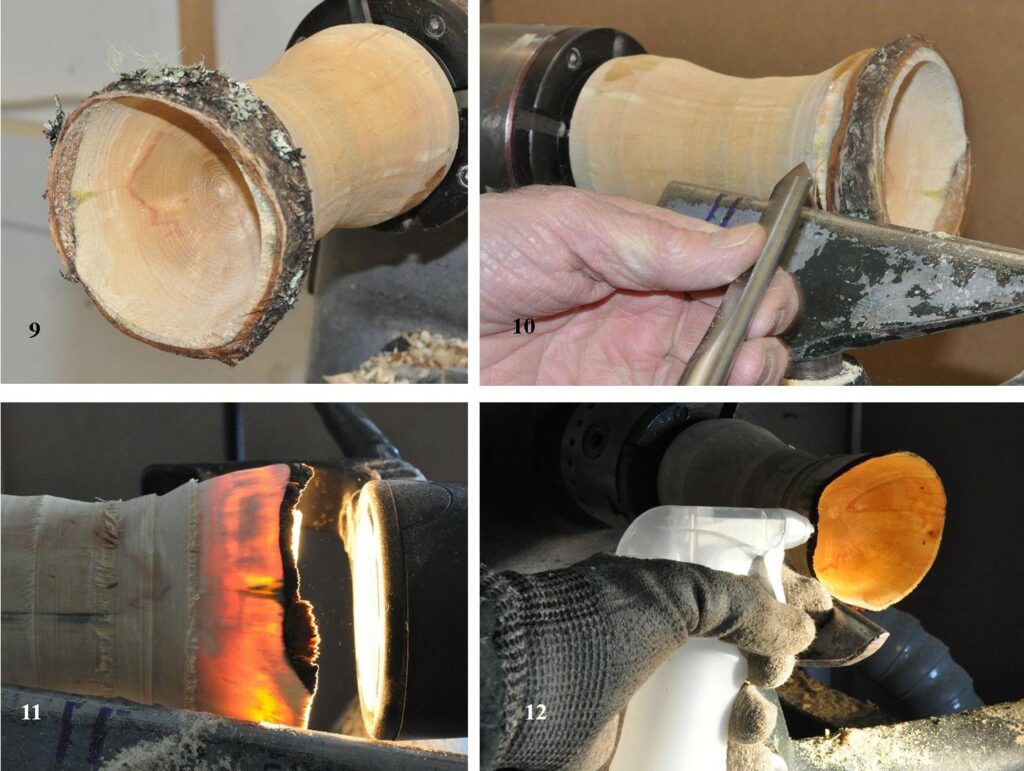
(10) Now for the outside. Move the tool rest alongside the cylinder and carefully start to remove the wood from the outside of the goblet with your freshly sharpened spindle gouge. Try to keep the bark intact. Remove wood from the area 20mm or so from the free edge and carefully work towards the free edge taking fine cuts. Because the branch is not circular there are areas where the bark can be seen at the edge of this picture.
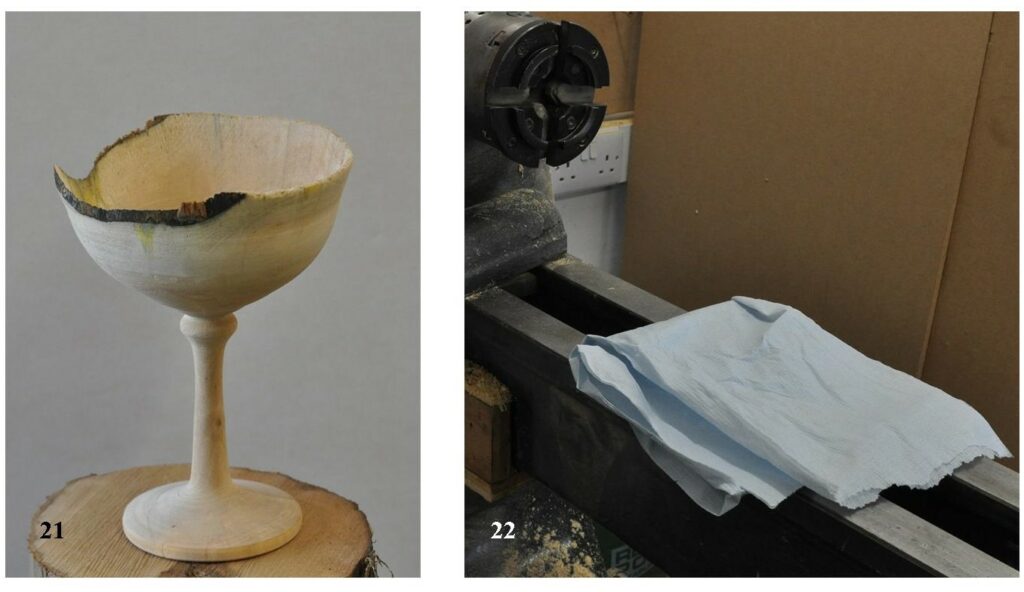
(11) I have been taking very light cuts at the free edge with a sharp tool but a large area of bark has separated and has been lost, but some is retained and that will give it character! We can see the thickness of the goblet wall by turning off the workshop lights and bringing up a light source as shown.
(12) It is important to prevent the thin walls from drying out which will make them brittle. Regular spraying with water will help to prevent this happening. Continue to remove wood from the wall of the goblet with your spindle gouge. You must keep your tools sharp so make frequent trips to the sharpener.

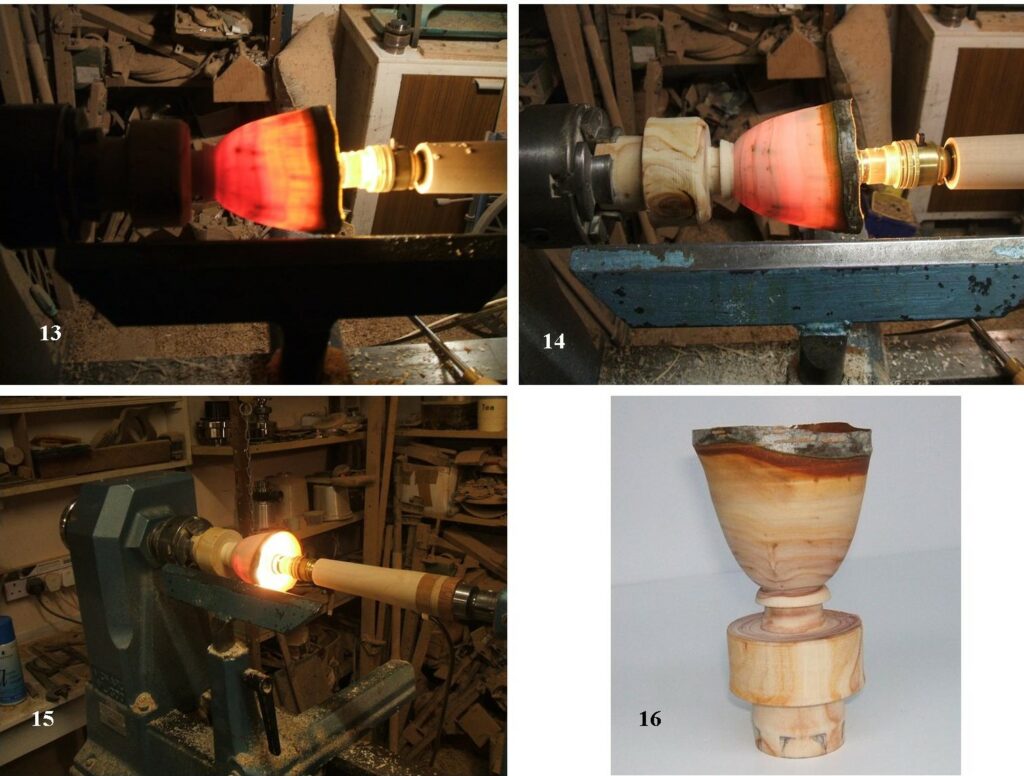
(13) The light source shows how thin the wall has become. As the wall gets thinner the colour changes from brown to dark red to orange and then yellow when about 1-2mm thick. You should gradually thin the walls working from the free edge towards the base of the goblet. As the walls get thinner, they become more unstable. It may not be possible to go back to rectify mistakes. The wetter the wood the more pliable and responsive to very fine cuts with a freshly sharpened tool.
(14) Ok. That’s as good as it’s going to get. Now to turn the stem with your spindle gouge. Starting with a bead at the base of the goblet bowl. You need to remove the bulk of the wood where the stem will appear. As the stem gets thinner the unsupported bowl of the goblet will cause the whole to become unstable and wobble. One easy way to reduce this is to bring up the tailstock and compress a tennis ball between the live centre and the goblet. Do not apply too much pressure or the stem may tend to buckle as it gets thinner.
(15)The stem should look like this after the wood has been turned away. There seem to be some imperfections but what can we do?
(16) Suggestion: Keep the piece in the jaws and unscrew the chuck. Place the chuck on a flat surface so that the piece is in its intended position. Now we can easily see at least 3 flaws indicated by the arrows. The top arrow suggests that the wall is thinner at this point than areas above and below. This has probably occurred in my attempt to keep some of the bark above the arrow but not kept the cut going further down. I should have re-sharpened the gouge. The second arrow shows a definite angle instead of a flowing curve on the outside of the bowl. The third arrow shows a horrible sharp angle where the stem meets the base. Can we do anything about these? Return the chuck to the lathe and bring up tennis ball and tailstock and re-sharpen the gouge. Above the top arrow – this is probably a lost cause because the wall at the arrow is too thin to maintain stability. Below the top arrow – Spray generously with water and taking fine cuts this area should become thinner. Middle arrow – the wall is still quite thick here so after wetting more can be removed by fine push and shear cuts. Bottom arrow – reshape this area with your spindle gouge.

(17) Now that those problems have been sorted, we can part off the goblet starting with a parting tool with the lathe spinning and finishing with the lathe stopped using a fine saw.
(18)This has left a small nib which can be removed by any sharp tool. In this case I am using a power carving chisel.
(19) Looking down on the goblet straight off the lathe. The wood is still very wet and will distort if left to dry naturally. Some, if not all, of the drying distortions can be ameliorated by a spell or two in a microwave.
(20) It is important to ensure that the microwave is on the lowest setting. Place the goblet on a couple of thin sticks so that air can circulate underneath. Switch on for 20 seconds or so and then open the door. There may be some steam escaping. Allow the piece to cool and repeat the process. Do not be tempted to hurry this process. Fires can and do happen. Use repeated cycles until you are happy that the piece is lighter and stable. Some people perform repeated weighings to ensure that all moisture has been driven away.
Note: Old microwave in my shed not in the kitchen.
If a fire occurs Unplug the microwave before spraying any water on the piece. |
(21) This is how the goblet looked after its session in the microwave.
(22) And finally…………..Don’t forget to dry all your tools and the lathe bed before packing away. A thin coat of camellia oil will then keep all your equipment in good order.
I hope you have gained something from this presentation.
Have fun
Nick Simpson.
Now for something similar from Myself, it was a total coincidence that we had both done something similar, however we may have done some things slightly different along the way whilst arriving at similar outcomes.
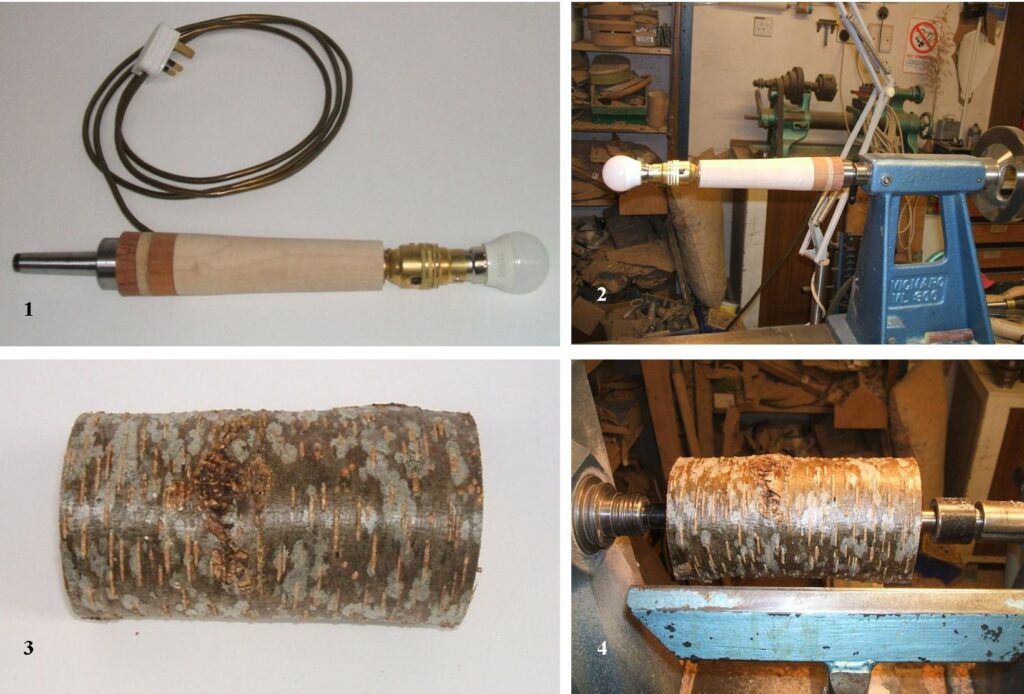
(1) The home made lamp I made and used in the making of any thin walled items.
(2) The lamp in position in the tailstock.
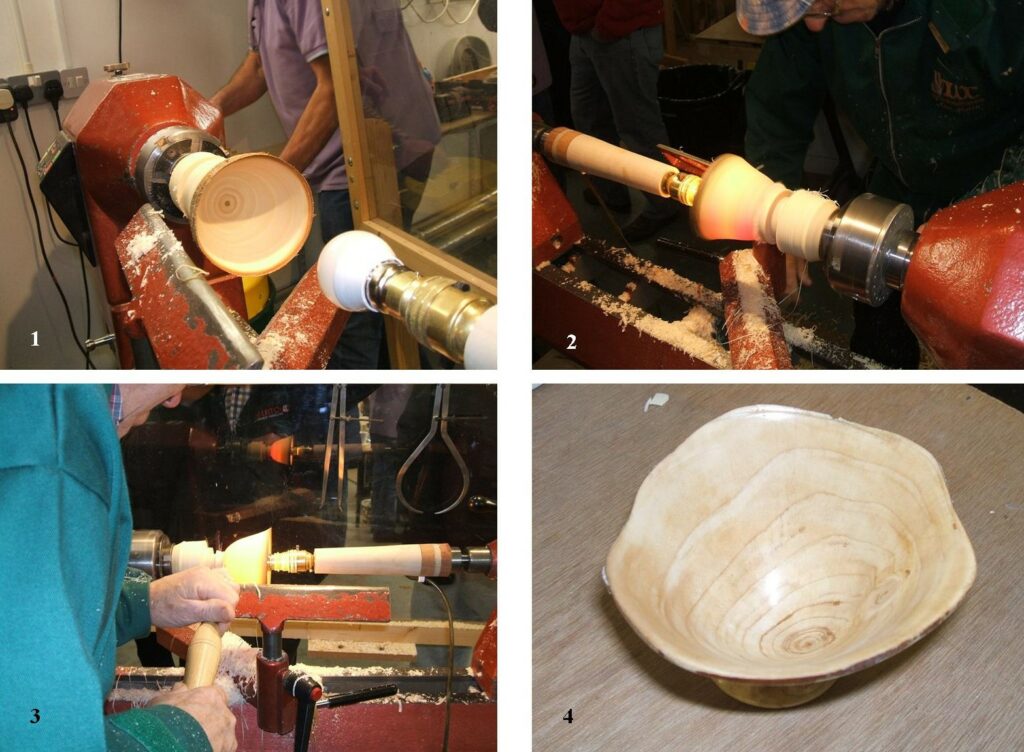
(3) The cherry log I used for this project, recently cut and still very wet.
(4) The log mounted between centres.
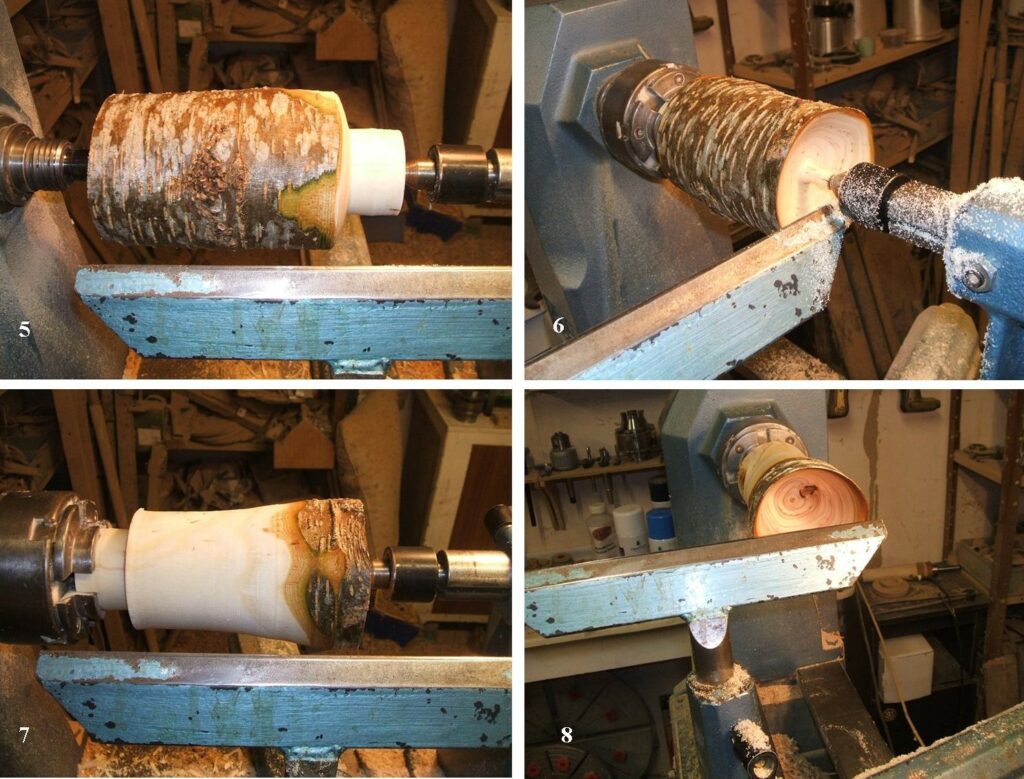
(5) The first job was to cut a spigot on one end, this should be made to fit the jaws of your chuck, in my case about 50mm in diameter.
(6) The log now mounted in the chuck, the tailstock used in the centreing of the log and the first of the internal cuts being made whilst the tailstock was in place.
(7) Now the outside can be worked, leave quite a large area near the cup end with the bark intact, remove all the bark and reduce the diameter of the rest of the log towards the chuck end.
(8) With the tailstock removed, the inside cup shape can be completed, the choice of tool is down to you, I used a small bowl gouge followed by a final cut with a very sharp round nose scraper.
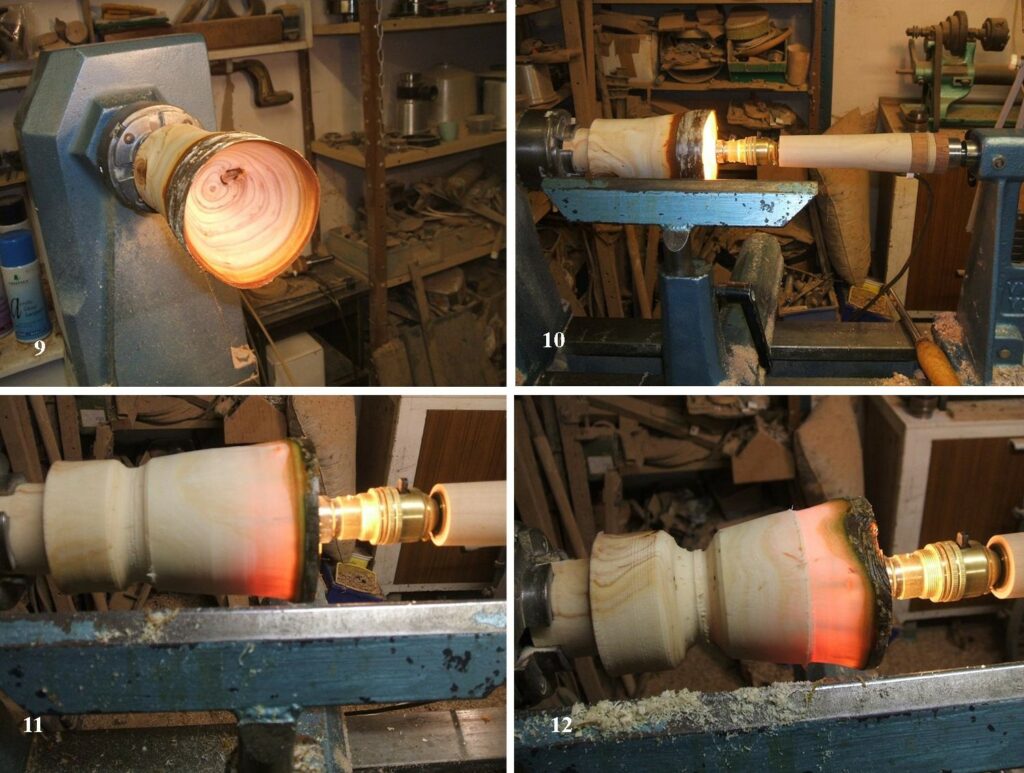
(9) This is the inside after a final clean up with some wet and dry sanding medium.
(10) This when the light comes into use, it’s held by the tailstock and positioned just inside the cup, use an LED bulb for this as it gives off a lot less heat than a conventional light bulb, the last thing you want to do is to use a bulb that will give off heat that could cause splitting of the wood.
(11) Now start to work the outside with a very sharp spindle gouge, start at the end nearest the light and take lots of very fine cuts, as the wood gets thinner you will start to see a soft pink to red sheen glowing through, the colour will get more intense as the wood gets thinner.
(12) Just follow the colour produced by the light, if you can keep the colour remaining the same all the way down you can be assured the thickness will also be the same all the way down.
(13) This is how the cup looked after I followed the light to the base, this picture was taken with the area lights off with just the light inside the cup being used, this does make the appearance much easier to see although you will be cutting the outside largely in the dark.
(14) This is how it looked with the area lights on.
(15) Another view of the light shining inside the cup.
(16) The cup now removed from the chuck, it still has the mounting spigot attached, this was left on for the drying process to take place, it was put inside a polythene bag with a lot of very dry sawdust and allowed to dry for a couple of weeks, after that it was re-mounted on the lathe, sanded and coated with food safe oil before finally parting off.
I did one of these at a demonstration at our club premises some time ago here are some pictures from that event.
(1) This one was made from Leylandii and the wood was a little dryer. The cup ready to receive the lamp.
(2) The lamp in situ for the final cuts, you can see the pink glow appearing.
(3) Parting off after friction drying and applying a coat of sealer.
(4) The finished Leylandii cup, the wood was cut to about 2mm in thickness.
Our next meeting should be on the 15th April, it’s being organised by Geoff Potter and Geoff’s theme for the meeting will be Natural Edged Bowls. This meeting will be held virtually.
Do remember the clubhouse remains closed.