Report on our virtual meeting 22-07-2021 Captive rings.
Our meeting this week on Thursday 22nd July 2021 was to make something that had a captive ring or rings. The meeting was organised by Errol Levings and it was Errol’s idea to put the project matter forward. The meeting had to done virtually due to the ongoing Covid 19 restrictions. You were all invited to take part, any item could be made, it could have been a goblet with a ring or rings or a mushroom, a vase, a candlestick anything at all the only important part was it had to incorporate a ring or rings.
I did give you some pictures of likely things to make with captive rings included but also stressed the importance of coming up with some ideas of your own.
By the time it got to Wednesday evening I had not received any entries, I decided to do a time line presentation on making a mushroom with some captive rings. That took most of my free time on Thursday, by the time I made the item, stopping frequently to photograph the stages as I made it, then all the computer work in editing the pictures, Thursday had come and gone.
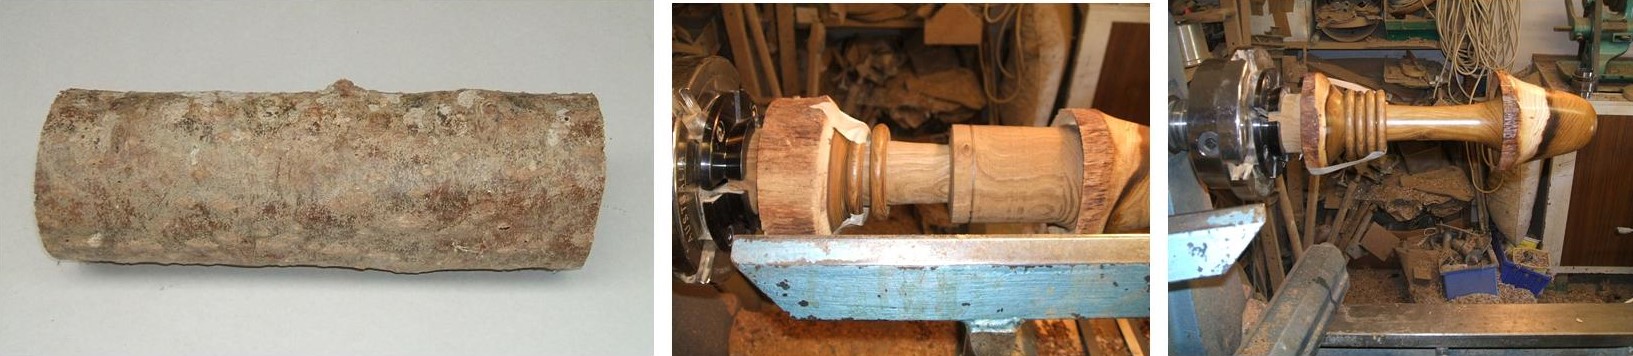
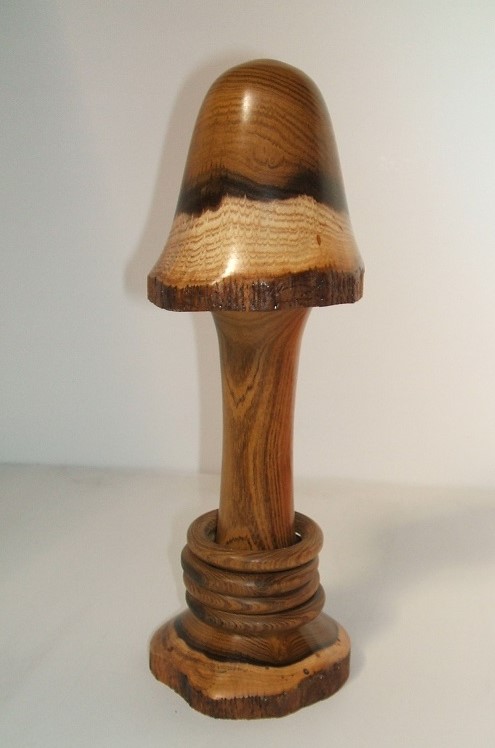
However here is my timeline on the making of a Mushroom with 4 captive rings, the wood I used was a log of Laburnum.
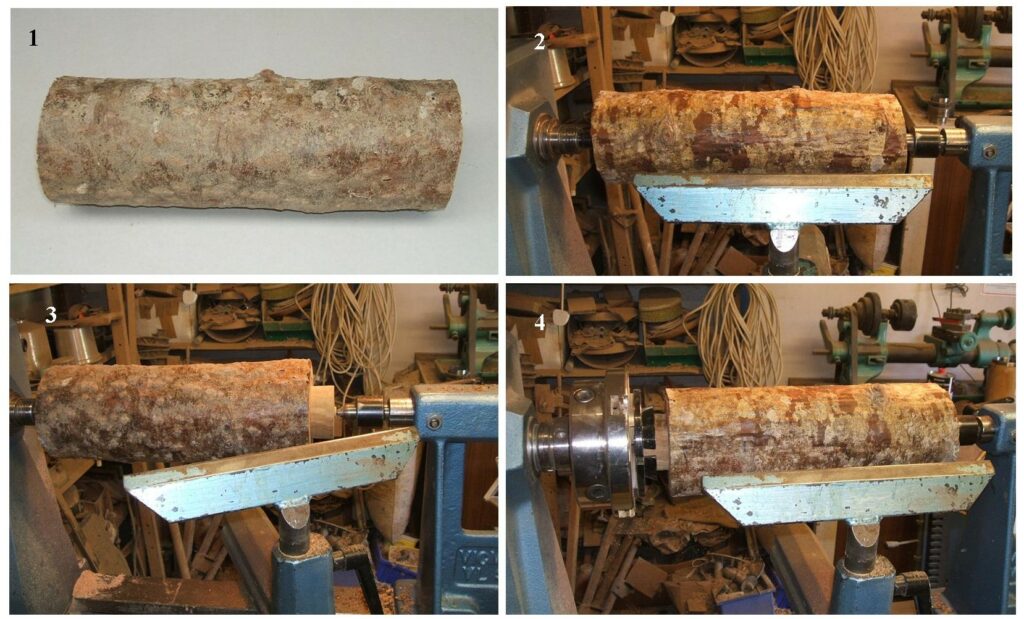
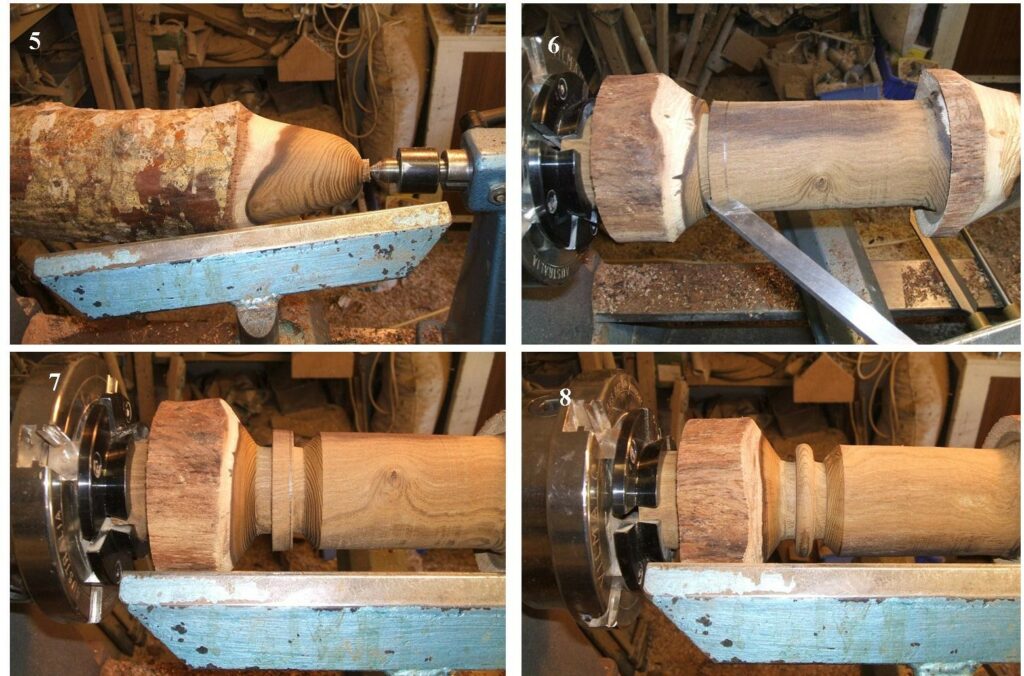
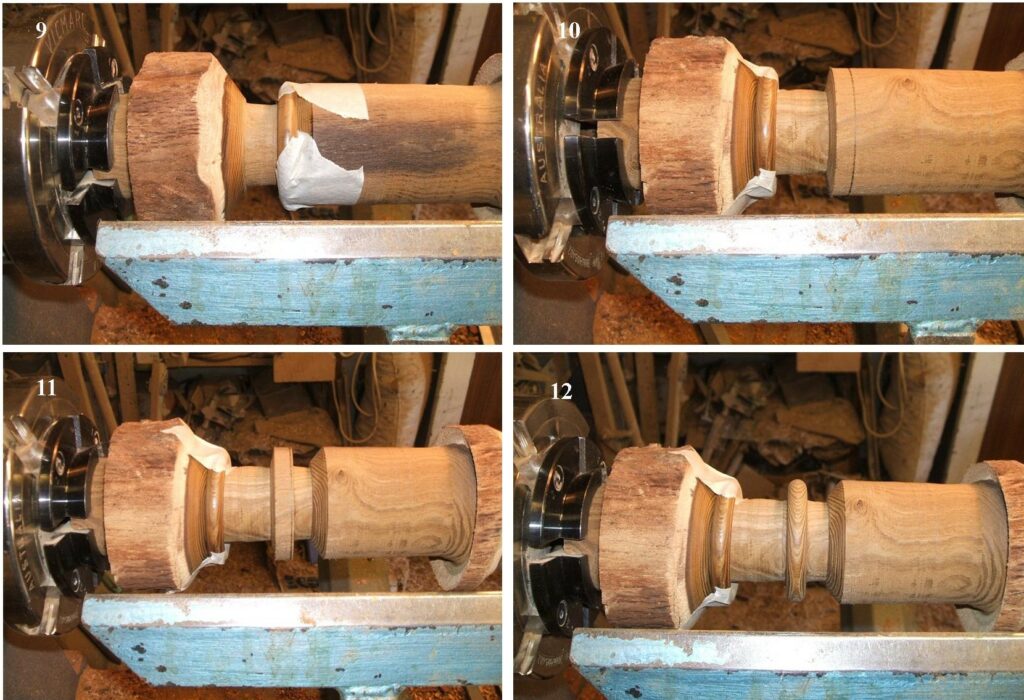
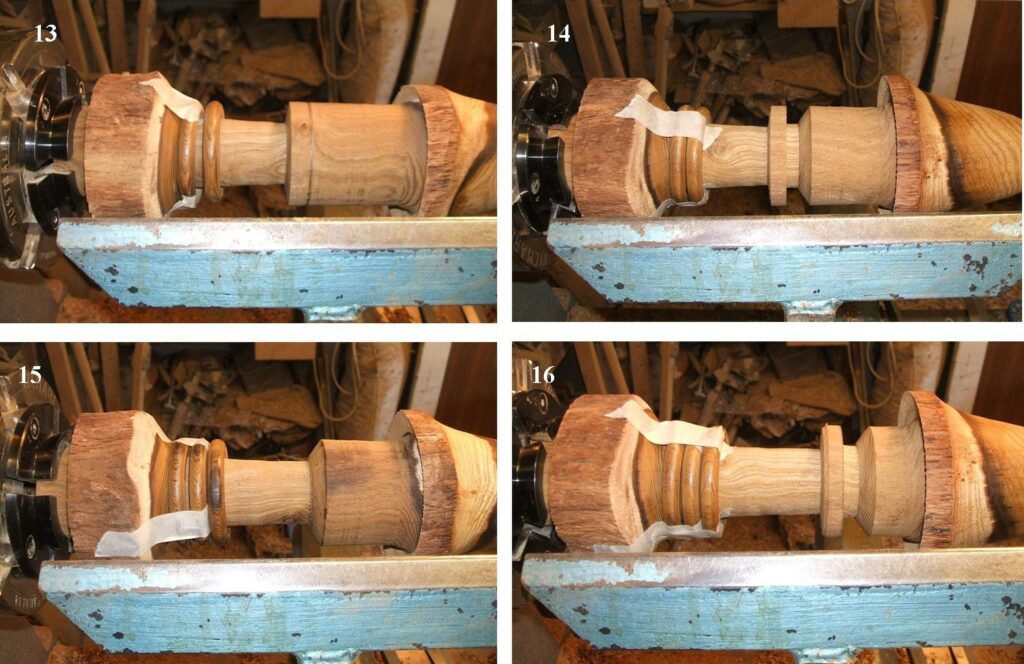
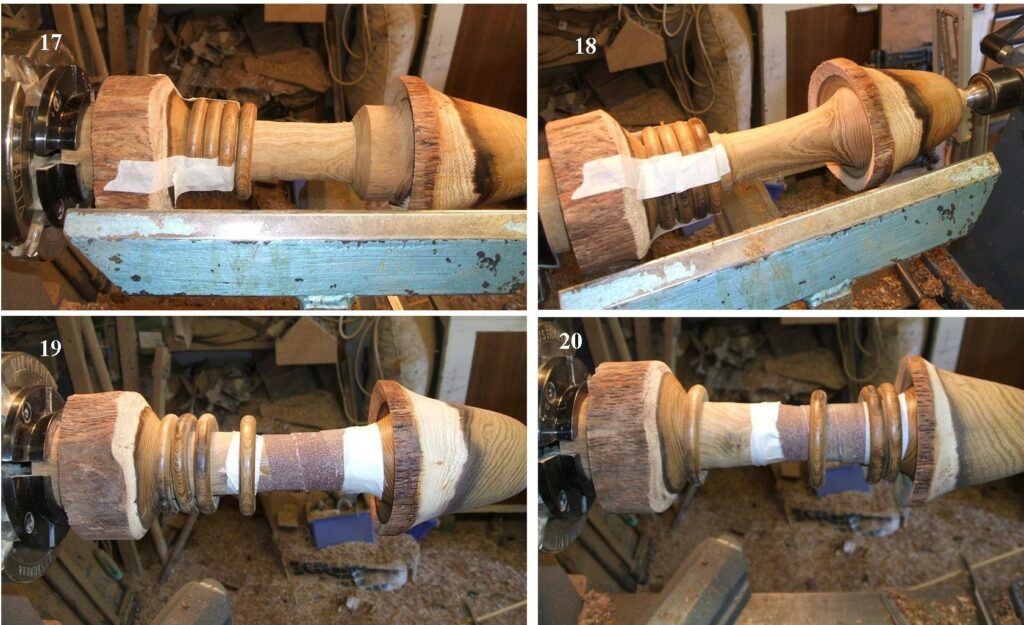
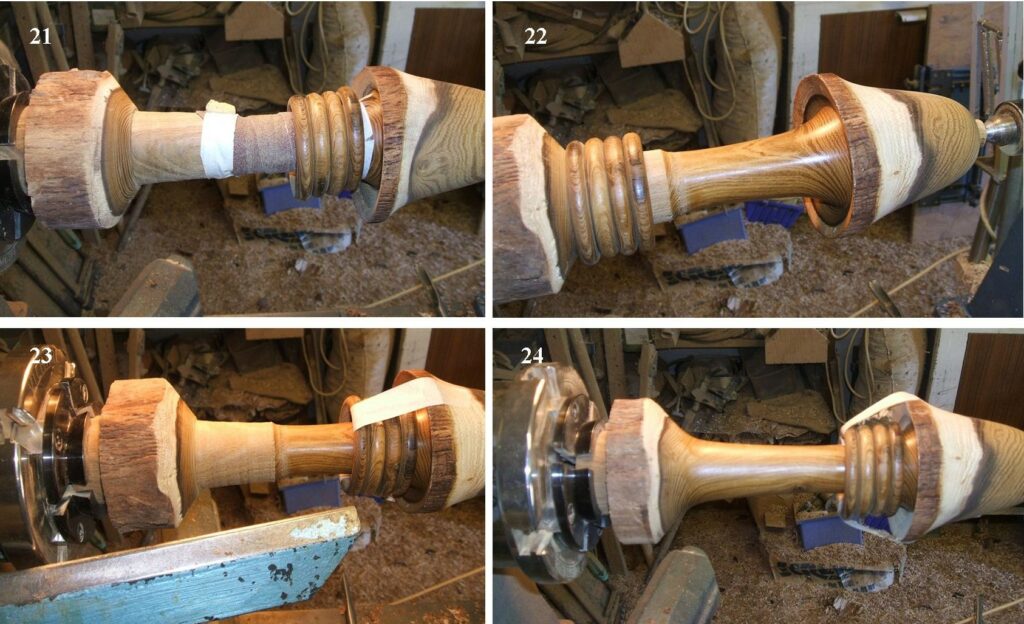
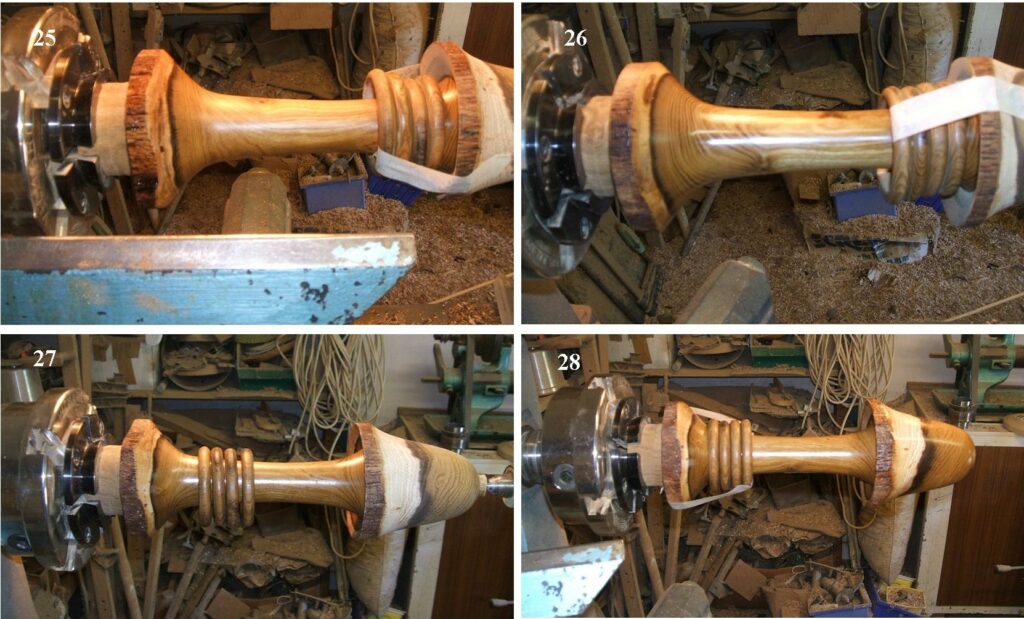
1, The Laburnum log, it measured 280mm long by 100mm in diameter. 2, the log mounted between centres. 3, I turned a spigot on one end that would fit inside my chuck jaws, the spigot was turned to 50mm in diameter. 4, Now the chuck has been mounted on the lathe and the spigot mounted in the jaws, the tailstock is still taken into use, you want to keep as much support as possible for as long as possible.5, start by forming the head of your mushroom, roughly about 1/4 the length of the blank, keep a pip at the tailstock end with the tailstock in place. 6, Take away the bulk of the stem down to 2/3 the thickness, then mark out where the first ring needs to come from, I always take the rings from the base upwards. 7, Part down on either side of the marked out ring to a depth that will allow for the ring tool to work, taper both side of the ring to allow for the tool to work. 8, the first ring formed but not released just yet, it’s better to sand the ring now before it’s released.9, having sanded and sealed the first ring it was then released, I moved it up the stem to clean up the lower area that had been below the first ring, use a bit of masking tape to keep it out of the way. 10, The ring now moved down to the base area and held in place with some masking tape, the next ring is then marked out. 11, Part and taper the top side of the ring. 12, Cut the 2nd ring profile again not all the way through, sand and seal whilst still being held.13, Repeat the process by releasing the ring and slide it down the stem and tape it to the other ring, clean the stem as you go. 14, mark out the 3rd ring, repeat the parting and tapering process, 15, the 3rd ring now formed and slid down to the bottom end, 16, 3rd ring held by masking tape and the fourth ring ready to be formed.`7, the 4th ring released and out of the way. 18, 4th ring held by masking tape, time to start to form the upper stem and do an undercut in the head, sand and seal the upper part of the stem now. 19, To sand the inside part of the rings, tape a length of sanding material to the stem as shown here. 20, turn on the lathe, not too fast, then hold the rings over the sanding material turning the ring by hand as they get sanded.21, all 4 rings sanded. 22, the rings now back at the base end, polish the upper part of the stem now. 23, the rings now at the top end ready to start to form the lower stem. 24, the lower stem now shaped and tied into the upper stem, sanded and sealed.25, now it’s time to reduce the base to a size that’s in keeping with the rest of the mushroom, use a parting tool and take it down to the depth of the spigot for now. 26, polish the stem. 27, with the rings and the stem finished, it’s time to complete the head, remove the little pip that is in the tailstock and sand seal and polish the head. 28, the completed head, sanded sealed and polished, now it’s ready to be parted off, use a sharp parting tool and take it down to about 10mm in diameter or whatever you are comfortable to do, then use a fine blade saw to cut it free, sand seal and polish the base.Here is my completed Mushroom complete with 4 captive rings.
It’s just as well I went and did this timeline because I did not receive any entries for this from any other member of the club, you have to ask yourself how long can I carry on posting items and projects if nobody else is taking part.
Our next virtual meeting will be on the 5th August, Mike Day is to be the organiser, the subject matter is still to be agreed, that information will follow shortly, but when it is I want some more activity than has happened not only today but for some time now, come on take part.
This website uses cookies to improve your experience. We'll assume you're ok with this, but you can opt-out if you wish.AcceptRead More
Privacy & Cookies Policy
Privacy Overview
This website uses cookies to improve your experience while you navigate through the website. Out of these, the cookies that are categorized as necessary are stored on your browser as they are essential for the working of basic functionalities of the website. We also use third-party cookies that help us analyze and understand how you use this website. These cookies will be stored in your browser only with your consent. You also have the option to opt-out of these cookies. But opting out of some of these cookies may affect your browsing experience.
Necessary cookies are absolutely essential for the website to function properly. This category only includes cookies that ensures basic functionalities and security features of the website. These cookies do not store any personal information.
Any cookies that may not be particularly necessary for the website to function and is used specifically to collect user personal data via analytics, ads, other embedded contents are termed as non-necessary cookies. It is mandatory to procure user consent prior to running these cookies on your website.