Report on our meeting 17-02-2022, A demonstration by John Ruickbie.
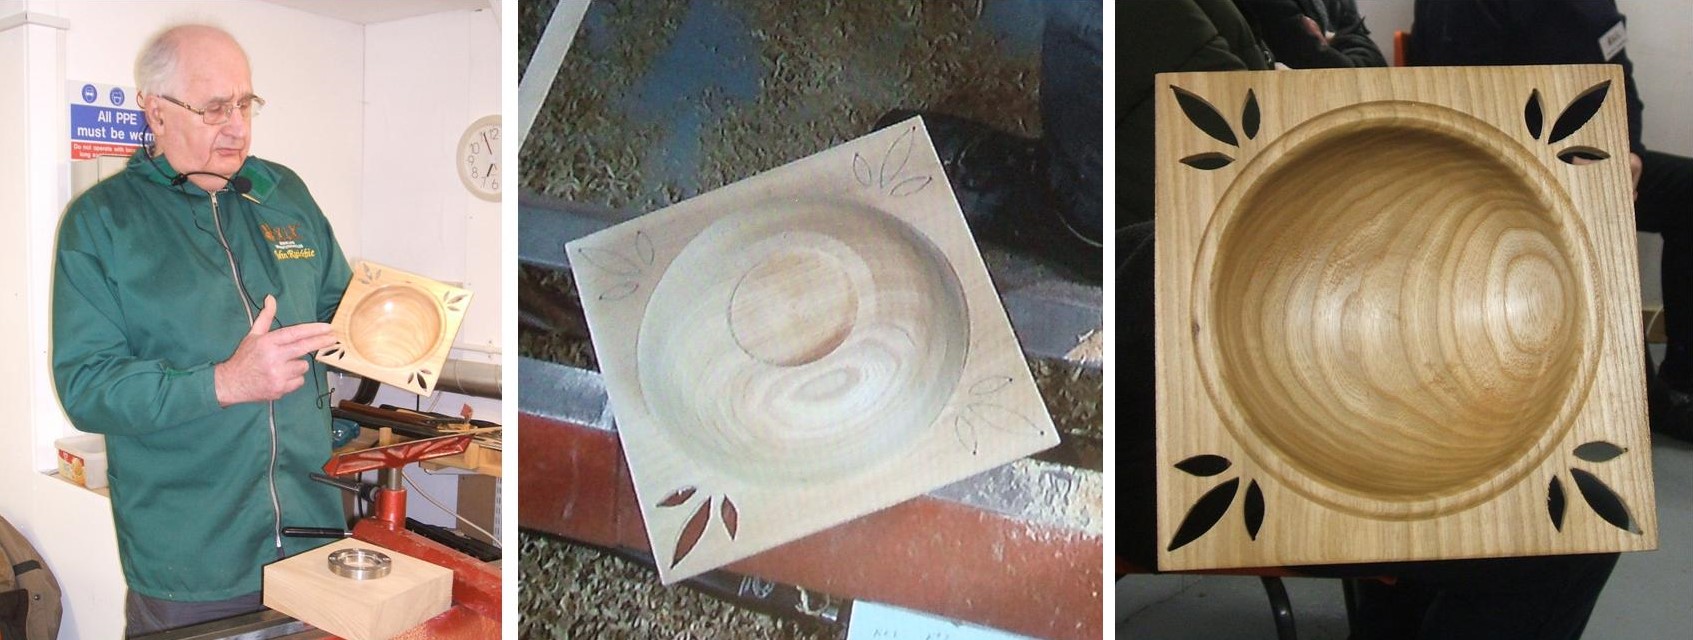
Our meeting this week on Thursday 17th February 2022 was a demonstration by John Ruickbie, John was to make a bowl from a piece of Elm but not the usual bowl, he was going to leave the top of his bowl square, in addition to being square, John was to make some decorative penetrations on the lip of his bowl at each of the 4 corners of the bowl. This would mean he required more than just the lathe to make this bowl, a Scroll saw would also be used. John was to demonstrate how the penetrations were made, making use of firstly a template to mark out the penetrations, then drilling a small hole to accommodate the saw blade, then actually using the Scroll saw to cut the penetrations.
What follows is a series of pictures along with some explanatory text to take you through the making of John’s square bowl. John used a power driven Scroll saw which most of you will not have, but this could be done with a hand held Scroll saw that most of you probably do have, if not could be purchased for just a few pounds.
Here are the pictures done as a time line.
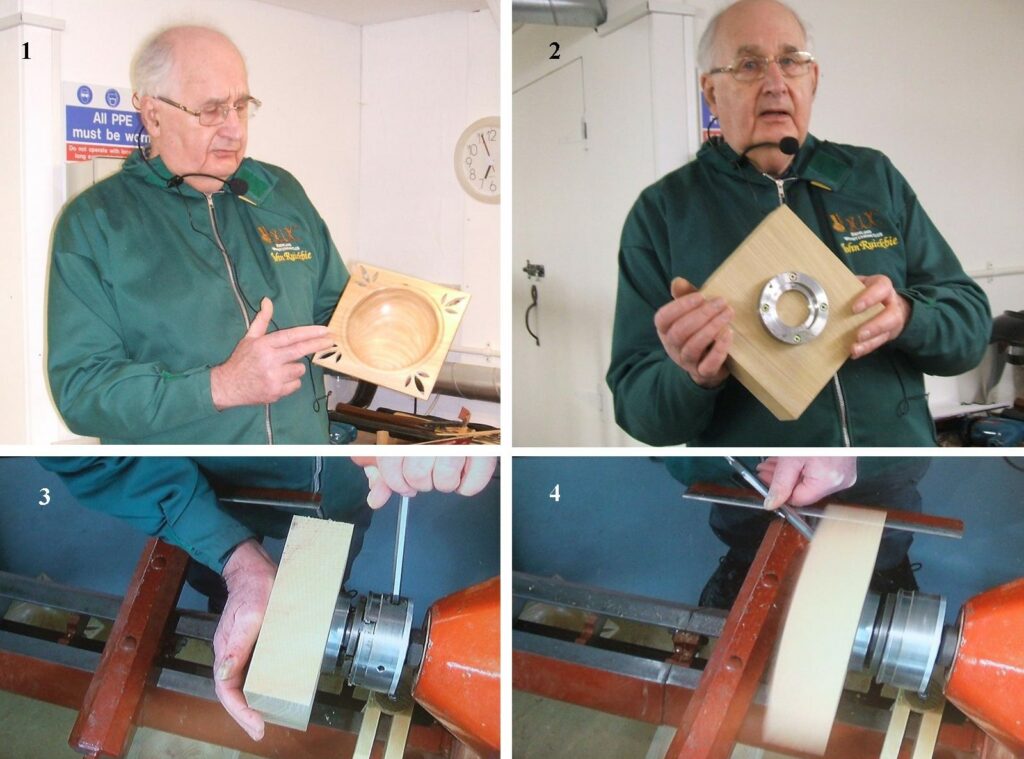
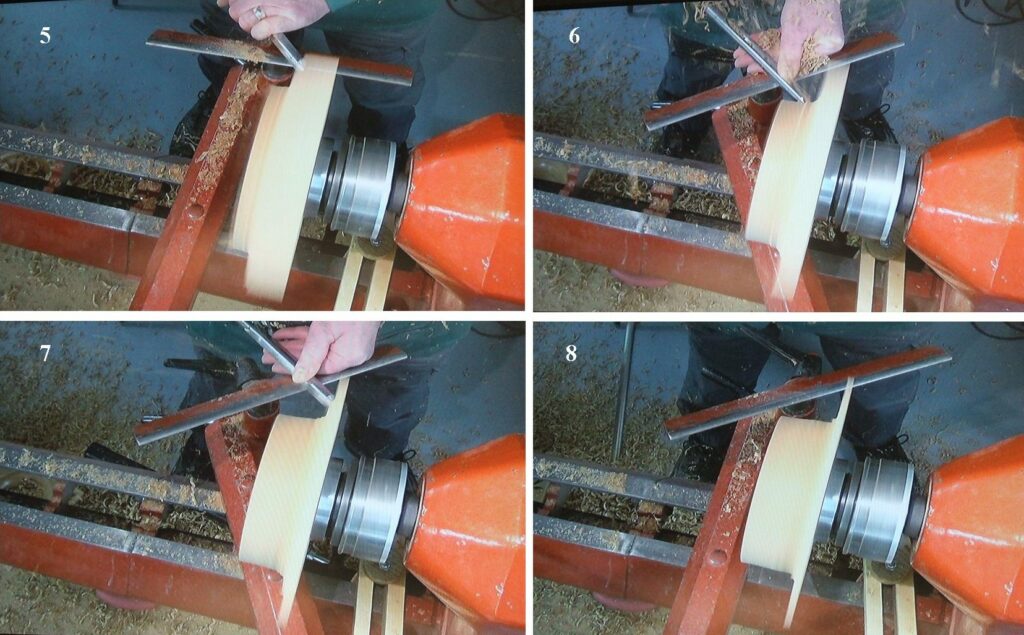
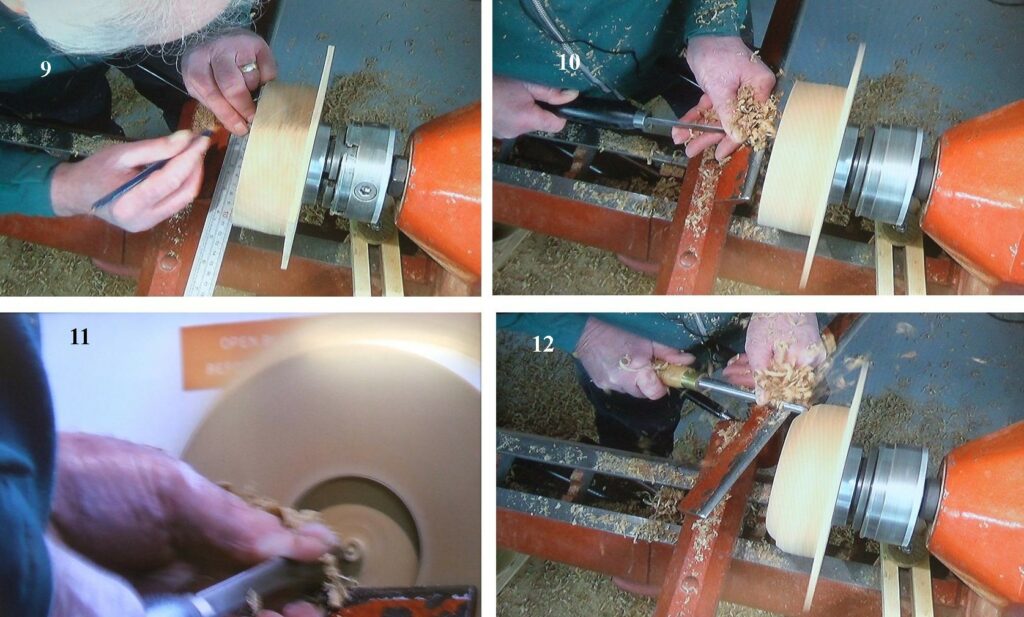
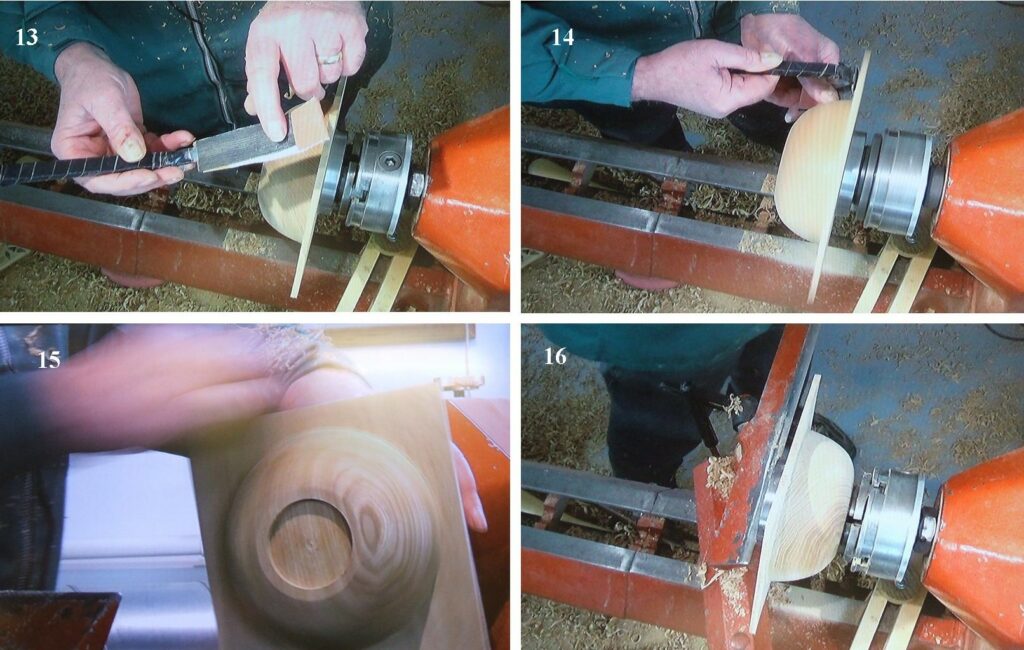
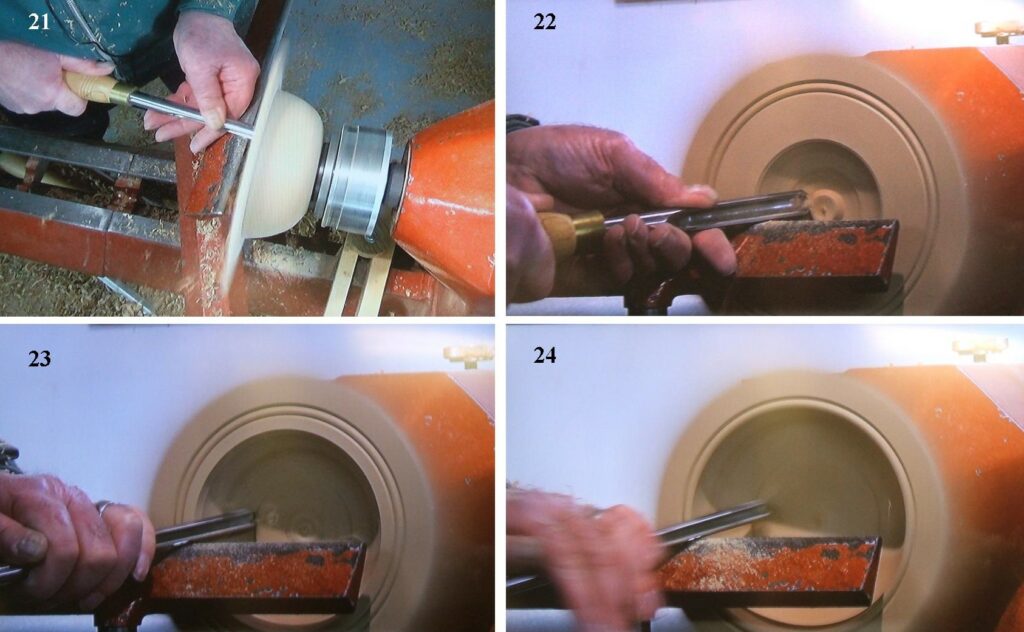
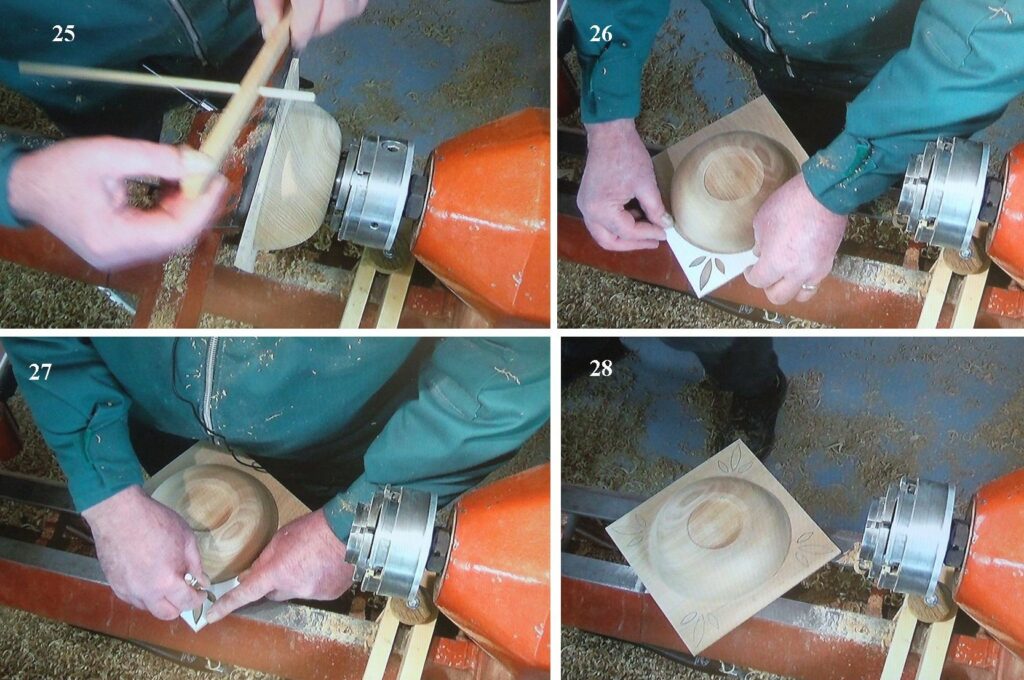
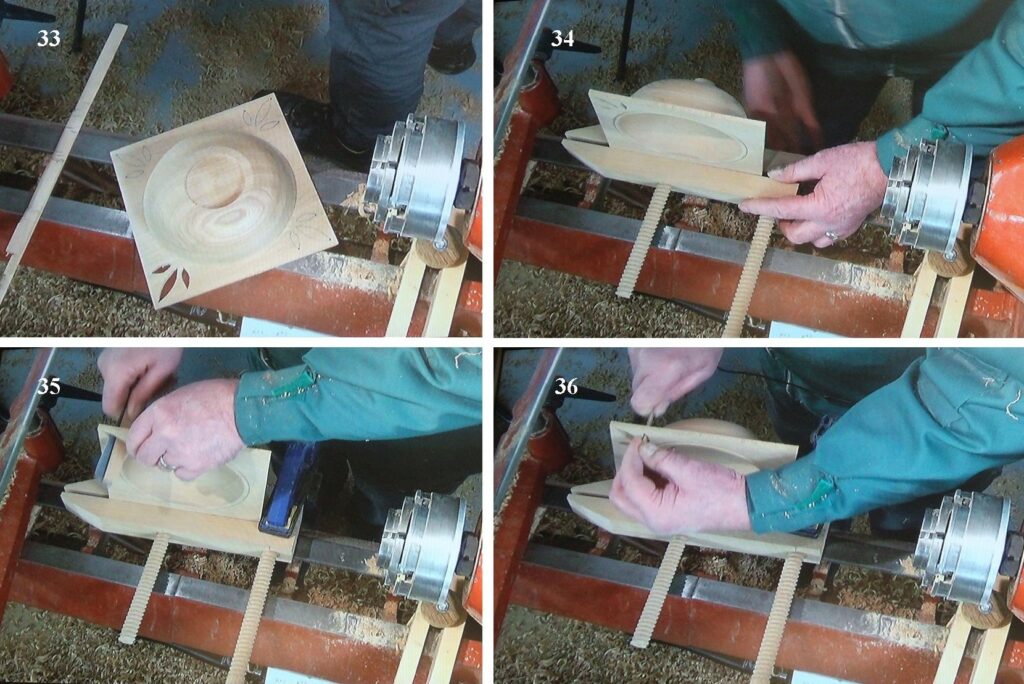
1, this is John Ruickbie doing his introduction to the club members, and showing them what he was going to make. 2, John started by explaining how he was going to hold the work piece, his preferred method was to use a faceplate ring screwed to the top side of the work piece and used 4 fairly long screws, this would then be held in the standard dovetail jaws of the chuck. 3, Here John can be seen mounting the work piece onto the chuck. John recommended a speed of about 1200RPM. 4, John making his first cuts using a standard bowl gouge, care needs to be taken when starting the cuts as the work piece is still square, this will be the underside of the bowl.5, The cuts continue to come in from the edge, don’t try to take too much at a time, allow the cuts to be fairly fine and use a fingernail grind on your gouge, this will prevent any rip outs at the bottom of the cuts, the cuts should be deep enough to be clear of the square shape on the under side. 6, The cuts progressing well, John now takes the cuts in from the bottom up to the point where he meets the cuts coming in from the side, again using the gouge. 7, Here John can be seen taking what would be his last cuts on the lip and the underside, 8, The lip now complete apart from sanding, John left the lip on the rim to be about 6mm thick.9, John needed a method of holding the work piece on the bottom, for this he was going to use a recess to fit the jaws of his chuck, here he can be seen marking out where the recess needed to be. 10, The recess being cut, a parting tool would be suitable for this task. 11, A view of what John could see, the recess taking shape, this only needs to be about 6mm deep. 12, With the recess cut John went on to start to form the base of the bowl, here again he is using a bowl gouge, working from the bottom up to the rim.13, Now the base needed to be sanded, John made up a sanding jig made from a piece of sprung steel and secured a piece of abrasive to it, this was to avoid trying to sand the square parts with your fingers. 14, The sanding jig being put to use, John would hold the top and bottom to the jig in both hands with only the abrasive in contact with the work piece. 15, The edges of the square section were sanded by hand with the lathe stationery. 16, The work piece now turned around and mounted on the chuck jaws ready to remove the faceplate ring before starting to work the inside.17, Here John is checking the depth that he cut the base too and marking that on the top side. 18, The pencil line is the extent he can go to on the outer curve, now clearly marked. 19, A second line was needed to create the bead at the rim, again clearly marked. 20, John used a specially made tool for creating the bead but a spindle gouge would do the same job or if you prefer a beading tool, here you can see the bead being formed.21, John starts to work the inside, again using a bowl gouge, start at the middle and work out and down. 22, The bowl shape being formed, quite a lot still to do. 23, Getting closer to the finished size and depth, check regularly to make sure you do not go through the bottom. 24, Here John can be seen taking the last cut before sanding.25, This is John’s method to determine the depth, a simple piece of wood with a hole in it to take a dowel, laid across the face with the dowel pushed into the depth of the bowl then checked by placing it against the rim. 26, For the penetrations, John made up a template with his cut outs, this was then placed on each of the 4 corners and marked out with a pencil, do this on the underside. 27, Here John can be seen marking out a set of the cut outs. 28, All 4 corners now marked out ready to cut.29, The first step is to drill a small hole in each of the cut out areas, this is to allow the blade from the Scroll saw to be passed up through it. 30, Here John can be seen threading the blade through one of the holes in the cut outs and securing to the Scroll saw, he used a No7 reverse tooth blade. 31, Here John can be seen cutting the first of the cut outs, care needed to follow the pencil line as accurately as possible. 32, Now cutting the other side of the cut out.33, With one corner cut outs complete, John went on to show how he sanded the cut outs. 34, Using a jig to hold the workpiece made it easier to sand the cut outs, a wood vice could also be used for this purpose. 35, John secured a piece if abrasive to a thin piece of wood to sand the larger cut out. 36, An even thinner piece of wood with the abrasive fixed to it was used for the smaller cut outs.37, A finished square bowl with cut outs that John had made earlier, time would not allow for the one he was working at the demonstration to be completed but he would go on to complete that one at home. The picture to the right shows the reading on our CO2 monitor, the ambient for outside is in the region of 400, even in the room with 26 people in it only pushed the reading up by a very small amount.Here are a couple of other items that John had made using his Scroll saw. The Eagle to the left is actually made as a jigsaw, the animal cut outs and inserts to the right depict the ARC.This information supplied by John Ruickbie.
That concludes John Ruickbie’s demonstration, we do hope you found it interesting and encouraging, John did make the point to our club members that although we are primarily a woodturning club not everything is done with just the lathe alone.
Our next meeting will be on the 3rd March, that meeting is going to be a demonstration by Nick Simpson on the making of a Tricylinder, if you are unsure of exactly what that is, you will have to come to the meeting to find out.
This website uses cookies to improve your experience. We'll assume you're ok with this, but you can opt-out if you wish.AcceptRead More
Privacy & Cookies Policy
Privacy Overview
This website uses cookies to improve your experience while you navigate through the website. Out of these, the cookies that are categorized as necessary are stored on your browser as they are essential for the working of basic functionalities of the website. We also use third-party cookies that help us analyze and understand how you use this website. These cookies will be stored in your browser only with your consent. You also have the option to opt-out of these cookies. But opting out of some of these cookies may affect your browsing experience.
Necessary cookies are absolutely essential for the website to function properly. This category only includes cookies that ensures basic functionalities and security features of the website. These cookies do not store any personal information.
Any cookies that may not be particularly necessary for the website to function and is used specifically to collect user personal data via analytics, ads, other embedded contents are termed as non-necessary cookies. It is mandatory to procure user consent prior to running these cookies on your website.