Report on our meeting 17-03-2022, a demonstration by Alec Mutch.
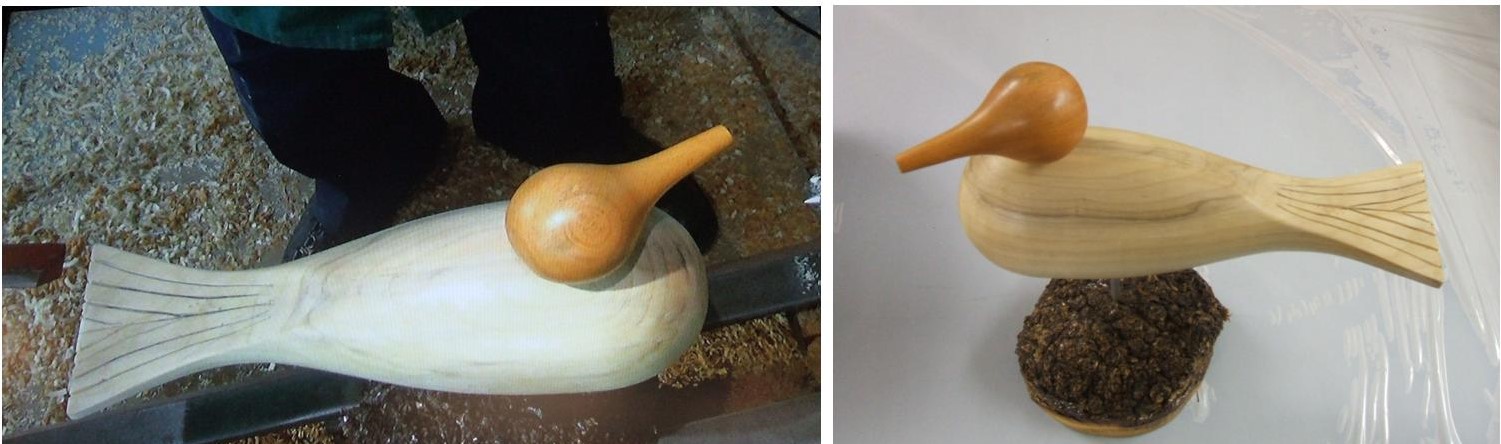
Our meeting this week 17th March 2022 was a demonstration by Alec Mutch, Alec was to make one of Mick O’Donnell’s wooden birds, he had made one of these some time ago at a previous demonstration for the club, but now with lots of new members it was worth repeating.
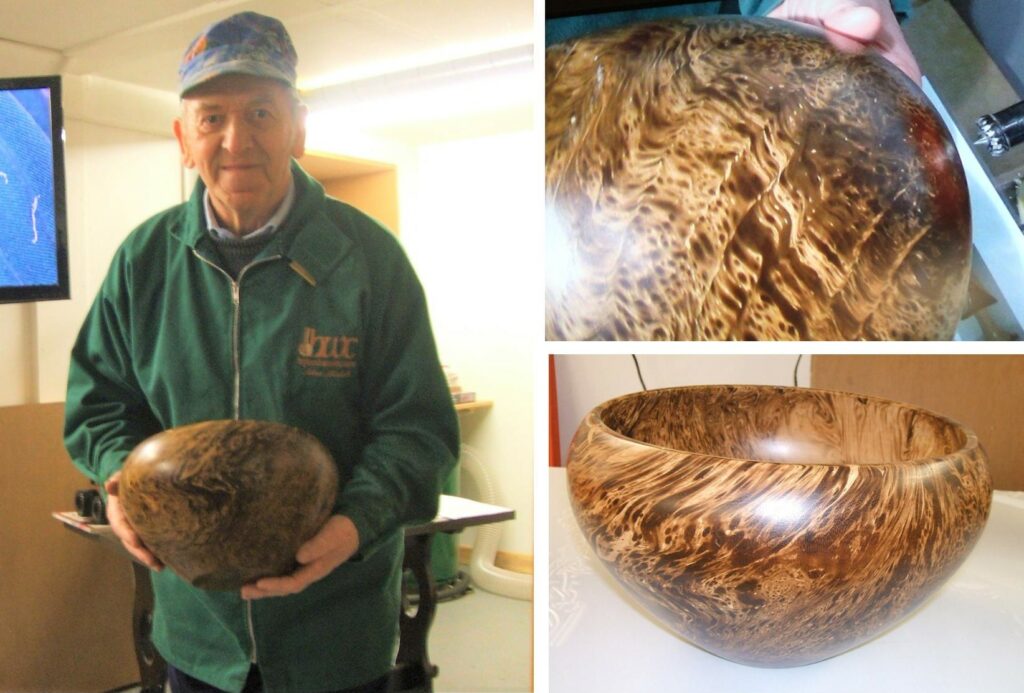
Before he got started on the bird project, Alec produced a wooden bowl that a chap from Strathpeffer brought in for him to see and identify, he had bought the bowl in a charity shop on the Isle of Lewis for a price of £20 but nobody knew what the wood was, it turned out to be Masure Birch and worth a whole lot more than he paid for it.
The pictures for this post was curtesy of Nick Simpson, Nick took a lot of pictures and just made it to the end of the demonstration before the battery ran out.
Here are the pictures along with some text to help you all to follow how it was made, I have done this as a timeline, but first a few pictures of the Birch Bowl.
Here is the bowl the chap from Strathpeffer brought in, I think you will agree the bowl is quite spectacular.
Now for the demonstration, the wooden bird.
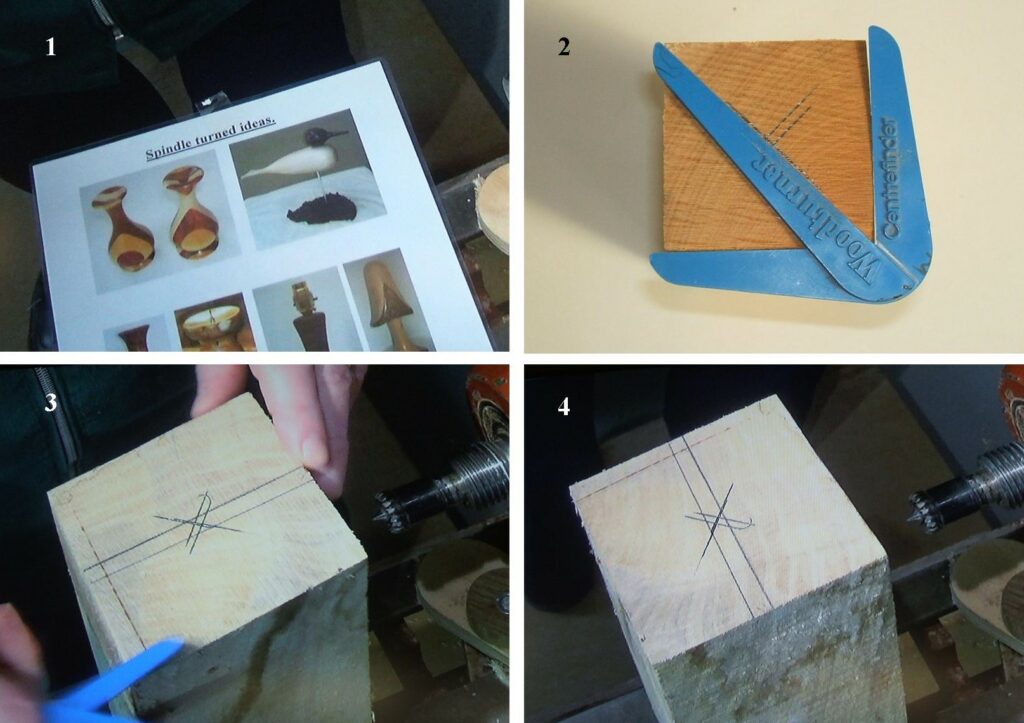
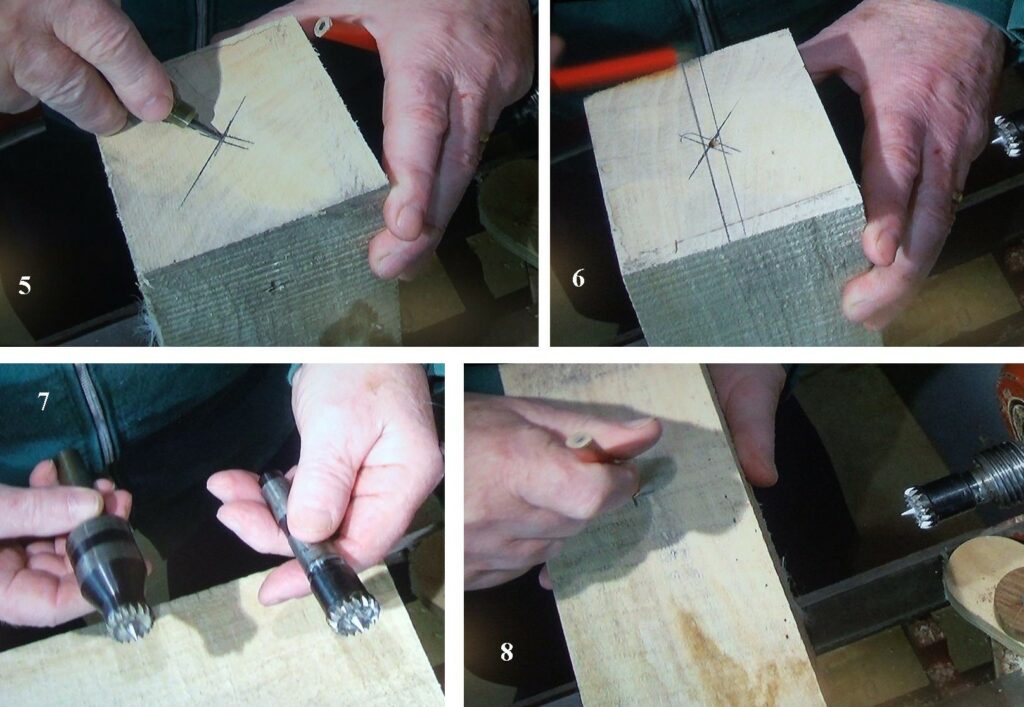
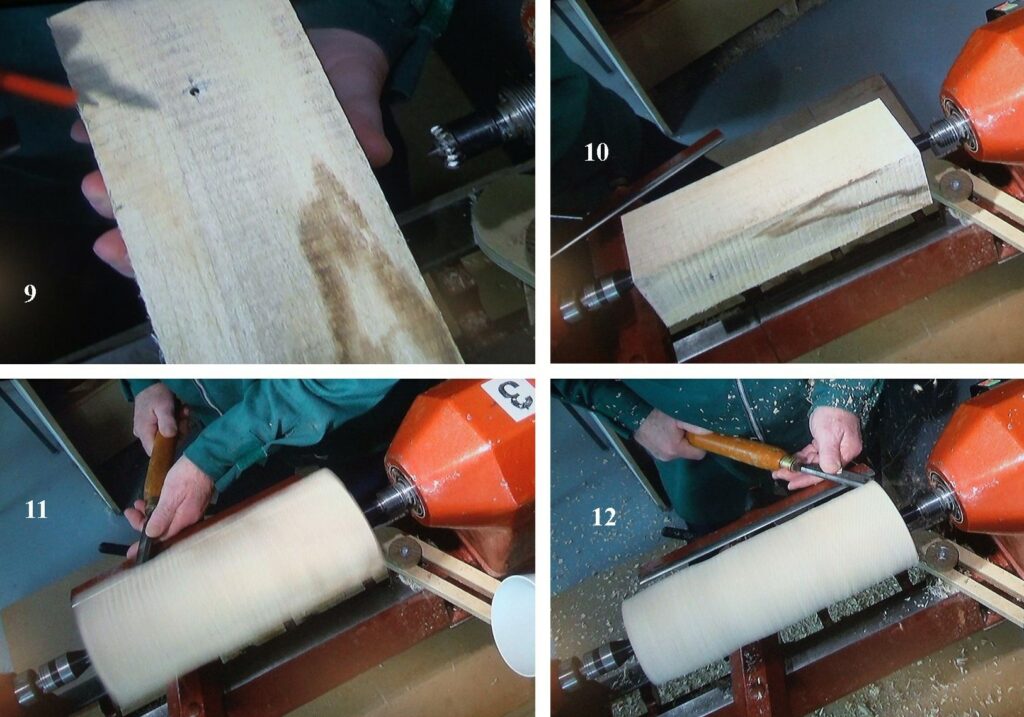
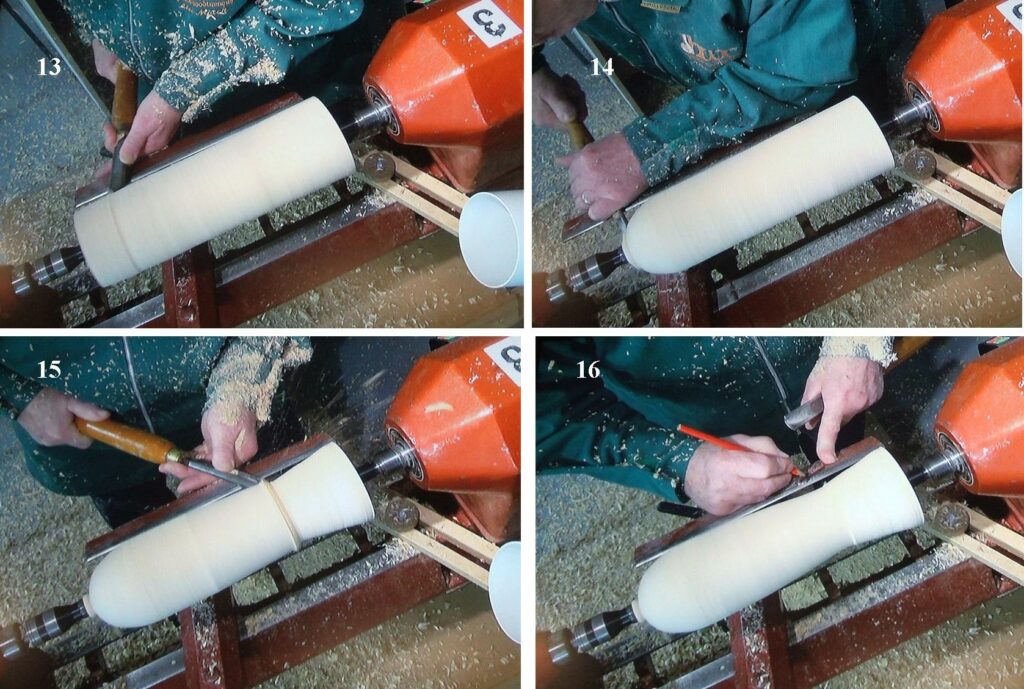
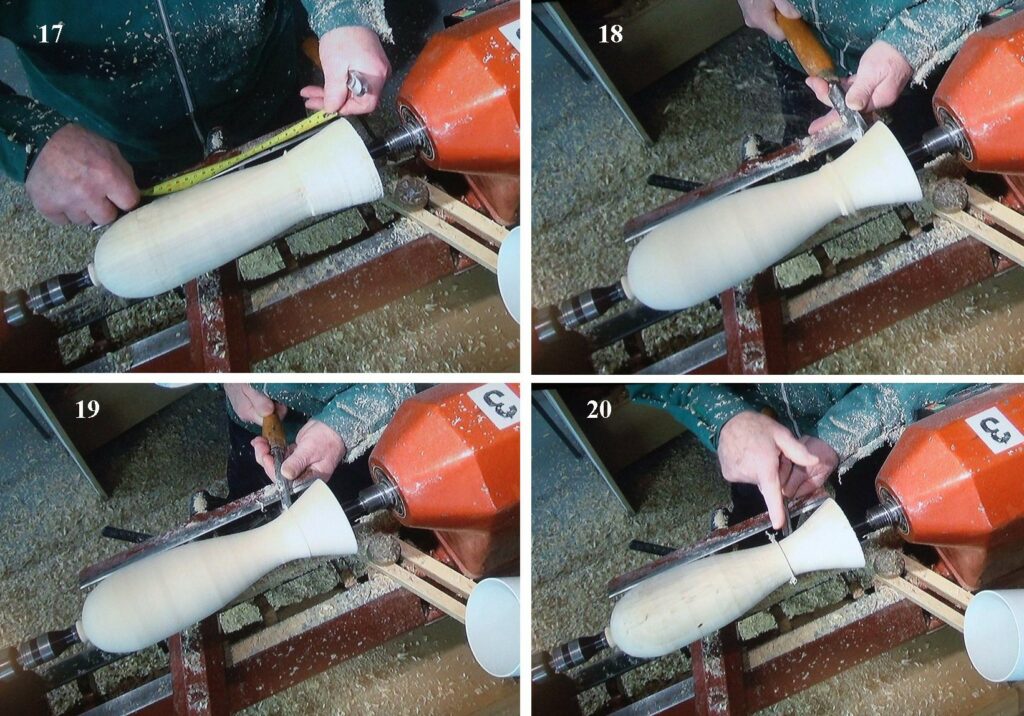
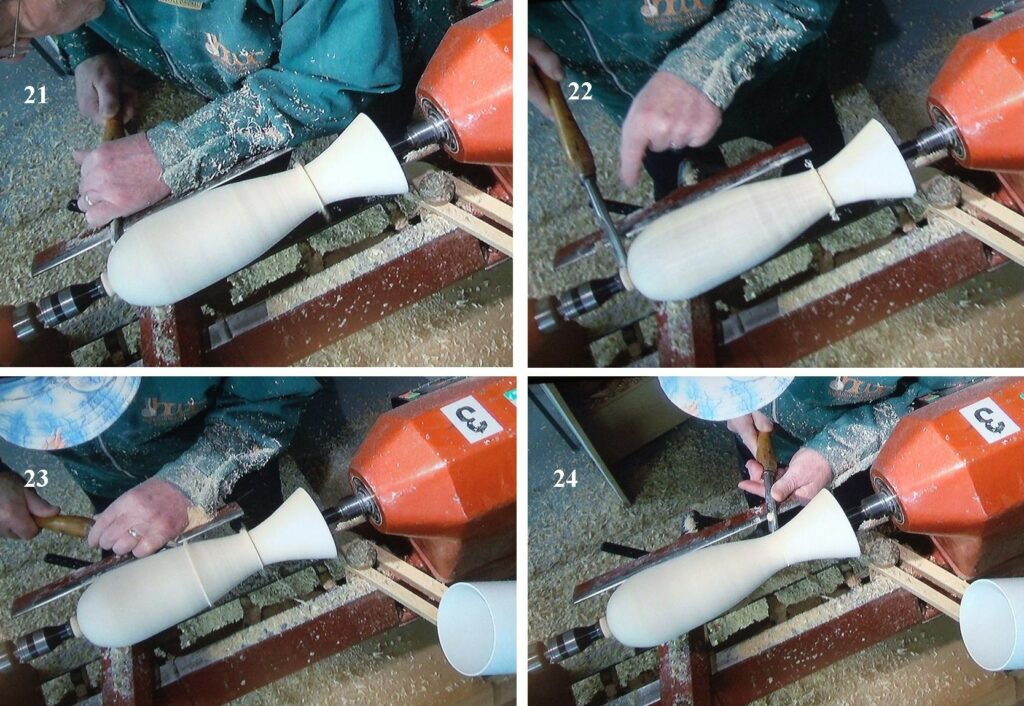
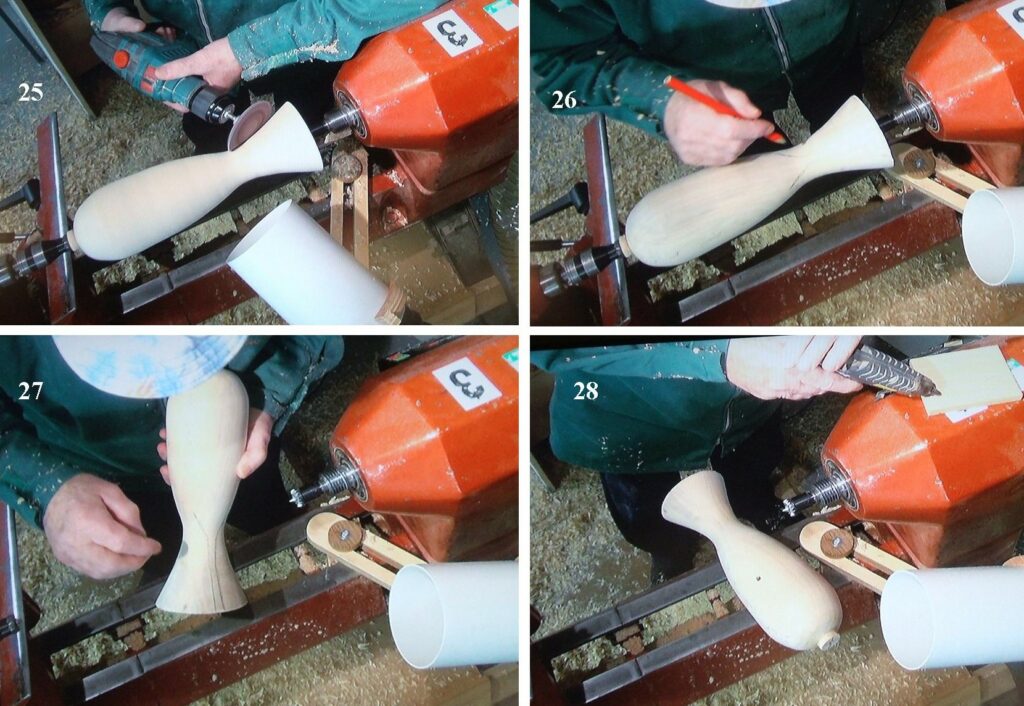
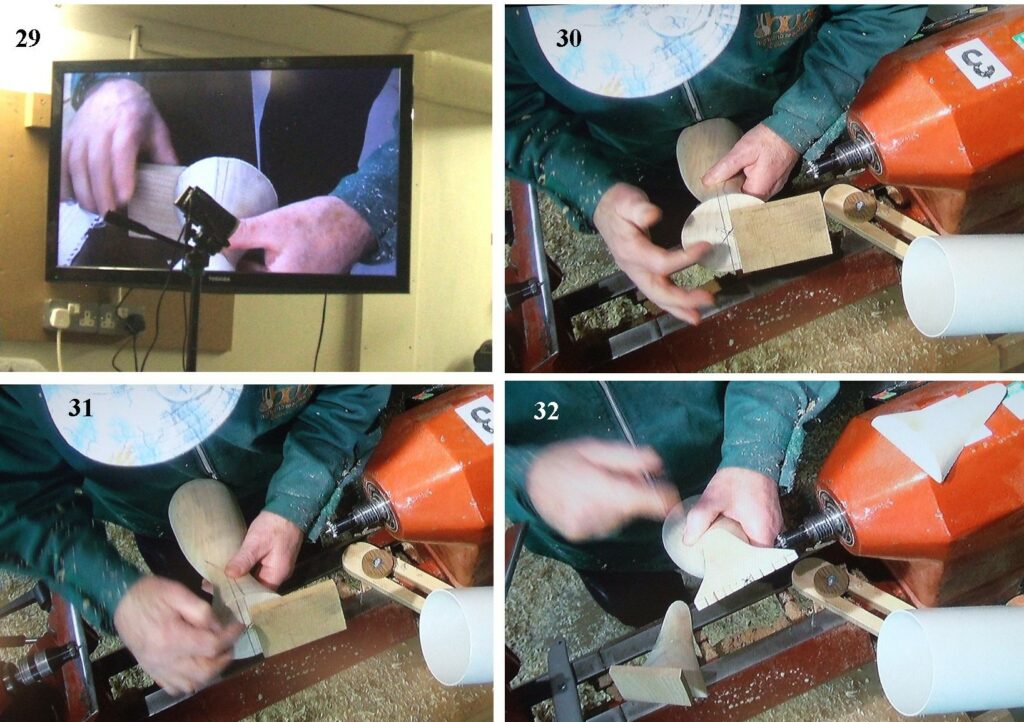
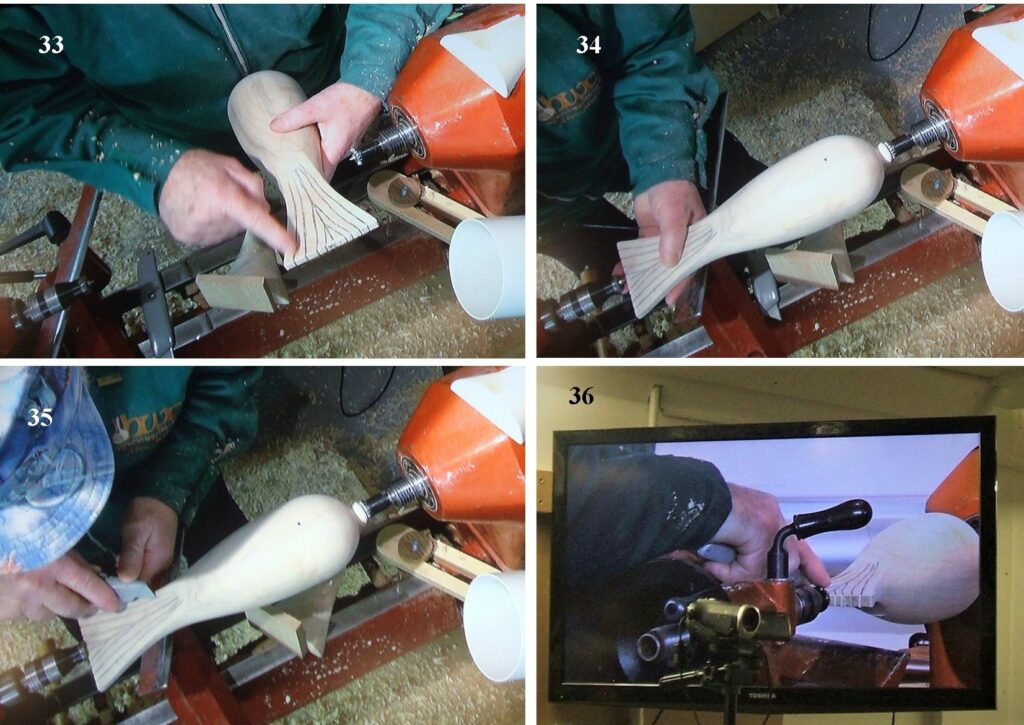
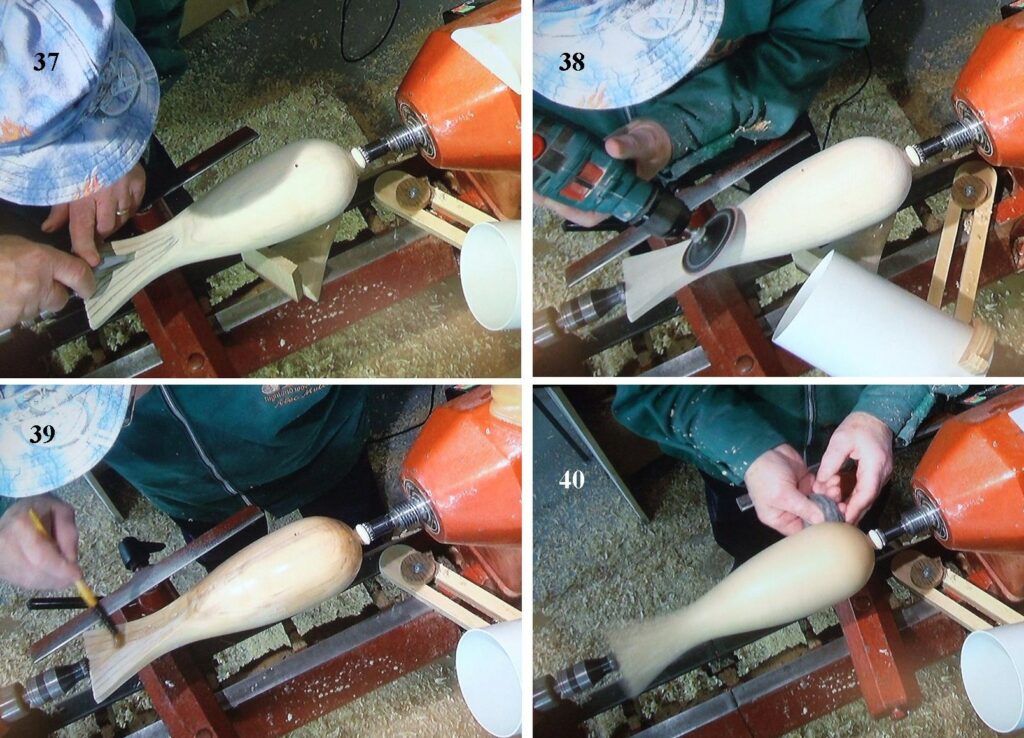
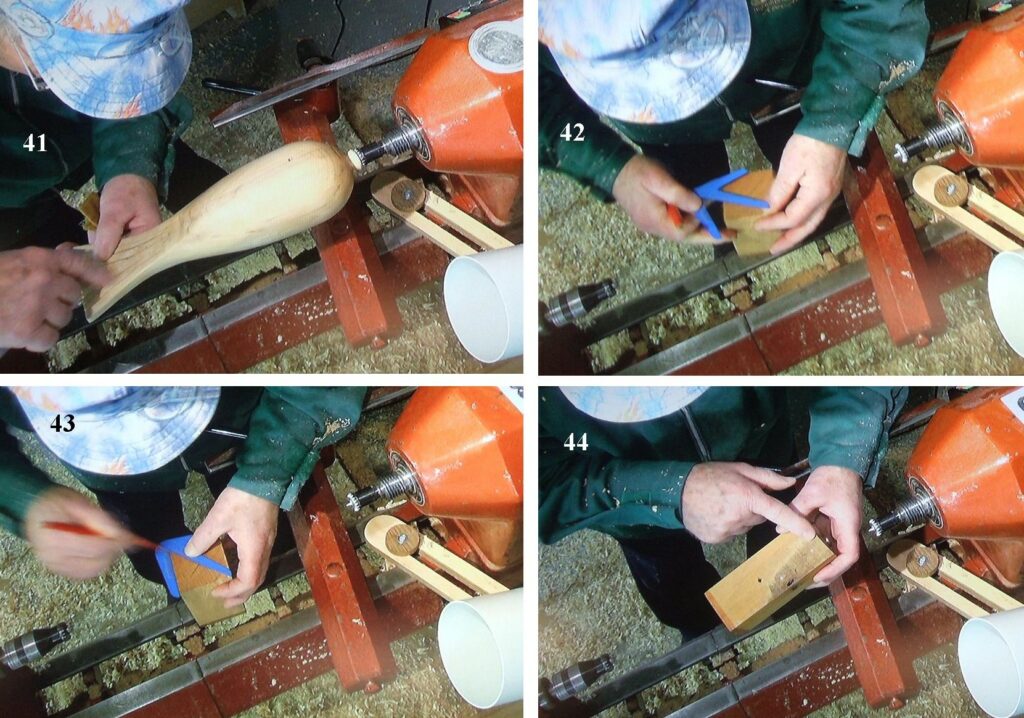
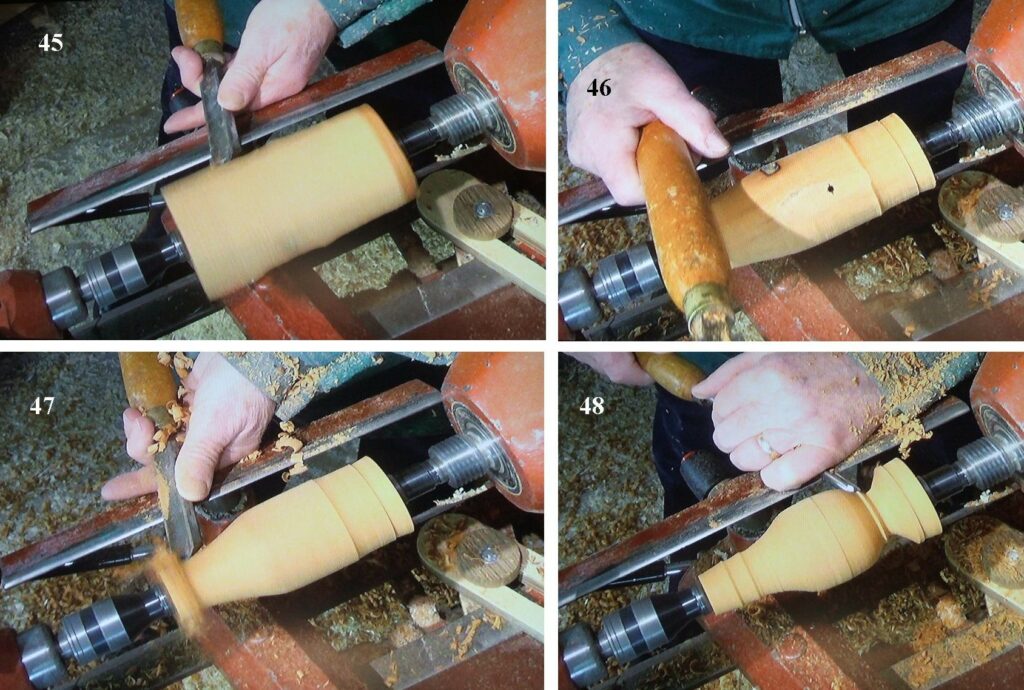
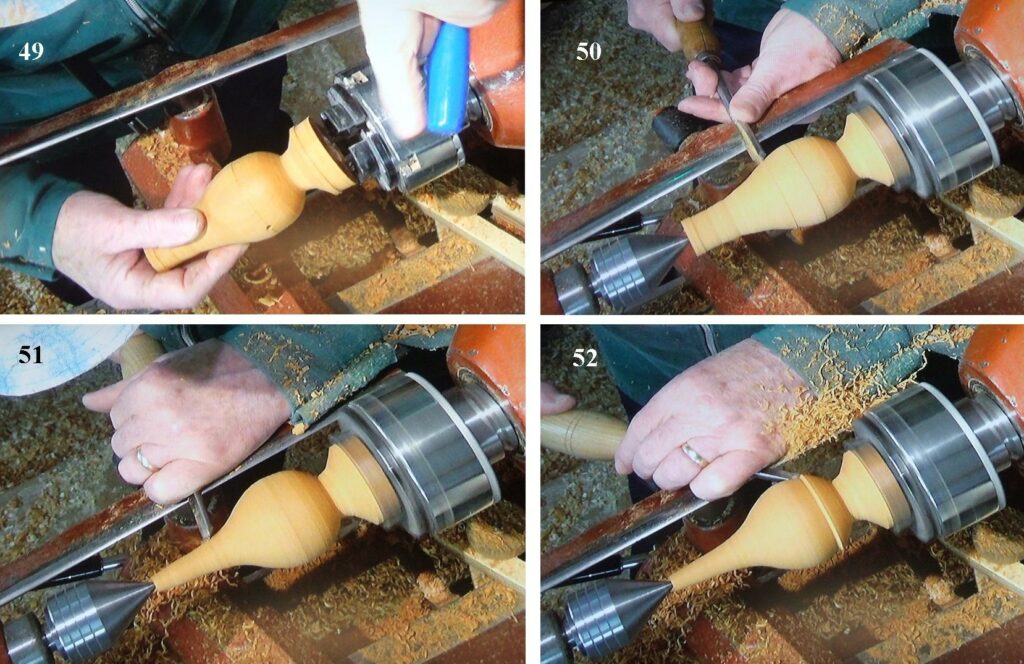
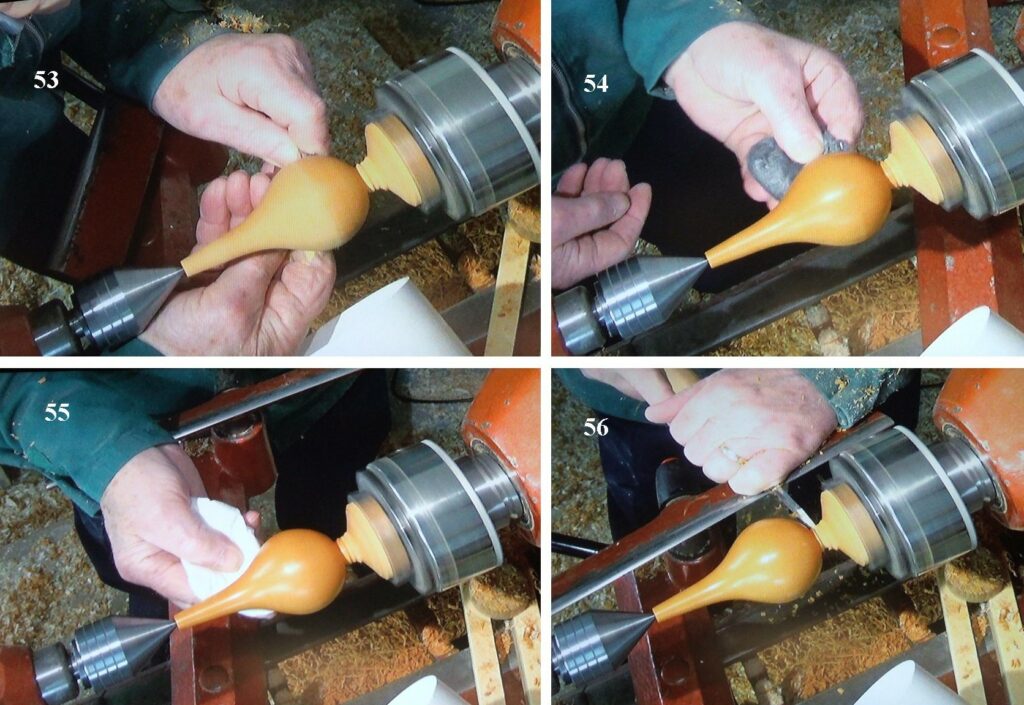
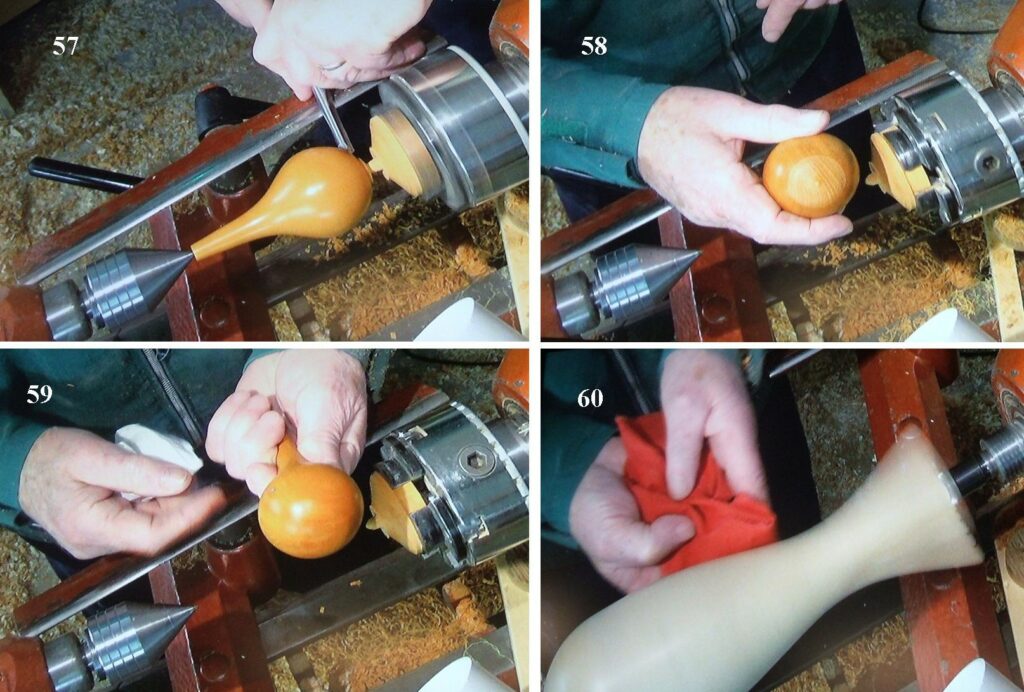
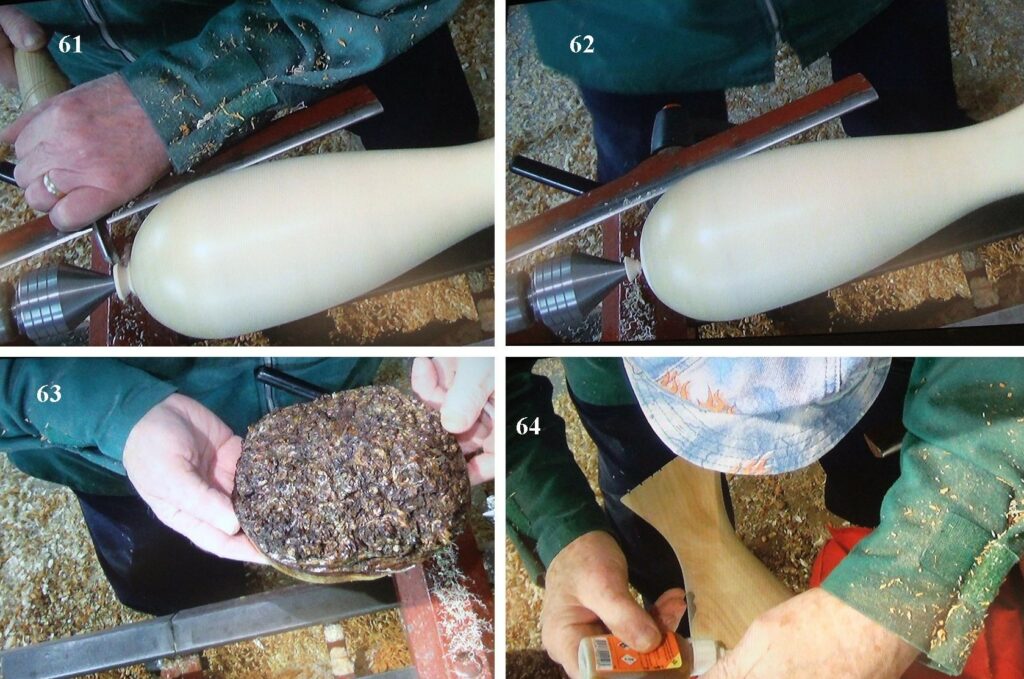
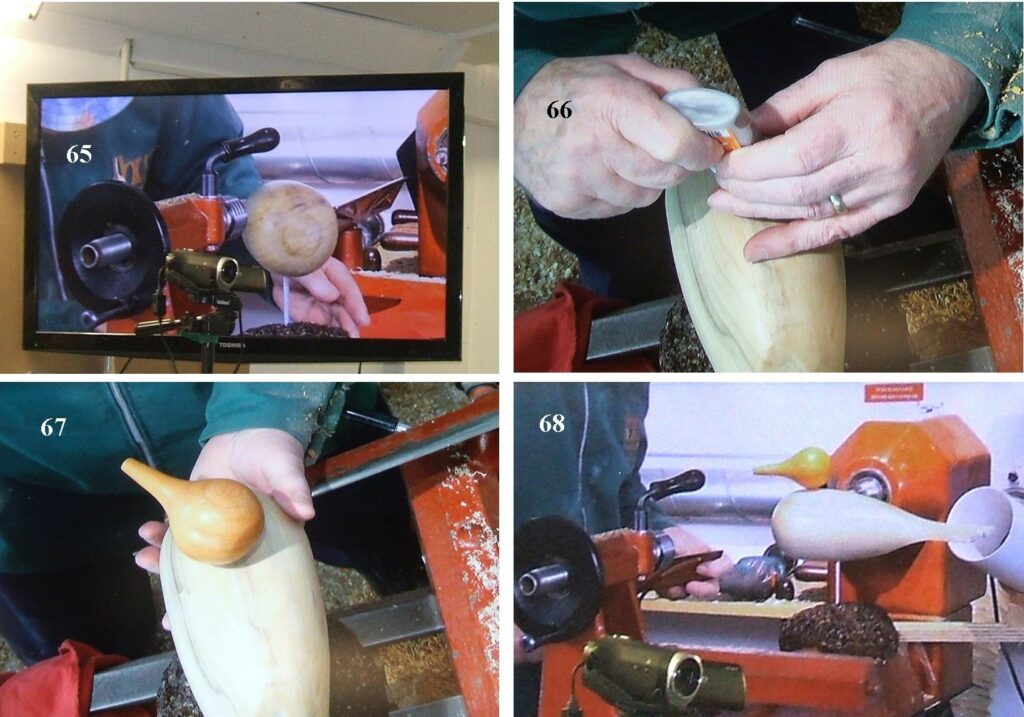
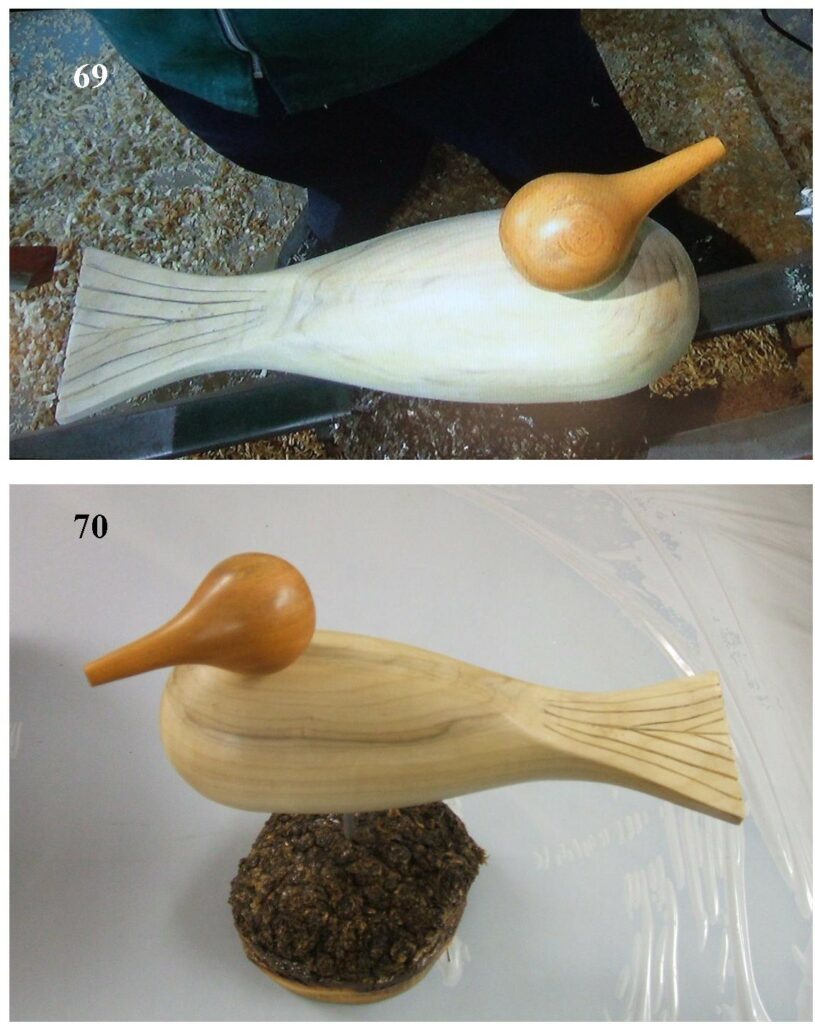
1, I didn’t have an example to show but I did have a picture of one of the birds I had made previously. 2, Using a cheap centre finder on both pieces to get me started, you will see there are 2 lines from the centre finder, this is due to the piece of wood not being square. 3, the body piece with the centre found. 4, you will see I have drawn on 2 more lines, these will eventually be the tail of the bird. 5, marking out the centre with a bradawl. 6, the centre clearly marked, you need top do this on both ends. 7, the 2 steb centres I was going to use, on the right is the main drive centre that will go in the headstock, on the left is a revolving steb centre that will go in the tailstock. 8, whilst still in the square, mark out where all the holes for mounting the bird will be, see detailed plan at the end of this post.9, one of the holes for mounting the head now drilled, I also drilled the other holes required. 10, The blank now mounted between centres using the steb centres. 11, bringing the blank into a cylinder using a roughing gouge. 12, working in both directions until it’s round.13, now the blank is almost finished turning it into a cylinder. 14, start of the shaping now taking place, make the head end nearest the tailstock. 15, now I’m starting to produce the profile, again with just the roughing gouge. 16, I’m making a mark on the tool rest for judging where the lowest point in the profile will be, I find this helps as you can’t make a mark on the wood, it’s being taken away.17, checking the lowest point, it should be somewhere about 100mm from the headstock end. 18, now continuing to shape the tail end. 19, A change of tool, now I’m doing the final cuts with a 12mm spindle gouge. 20, I stopped to explain why it was important to cut with the grain, that meant the cuts should always be downhill on any spindle turning.21, refining the cuts with the spindle gouge. 22, I explained that the gouge should be turned almost vertical as you reach the pip at the tailstock end, this will avoid any potential catches. 23, now performing the final cut along the body with the spindle gouge. 24, likewise for the tail end, a final delicate cut to blend in the profile.25, sanding the body using the Powerlock system driven by a hand drill and the lathe rotating. 26, at this stage it’s time to mark out the tail ready to be band sawn. 27, you will see the marks are about 8mm apart, this will form the tail when cut. 28, I needed to be able to cut the tail with the bandsaw so I hot melt glued a square piece of wood to the tail in order to keep it stable when cutting.29, here I’m holding the piece being glued on until it cools. 30 the square piece now glued in place, it needed to be flush with the bottom of the tail and close to the left hand pencil line. 31, the first cut on the bandsaw needs to be the line to the far right of the tail, then the 2nd cut would be on the line nearest the glued on piece of wood. 32, shows what you are left with, a narrow tail approximately 8mm thick, I put a few shallow cuts on the end of the tail to indicate where the feathers would be.33, I have pencilled in the feathers pattern, matching them to the shallow cuts on the end of the tail. 34, to cut the feathers on the tail, mount it back on the lathe and lock off the spindle. 35, use a stanley knife or a carving tool to create the feather look. 36, another view of the tail being worked.37, the feathers on the tail almost complete, there’s no need to carve the feathers on the underside. 38, the underside of the tail being sanded. 39, the whole body now being sealed using a cellulose sanding sealer. 40, flattening the sealer with some 0000 wire wool.41, I applied a coat of wax to the whole body, I left it then to dry before re-working. 42, the piece for the head now needs to be worked. 43, checking the centre and re-marking if required. 44, this piece had a small defect that I pointed out to the members, it should not present a problem as it should all disappear in the working of the head.45, bringing the blank into a cylinder with the roughing gouge. 46, the end nearest the headstock should be taken down to fit your chuck and a shallow bevel created to suit your jaws. 47, the shaping of the beak end now taking place, roughing gouge again. 48, some shaping at the other end this time with a spindle gouge.49, now it’s time to put the chuck back on the lathe and mount the blank. 50, continue to shape the head using the 12mm spindle gouge. 51, a change of tool again, this time I’m using a 6mm spindle gouge to refine the shape. 52, the same tool being used to complete the back of the head.53, sanding by hand the head piece, 240 and 320 grit were used. 54, a final rub with fine wire wool. 55, a coat of sealer was applied then a coat of Melamine and then buffed up with a paper towel. 56, performing the final cuts to release the head, a very sharp parting tool was used to bring it down to the point where a 6mm spindle gouge would be used to do the final cut.57, a spindle gouge being used to do the final parting. 58, the cut should be clean and ready to do a little sanding to blend it in. 59, a coat of sealer and Melamine on the cut surface and then given a buffing by hand. 60, the body I waxed some time ago re-mounted on the lathe and given a good buffing with the lathe running.61, with the body waxed it was time to cut it free. 62, the pip on the end reduced to 3 or 4 mm in diameter can be cut off with a sharp Stanley knife and the area sanded sealed and waxed. 63, here is the piece of Elm Burr I used to mount the bird on. 64, using a Polyurethane glue to fix the mountings.65, the body now glued to the base using the 6mm Aluminium rod. 66, now the glue is being applied to the head fixing. 67, the head now fixed using the 4mm rod. 68, the assembled bird.69 & 70 two pictures of the finished bird.
That completes my demonstration, I do hope you found it interesting. I would like to take this opportunity to thank Nick for taking all the pictures, and there were lots more of them.
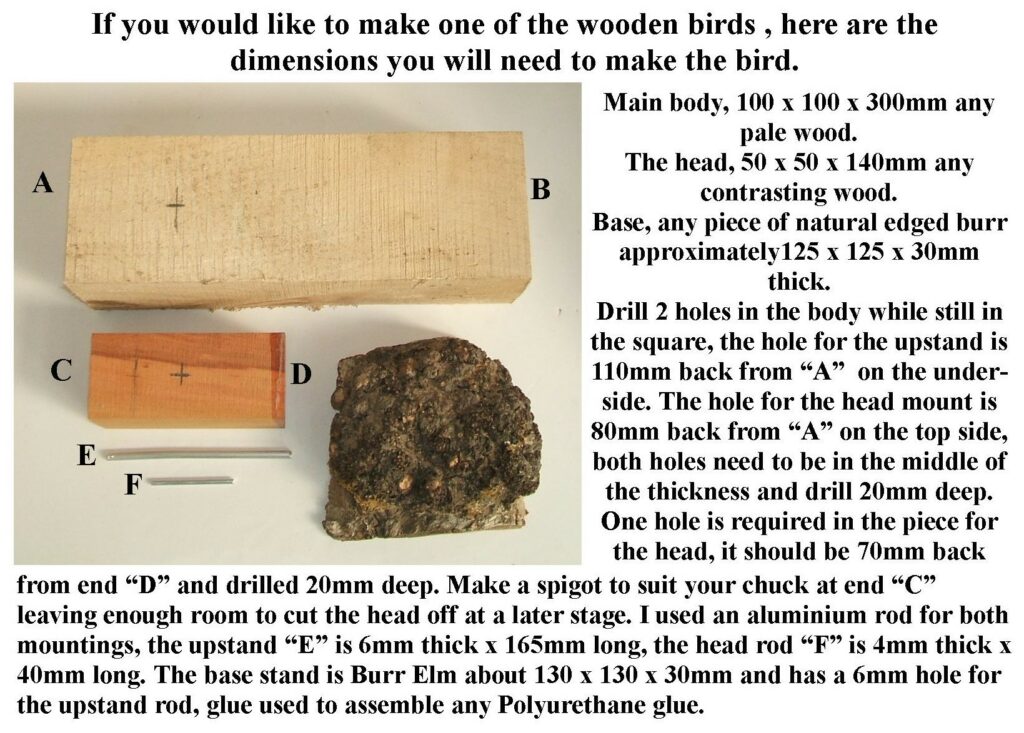
I have made up a page with all the dimensions you would need to make one of these birds if you wish to make one.
Thanks to all who attended, our next meeting is on the 31st March and it will be a demonstration by Errol Levings on the use of templates, hope to see you all there.
This website uses cookies to improve your experience. We'll assume you're ok with this, but you can opt-out if you wish.AcceptRead More
Privacy & Cookies Policy
Privacy Overview
This website uses cookies to improve your experience while you navigate through the website. Out of these, the cookies that are categorized as necessary are stored on your browser as they are essential for the working of basic functionalities of the website. We also use third-party cookies that help us analyze and understand how you use this website. These cookies will be stored in your browser only with your consent. You also have the option to opt-out of these cookies. But opting out of some of these cookies may affect your browsing experience.
Necessary cookies are absolutely essential for the website to function properly. This category only includes cookies that ensures basic functionalities and security features of the website. These cookies do not store any personal information.
Any cookies that may not be particularly necessary for the website to function and is used specifically to collect user personal data via analytics, ads, other embedded contents are termed as non-necessary cookies. It is mandatory to procure user consent prior to running these cookies on your website.