This week would have seen our 2nd competition for this year, this will now be handled virtually, it should have been taking place on Thursday 25-06-2020, it was being organised by Errol Levings and Errol had laid down the criteria for the competition. He wanted the Novice group to make a Natural edged Bowl from half a log, he wanted the Intermediate group to make a Natural edged Bowl from a whole log, and the Experienced group were tasked with making an Inside Out Turning. Whatever group you are in can you still make something in line with what Errol has asked for, there will be no judging taking place, do it for your club or do it for Errol, I will let Errol see all the entries and he may well decide to comment on some of them. Firstly we want plenty of entries in all 3 categories, you have up to Thursday evening to get your items made, photographed and sent to me, I will be uploading them to our web site on the following day.
Don’t let Errol down, I know he is looking forward to seeing what you all have made.
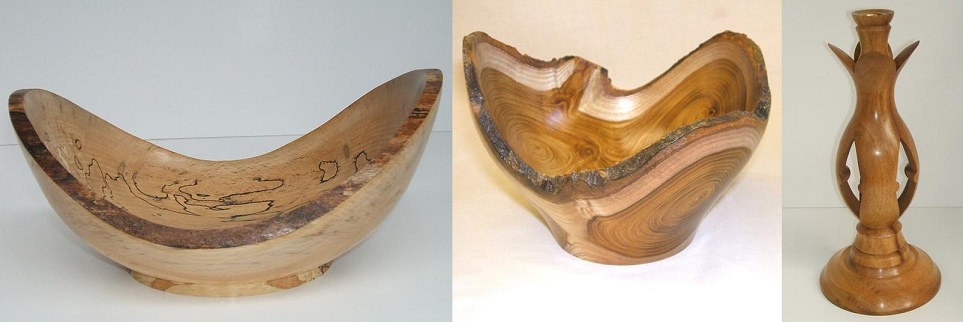
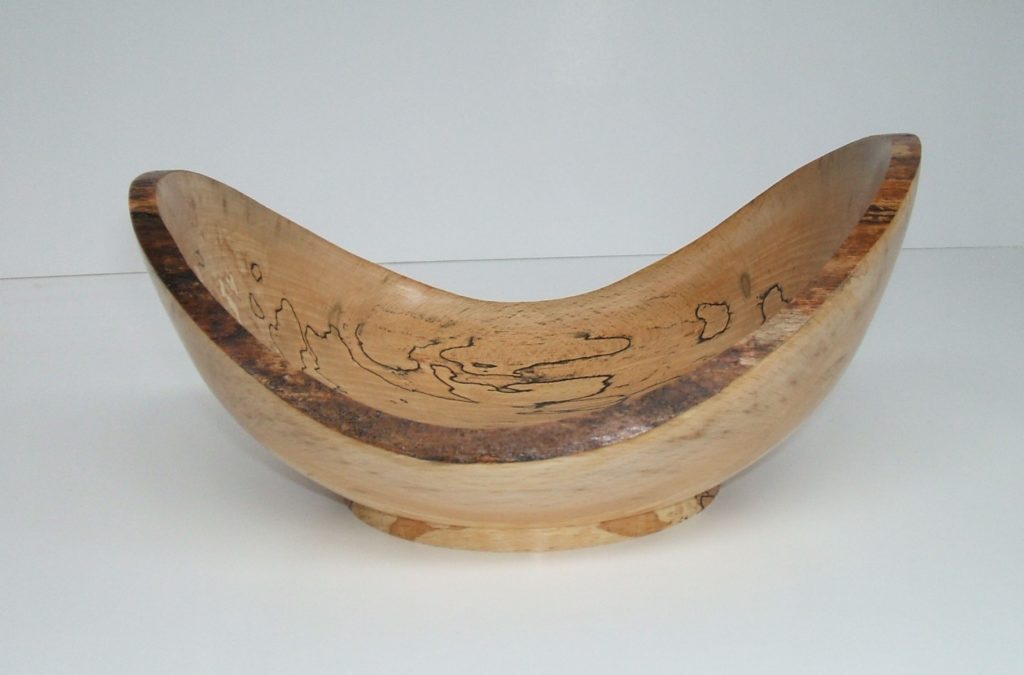
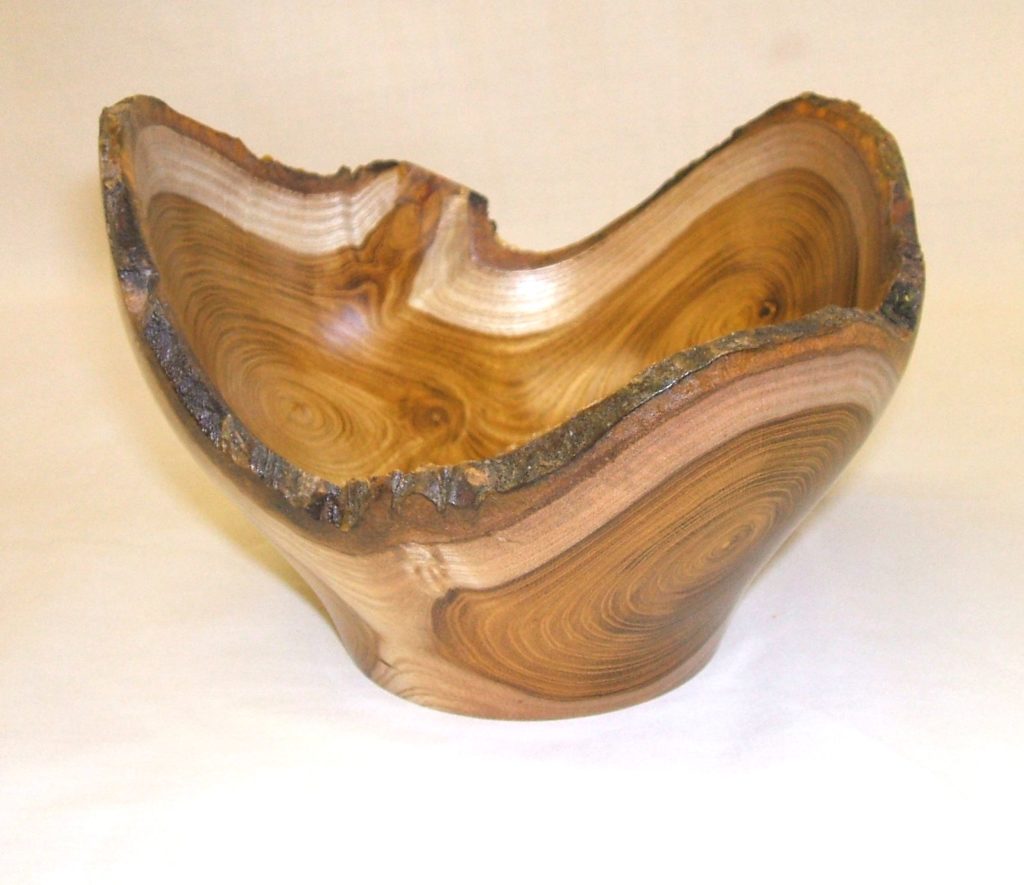
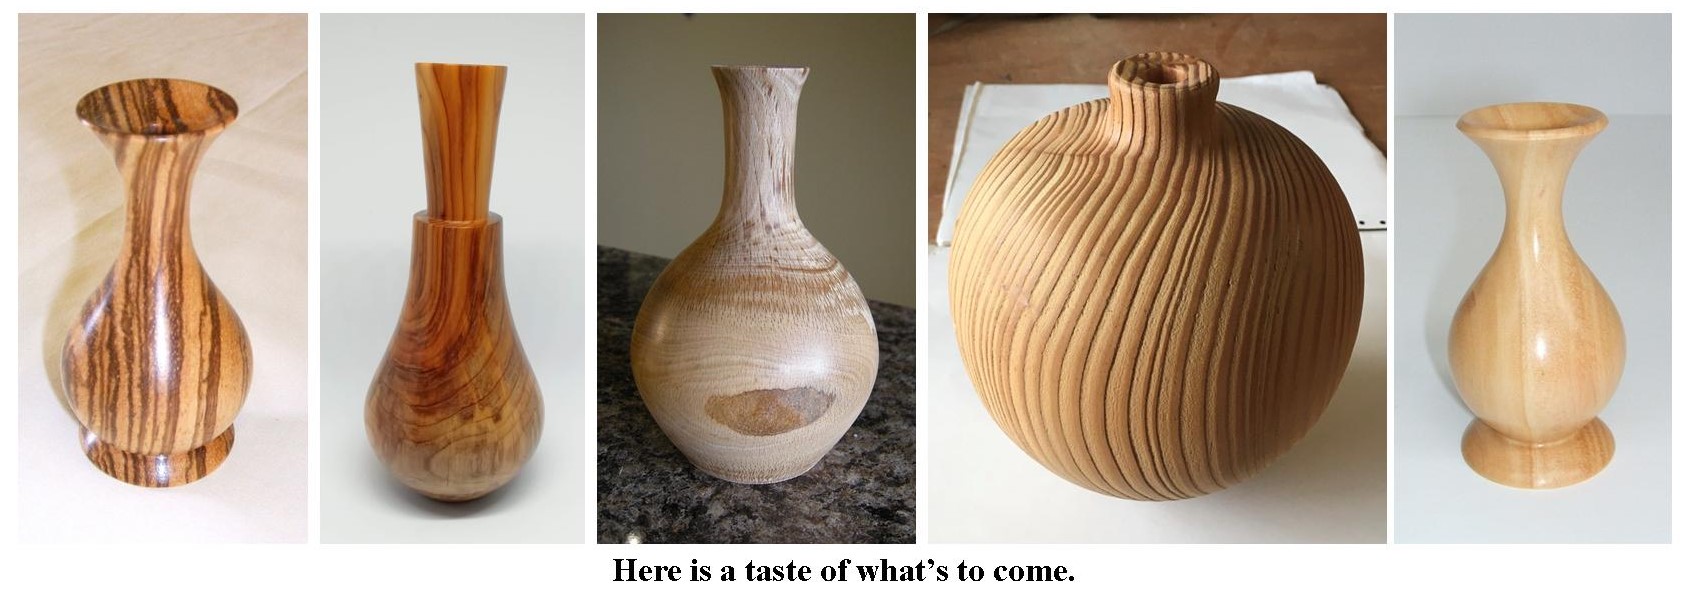
I have given you 3 pictures of things made using Errol’s criteria.
This is a Spalted Beech bowl that was made from half a log, the type of thing Errol is looking for the Novice group to make.This is a Laburnum bowl made from a whole log, this is a little more difficult and would suit the Intermediate group. This one was made from a “Y” piece but a straight log will be all that’s required.The final group, the Experienced members, you are being asked to make an Inside Out Turning, it can be any size or shape.
Our entries over the past few weeks for virtual meetings or just for publication have been very poor in number, we would like to see you all entering your work much more than has been happening, so please enter into the spirit of the virtual meetings until we eventually get back to the clubhouse, we are aware that may be some time yet so the only way we can keep in touch is through the internet.
Our virtual meeting on the subject of weed pots was held on Thursday 11th June 2020. It was being organised by myself, the usual criteria was in place, the members were to make the weed pots and send their pictures to me for publication on our web site. It was looking fairly clear to me that by Tuesday evening I had very few pictures from only 4 members, this was to say the least very disappointing, so as I was the organiser I decided to do a tutorial on the making of a weed pot, if only to make it worth while to do a post.
I have also change some of the ways I used to present the entries, I do hope you approve of my new method, it will be presented in 2 parts, the 1st part will be the members entries and the 2nd part will be the tutorial.
Part one, the members entries. Click any picture for a larger view.
Here’s a short video of Mike Day’s Weed Pot
Part two, a tutorial by Alec Mutch, on making a weed pot, see the gallery below, there are 24 pictures in 12 entries, just follow the pictures 1 to 24 and you should produce a weed pot at the end if it, click the pictures.
I hope you have gained something from this post from both the members and myself, I hope we can get a better response from our members in the future, our next virtual meeting was to be a competition organised by Errol Levings, this will now be a virtual meeting. Errol wanted the competition to be on 3 subjects, the Novice group were to make a Natural Edged Bowl from 1/2 a log, the Intermediate group were to make a Natural Edged Bowl from a full log The Experienced group were to make an Inside OutTurning. Now I would like you all to follow what Errol has asked for and make something in line with his requests, there will be no judging, but then there doesn’t need to be, just do it for your own satisfaction and remember to send the pictures to me.
Our meeting this Thursday should have been all about making weed pots, it will now be handled on line by means of a virtual meeting, it was to be organised by myself, what we would like you to do is to make a weed pot or more than one and send the pictures to me along with some text for publication on our web site. These are not difficult things to make and they use up odd bits of wood that would otherwise not be used.
We had a real disappointing entry for the Inside Out Turnings, I hope we can do a whole lot better with this subject.
If you need some guidance on what a weed pot is and how to make it, click the link provided below for a full description on how to make one.
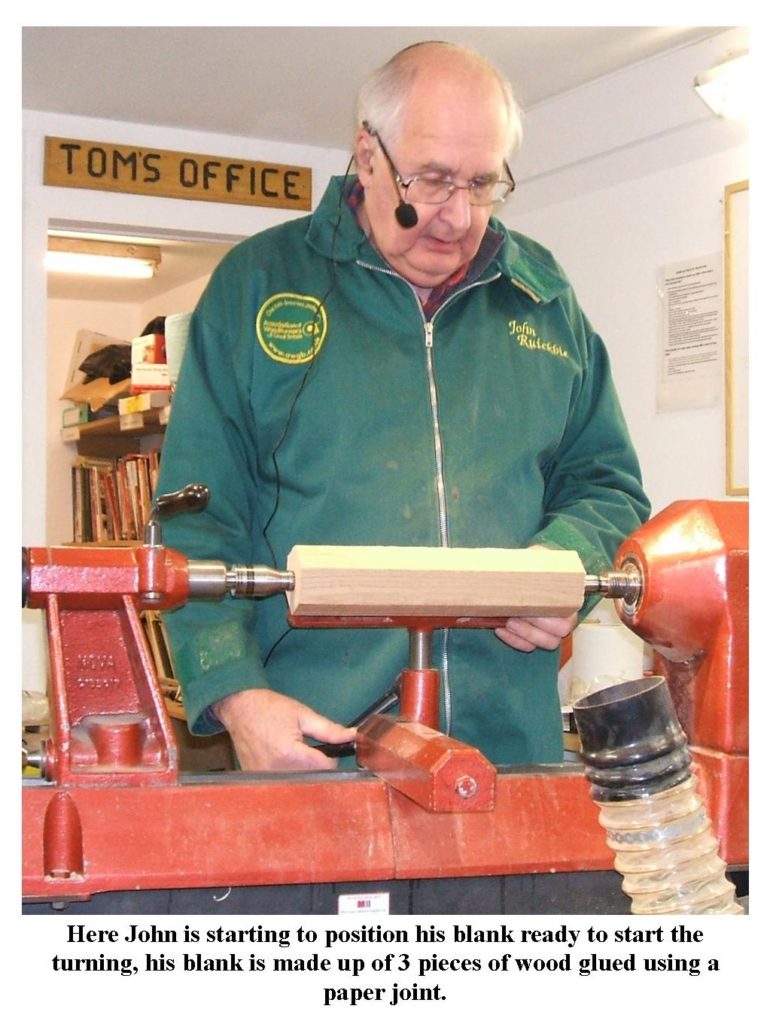
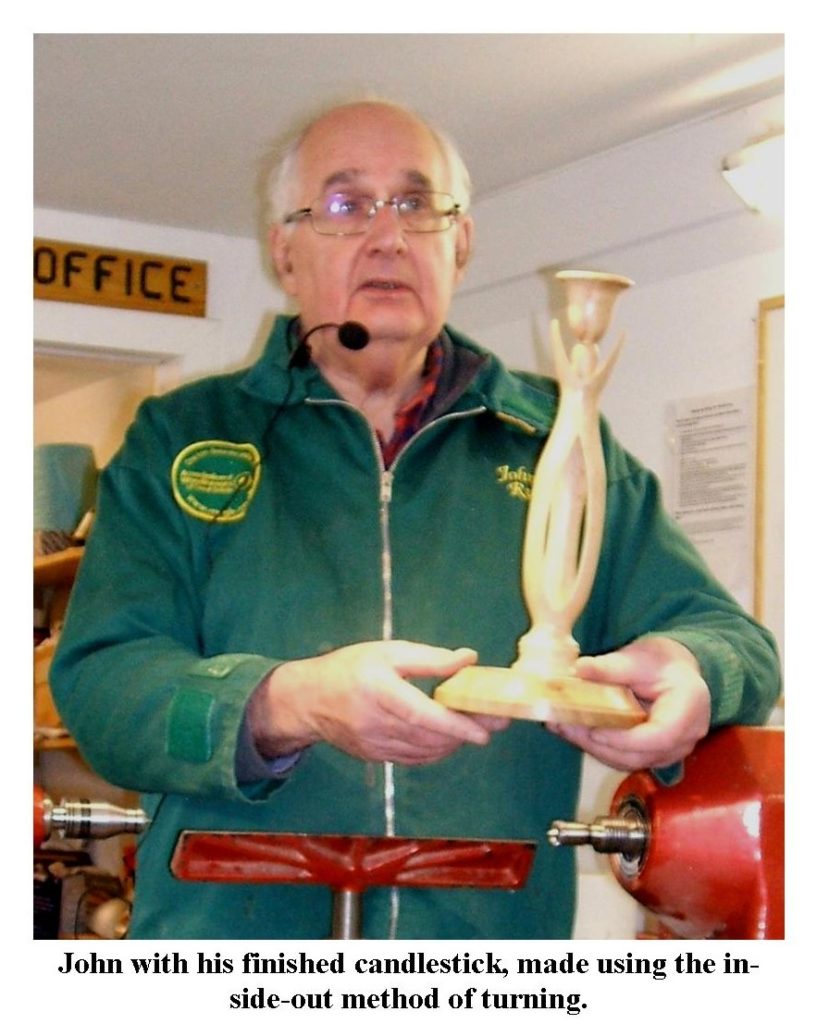
Our virtual meeting on “Inside Out Turning” was on Thursday 28th May 2020 It was to be organised by myself, I was going to demonstrate the methods used to produce an Inside Out Turning, however as this was not possible due to the lockdown we made it a virtual meeting instead. I was to be the only turner for this demonstration, we were not going to use all the lathes as is the normal practice. On that basis I decided I would handle this more like a tutorial rather than the normal proceedure where we just show some pictures with a little text, I will take you through the making of an Inside Out Turning.
The membership were invited to do an inside out turning to be shown on this post, however I have only received one other entry for the Inside Out Turning, I was hoping for a few more but I do realise that this type of turning may have been a step to far for the some of our members.
I did receive a couple of pictures of other turnings from another member, and they will be shown here, I did invite everyone to enter any piece of turning if they felt the Inside Out Turning was not for them.
First up is the only Inside Out Turning I received from Nick Simpson, this is what he had to say about his picture.
Morning Alec
If you are short of photos this is one I did a while ago.
It is 9” tall and made from sycamore. The inside is spray painted gold
and the outside stained with spirit stain and satin lacquer.
Regards
Nick Simpson.
Next are a couple of pictures from Dave Line, not Inside Out Turnings, just items he has made recently, this is what Dave had to say about them,
Hi Alec.
I tried inside out turning after John Ruickbie demonstrated a couple of
years ago but the result was a complete disaster so when I saw the programme
for this year I was looking forward to this week when Alec would be
demonstrating inside out turning so I could have another go.
So no inside out turning but 2 items I have made in the last couple of
weeks.
The first is a lamp, 280mm high and 120mm Dia. The body is Ash and the
feature rings are Sycamore and Sapele , it is finished with wood wax and
friction polish.
The second is a clock of 150mm Dia it is very simple but my first use of
millput which I think sets it off quite well, the wood is Copper Beech and
finished with melamine lacquer.
Now for my own tutorial on Inside Out Turnings.
For those wishing to follow the tutorial start at the fourth picture and go through them in sequence they are all on a step by step basis for you to follow, and good luck with this, if you don’t try you will never know how interesting it can make woodturning, for a larger picture and the text just click any picture, a full sized picture should appear.
Our next Virtual meeting is on the 11th June 2020, that too is being organised by myself, it’s on a much simpler turning this time, it’s all about making weed pots, now that something that everyone can do and can enter for publication, so get to making weed pots and lots of them and send your pictures to me but don’t forget to tell us all about them.
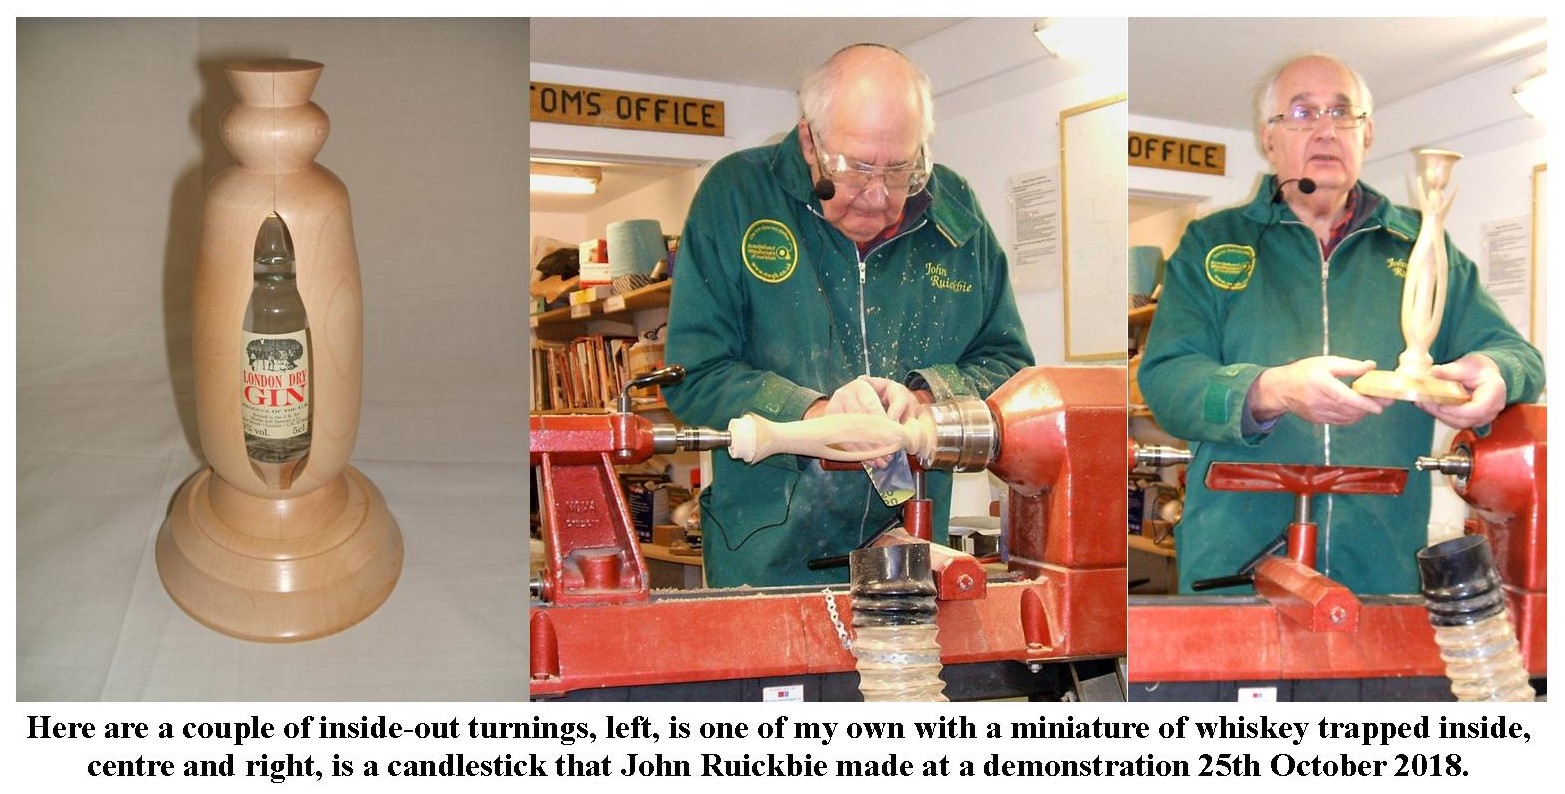
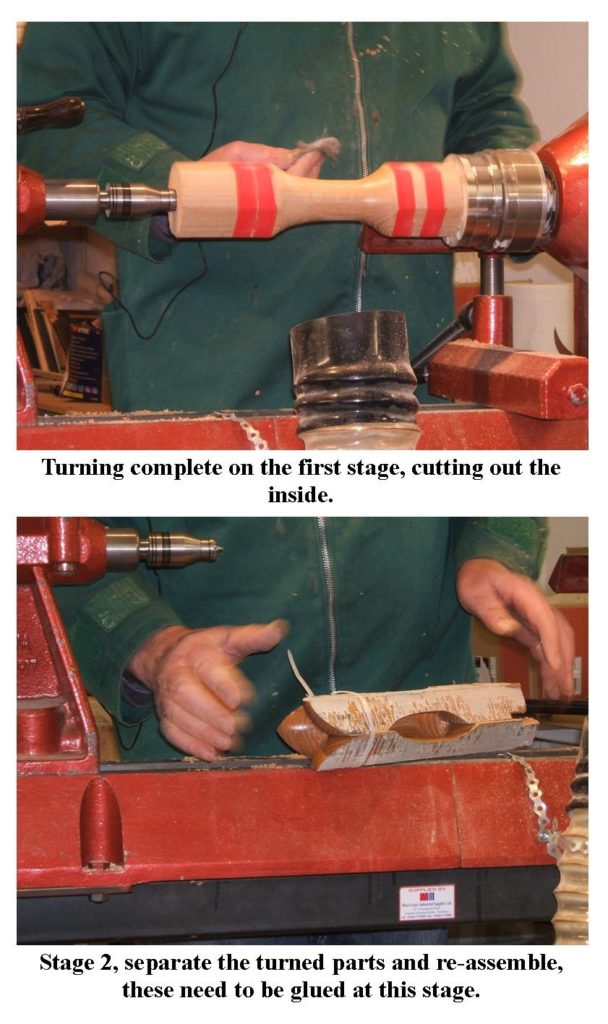
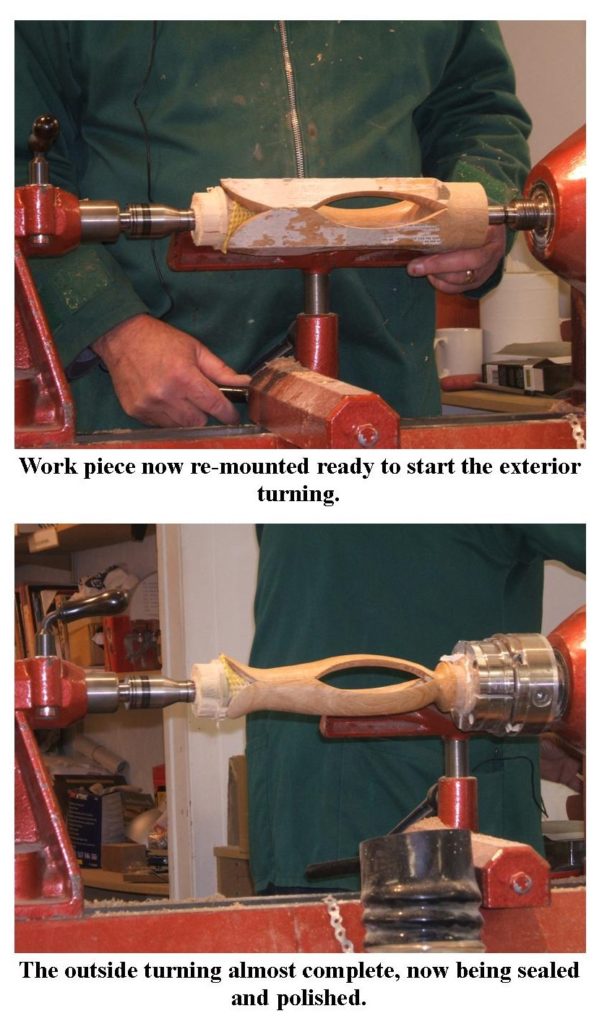
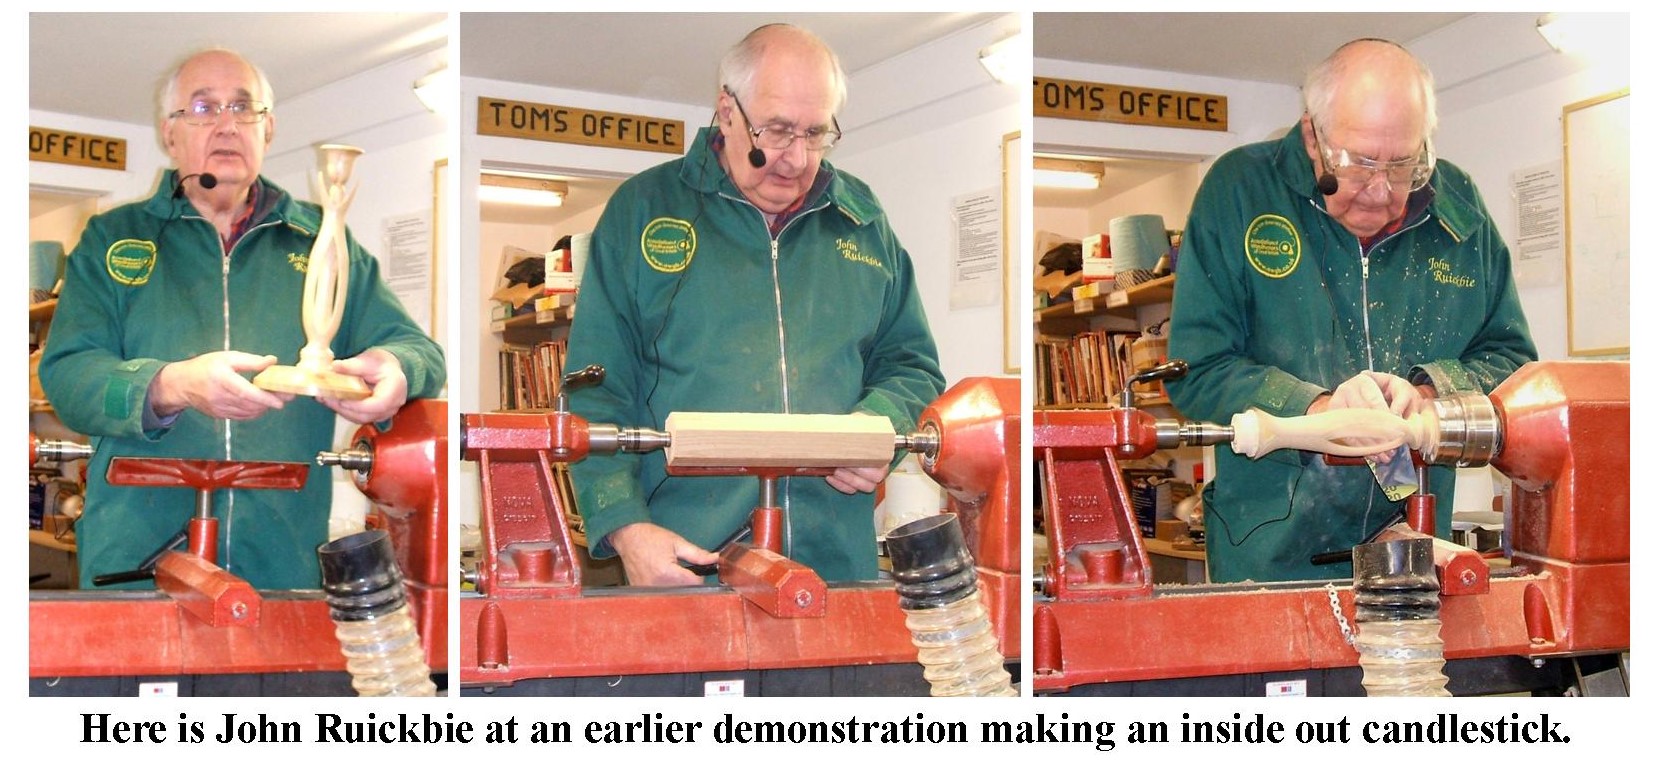
Our next meeting should have been on the 28th May 2020 but due to the lockdown this meeting will be handled virtually. It was to be organised by myself demonstrating how to make an inside-out or involuted turning. This type of turning usually consisted of 3 or 4 pieces of wood held by temporarily gluing the pieces together (paper joint method) to create a cylinder where the turning that would ultimately be on the inside is turned first on the outside with the ends untouched at this stage, the whole assembly would then be taken apart and reversed so that all the turnings are now on the inside, the pieces would then be glued permanently, allowed to dry and then turned. I have given you a few pictures of one I did myself and one that John Ruickbie did at a demo in 2018, you can follow what we did if you wish or come up with your own idea for any form of inside-out turning, but do have a go at this and send your pictures to me.
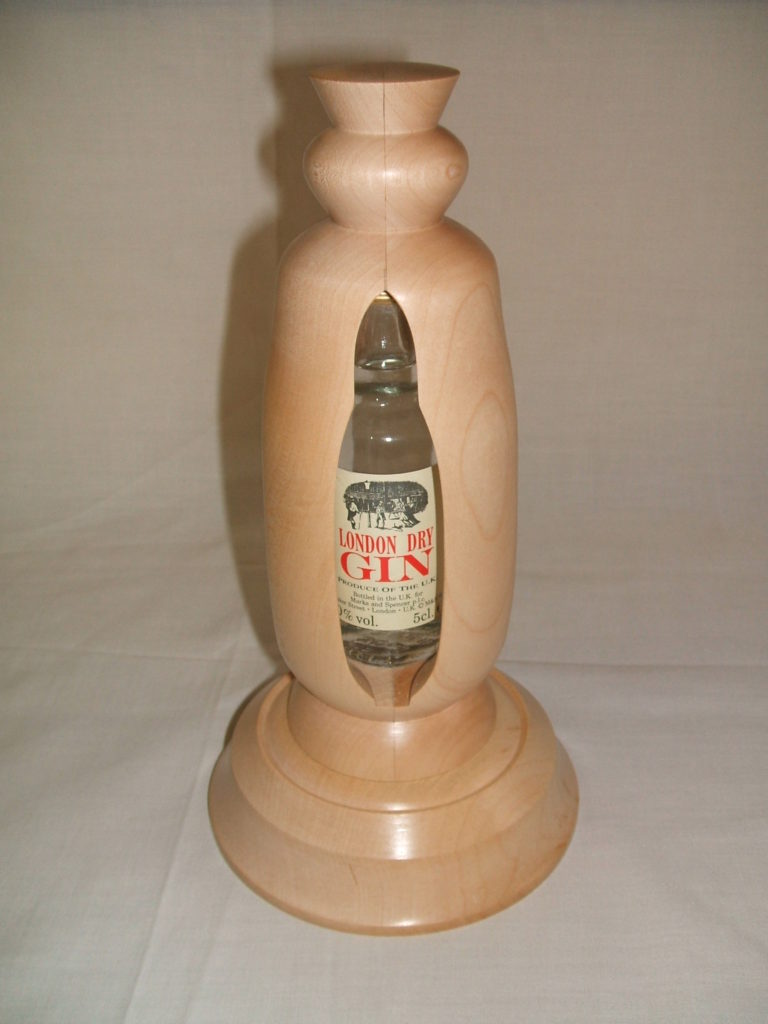
This is one I made some years ago, it’s made from Sycamore and has a miniature bottle of whisky inside.
Do have a go at this and send me the pictures, some of them could be as it’s being made along with the finished article and some information to go with it. If you don’t feel comfortable to make one of these turnings, send me pictures of anything else you make instead, we still want to see your pictures, so keep them coming.
Our Platters virtual meeting took place this week on Thursday 14th May 2020, it was being organised by Peter Lawrence but had to be made into a virtual meeting due to the lockdown. We did get some response from the members, not as much as I would have liked, 9 of our 65 members submitted pictures of their work and for that we are very grateful, however that meant that 56 did not, and that also included 7 of the 12 committee members. It does appear that since we started the virtual meetings that there are a handful of members who are more than willing to take part with the rest taking little interest, this is most disappointing because we are trying to keep the interest in the club alive and that will only happen if you all participate. I do hope that at the next virtual meeting in 2 weeks time there will be a better response, we were also asking for you to put any pictures in of anything you were doing outwith the virtual meetings in for publication on our web site and facebook page, this too seems to have come to a complete halt.
There are a total of 30 pictures submitted by our members along with some text, I will put this into 2 sections, the text being the first section and the pictures in a second as a picture gallery. Here are the text entries.
Pictures 1 to 3 are from Alan Ross.
Platter made from mahogany (not certain)
22.5cm x 3cm
sanded to 400grit, sanding sealer, cut’n’polish then wax 22.
Regards,
Alan Ross
Pictures 4 & 5 are from Bob Chisholm.
A Sycamore
Platter measuring 300 mm x 35 mm, it was sanded to 400 grit then sealed with
sanding sealer, re-sanded with 400grit and a coat of Melamine applied, it was
then buffed to a soft sheen,
Regards,
Bob Chisholm.
Pictures 6 to 10 are from Cliff Sim.
Good evening, Geoff. I attach photos
of my recent work. Unfortunately my oak platter had a few breakouts hence the
reason it became more of a bob-bon dish instead. I took heart from Alec’s
recent showing to finish off my table lamp using two lignum vitae bowls, one
cut in half, and the other mounted on top . I drilled a separate piece of odd
wood I had tuned as I originally planned to use a metal pipe to connect the
lamp holder but couldn’t get a fitting of the requisite size. The other
half of the bowl I turned to make a small trinket dish as shown, just like
Alec’s, though not nearly so skillfully nor tastefully made. I turned small
pieces of contrasting wood to glue in the bases to flatten them and hide the
turning recesses. I applied sanding sealer, melamine lacquer then chestnut wax
polish to all the items.
Best, Cliff Sim.
Pictures 11 to 13 are from Dave Line.
Hi Alec,
Here are
3 platters I have made.
The 1st
is 170mm dia, it is made from Ash with Mahogany insert, the only problem I
encountered was getting the mahogany inserts to bend without
cracking, also cutting the blank, this has to be done (very accurately) when
the blank is still square so that it can be clamped when the glue is drying It
is finished off with food safe finish.
The 2nd
is 200mm dia made from Ash. The blank is first turned then sprayed with
Ebonising Lacquer (cheap mat black spray paint from Aldi) then the blank is
rotated at 2000rpm on the lathe when dry and “Butt It” paint flicked
onto the blank whilst rotating. The platter is then turned where required to
remove unwanted paint and finished off.
The third
is only 150mm dia and my first attempt at using Pabeo Prisme paint and as
can be seen I need lot’s more practice.
Keep safe Dave Line.
Pictures 14 to 18 are from Errol Levings.
Hi Alec
Two very
plain platters from the same piece of Tibetan spruce- still fairly wet with
lots of resin. Very soft, some ripple and short grain so kept thickness up.
Needed very sharp tools to cut clean. Had hoped the spruce would have been
easier to use – some lovely ripple near the bole. These two platters are 120mm
by 15mm. Will finish with OSMO foodsafe oil – have only had one coat so
far.
Errol Levings
Pictures 19 & 20 are from Geoff Potter.
Alec find
attached my platter.
OAK
PLATTER
The
platter was made from an unpromising thin piece of oak. The wood was thoroughly
dry and had a waxed circumference. There was an obvious knot and a section that
looked like it might fly off! I used very short screws to attach it to my face
plate and used my revolving centre as support until I became convinced it
wouldn’t all Frisbee off my lathe. I turned the base including the mortise to
suit my chuck. I decided that because of the thin section I would keep the
mortise after I had finished so took the opportunity to decorate it with a few
grooves. These grooves would probably impress my friends but wouldn’t impress
many Woodturners.
It took
at least 6 applications of superglue and wood dust at various times to
stabilise the knots and cracks.
The top
with its very shallow dish looked too plain so I used two small grooves to
highlight the rim/dish boundary.
I like
the result, the oak has an impressive set of grain and medullary rays. Its
finished with sanding seal, sanded to 400 grit, melamine and a wax. The platter
is 220 x 15mm. Quite a thin turning for me.
Regards,
Geoff Potter.
Pictures 21 to 23 are from Gordon Leitch.
Evening
Alex I enclose photos of 2 platters
One is
made of oak
38.5
across
122cm
circumference
The other
is made of elm
36cm
across
115
circumference
Regards
Gordon Leitch.
Picture 24 is from Nick Simpson.
Hi Alec
I haven’t had time to turn a platter this week with gardening and HWC
business
I thought members might like this. It is called ‘Reflections of…….’
It is a composition of two adjacent slices through the grafted crown of
a flowering cherry.
The frame is just that. It gives the sense of a mirror and, in fact, the
judge in the Borders Woodworkers Open competition asked the Borders club
chairman why someone would bring a mirror to a competition for woodturnings.
The platters are 7” diameter and textured followed by pyrography.
Kind regards
Nick Simpson.
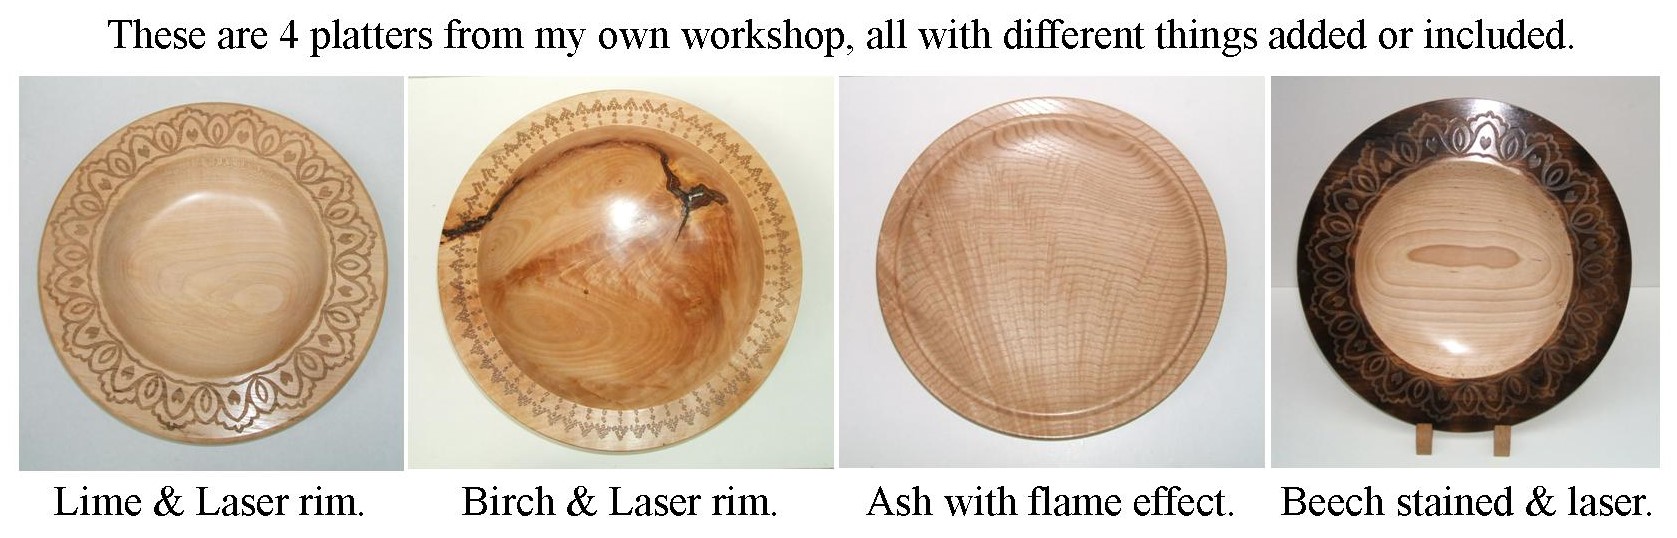
Pictures 25 to 30 are from Alec Mutch.
I have made
3 new platters this week, also shown a couple of smaller platters I had made in
the past, all of them have something different to offer.
1, This is
an Elm platter it measured 305 mm in diameter by about 40 mm deep, I brought
the bowl through the rim by creating 2 small beads on top of the rim.
2, This is
an Olive Ash platter it measured 330 mm in diameter by about 40 mm deep, I
decorated the rim using a laser.
3, Another Elm platter, it measured 305 mm in
diameter by about 50 mm deep, I cut some Celtic design inserts for the rim and
set them in by drilling a series of shallow recesses to accommodate the
inserts, I then used some Milliput to fill the recesses before completing the
turning, the Milliput was allowed to harden over night.
4, A smaller
Ash platter, with a decorated rim. I used some Pebeo paints for this, the base coat was Black Vitrail and the Blue was
Pebeo Moon, both were allowed to dry for several days before finishing the
turning.
5, Another Ash shallow platter, measuring 250 mm
by 30 mm again with a decorated rim, this time the paint is Pebeo Prisme in 3
different colours, these paints are oil based and can be applied at the same
time then allowed to dry over several days, in the process they react to each
other and produce the formations you see on the rim.
6, I have
included a picture of my Laser in operation, it’s a LOBO 6040 CNC machine, it
can do engraving or cutting with the use of a suitable computer programme.
Regards,
Alec Mutch.
This is a late entry from John Ruickbie, it’s very relevant to what’s going on at present so I have given it front of house prominence.
This is what John had to say about his entry,
This is a tribute to
the work being done combating the virus it is more a plaque than a platter. The
centre is the virus which I have given a black centre. Each group is a
spear of sycamore piercing the virus. The overall diameter is 290mm and the
stand is elm.
Regards.
John Ruickbie.
Thank you john for this excellent piece of work, it’s most befitting the situation we are in at present.
To get a full sized picture of any in the gallery just click the picture, we hope you find the pictures interesting and encouraging, and perhaps on the next virtual meeting you too could have your work posted here. We look forward to seeing what you can do.
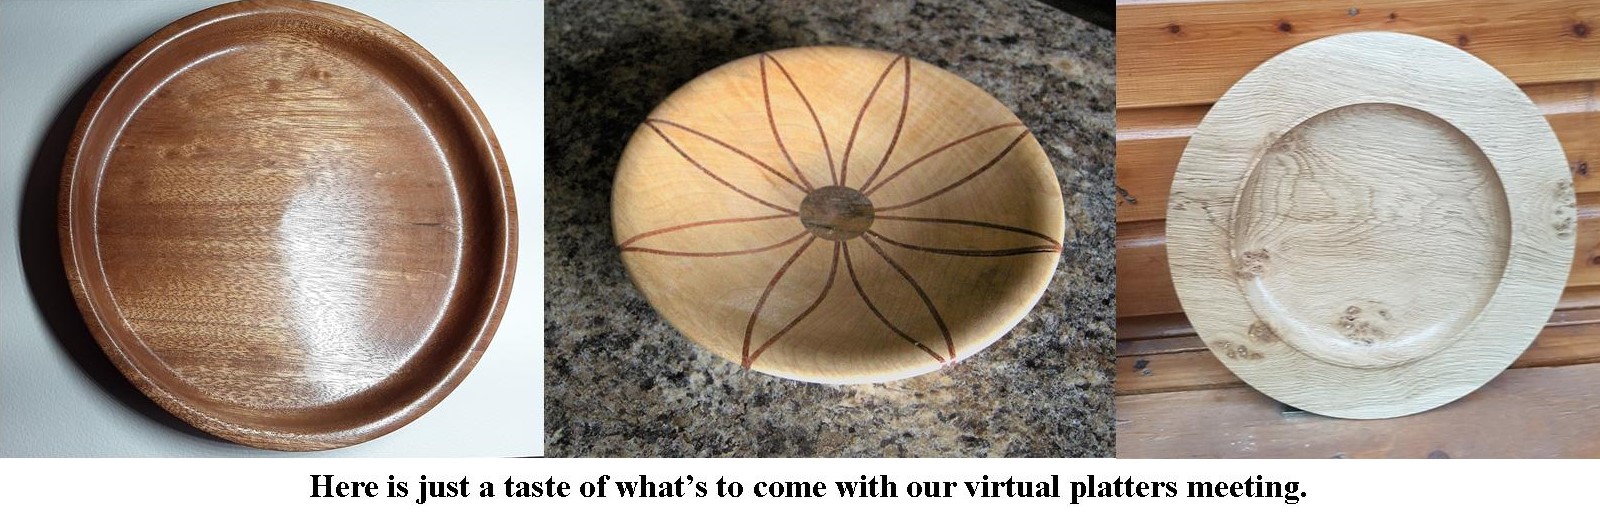
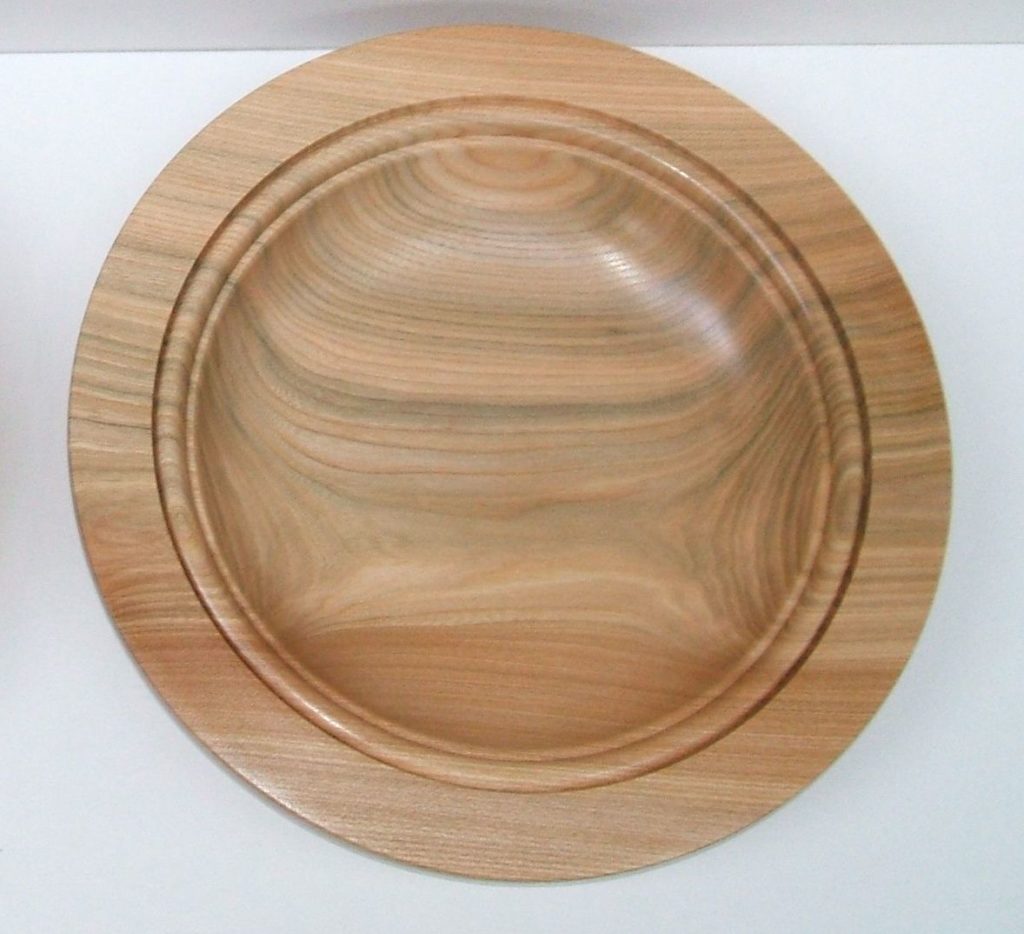
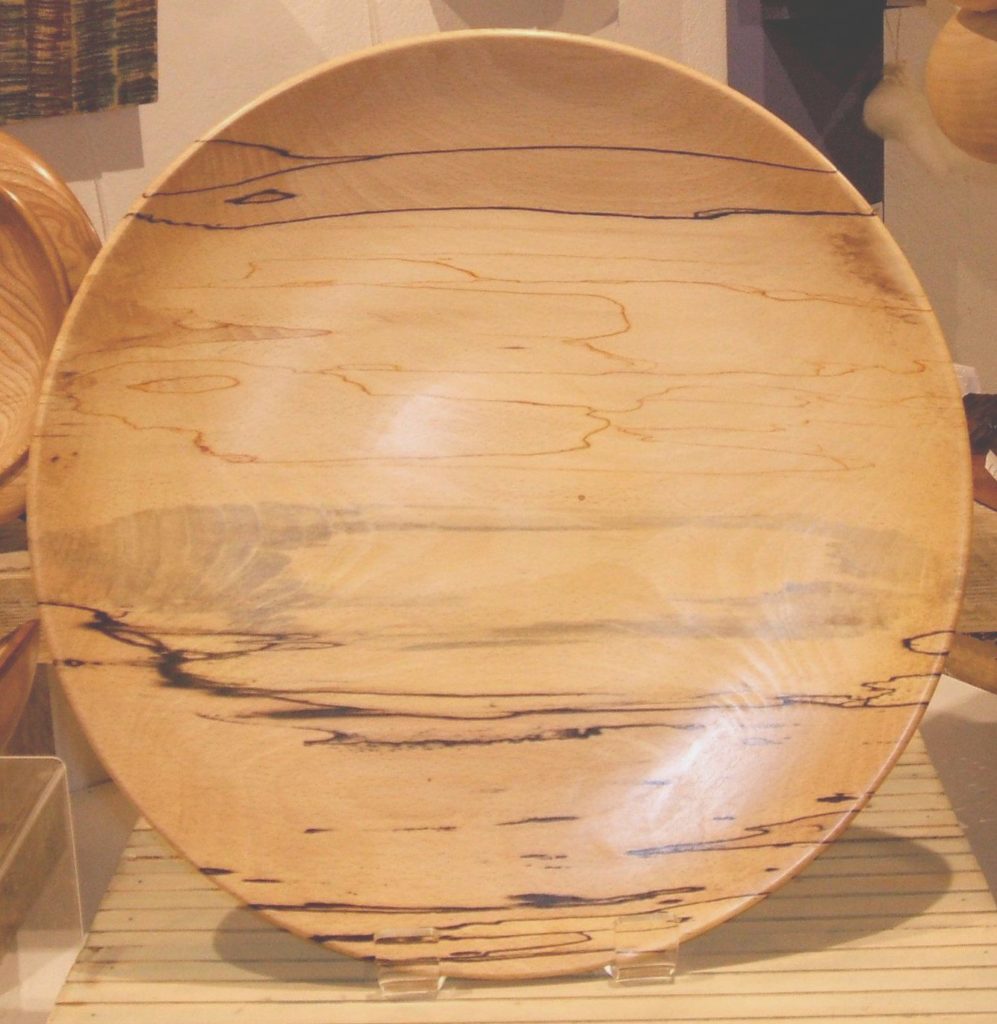
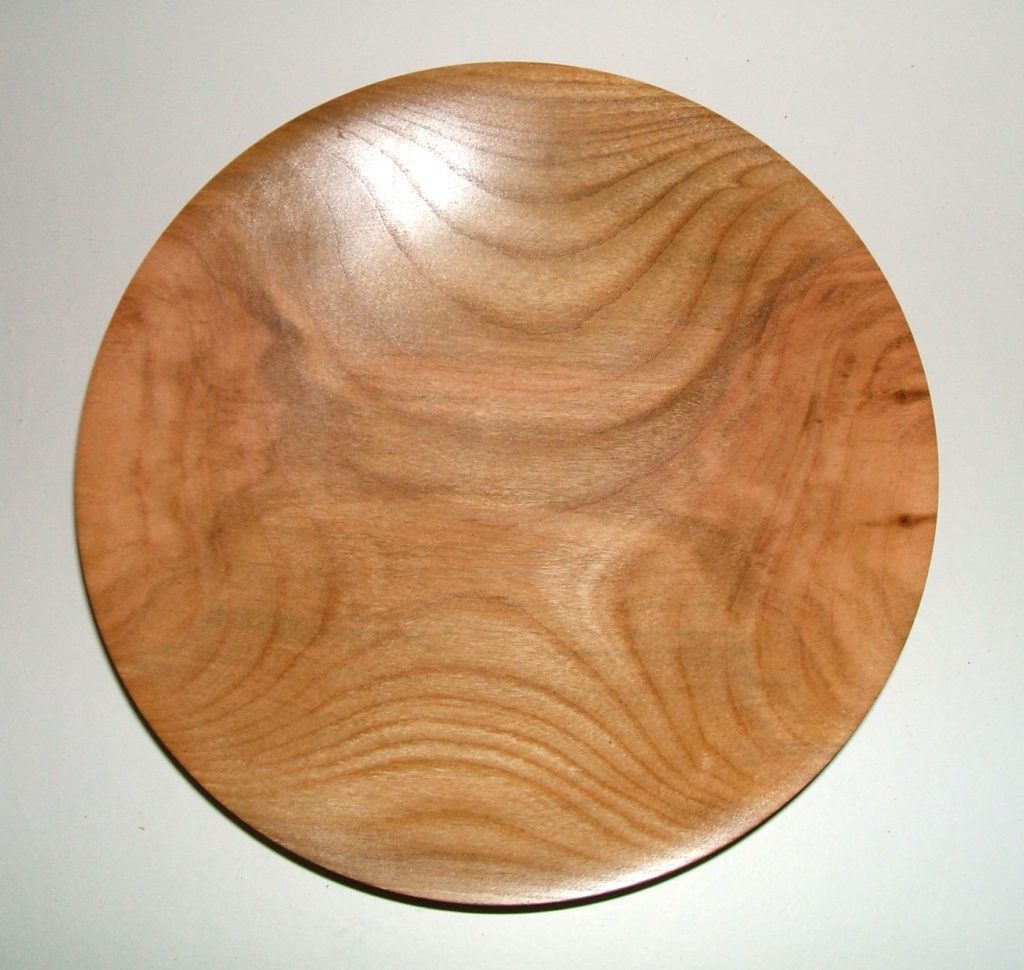
This Thursday 14th May 2020 would have been our meeting where platters were on the programme, it was to be organised by Peter Lawrence, however this meeting will now be done virtually over the internet and not at the clubhouse, to take part you need to make a platter or two, then photograph it or them and send the pictures to me along with some information, such as , type of wood used, size of item made and anything that may be of interest to the rest of the members. The platter can be made from any wood in any size and even laminated or decorated if you prefer. Below are some examples of platters that I have made over the years.
This platter was made from a piece of Wych Elm and measured 325 mm in diameter by 50 mm deep, Wych Elm is quite easy to recognize as it has these pale green streaks throughout the wood.This large platter was made from Spalted Lime and measured 400 mm in diameter by 60 mm deep. The spalting turned this rather plain looking wood into something much more interesting, almost landscape like in appearance.This platter although quite a bit smaller than the others was made from a piece of Native Cherry, the grain structure was so nice that I kept the design to an absolute minimum, it measured 250 mm in diameter by only 30 mm deep.
You are more than welcome to use any of my designs as an example for your platter but what we really want to see is for you to come up with your own design.
All pictures and text to arrive by Thursday 14th May 2020 and should be sent to me by email at,
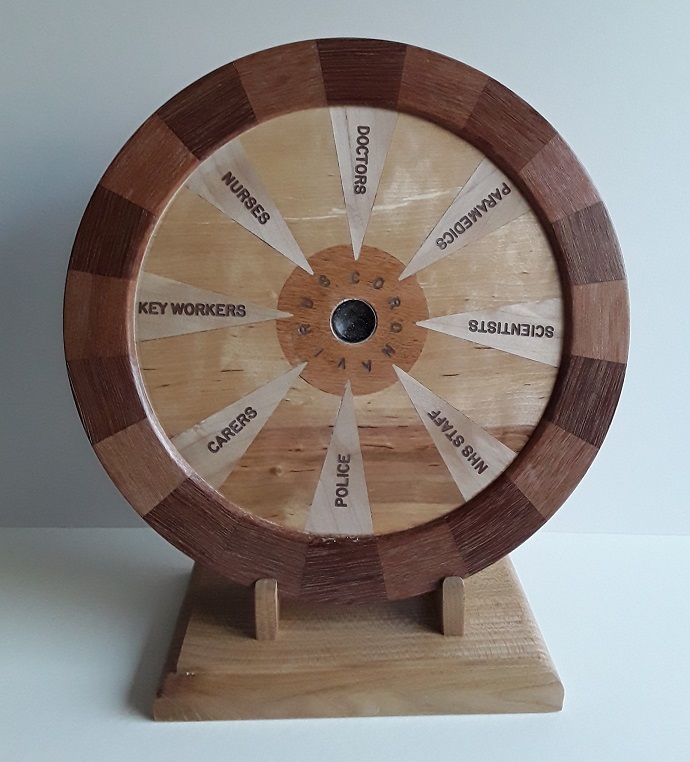
I have one more piece of information to pass on to you all, after the Prime Minister’s address on TV tonight nothing much in Scotland has changed, we are still under lockdown, our first minister has only relaxed the amount of exercise you can do, we are still all expected to stay home. As the lockdown situation changes we will be advising you of what we are doing to comply with the government regulations in regards re-opening the club. To that end we have already formed a sub committee, a task force to look into how we can open safely again, I am chairing the task force with Geoff Potter recording all meetings as secretary, John Ruickbie dealing with all safety matters as our safety rep, Nick Simpson dealing with all matters medical and Peter Lawrence representing the membership. As soon as we know anything you will be informed.
Do remember the clubhouse remains closed and do try to stay safe.
Just in today a picture from John Ruickbie, John’s usual work is mainly woodturning and that often consists of mainly laminated work pieces, however John admitted to me today that due to the lockdown he was running out of suitable woods for woodturning, this has led him down a different road where he has made use of a lot of very small pieces of wood in a wood craft called Intarsia, for those who are not familiar with Intarsia it’s very similar to that of Marquetry the main difference is that the Intarsia is cut 3 dimensional, where as the Marquetry are all cut very thin and all the same thickness. This is an art that requires a very good knowledge of shape and form and most of all very accurate cutting,
This is what John had to say about his picture,
I have
attached a photo of my first attempt at intarsia they are fridge magnets and as
you see use very little wood but require very accurate cutting. Some parts are
natural wood others are coloured using spirit stain. They are assembled on a
thin backing board with rare earth magnets inserted.
Regards
John Ruickbie.
These are John’s Intarsia fridge magnets.
These are not woodturning in any way, but we are a woodworking club that specialises in woodturning but not to the exclusion of any other type of woodworking. We are always going to be accommodating to any other type of woodwork that any of you who follow the web site and facebook pages want to show, this will include anyone who is not a member but who follows the online service.
Please keep sending me your pictures and text, I’m sure the members are always looking to see what other members are doing.
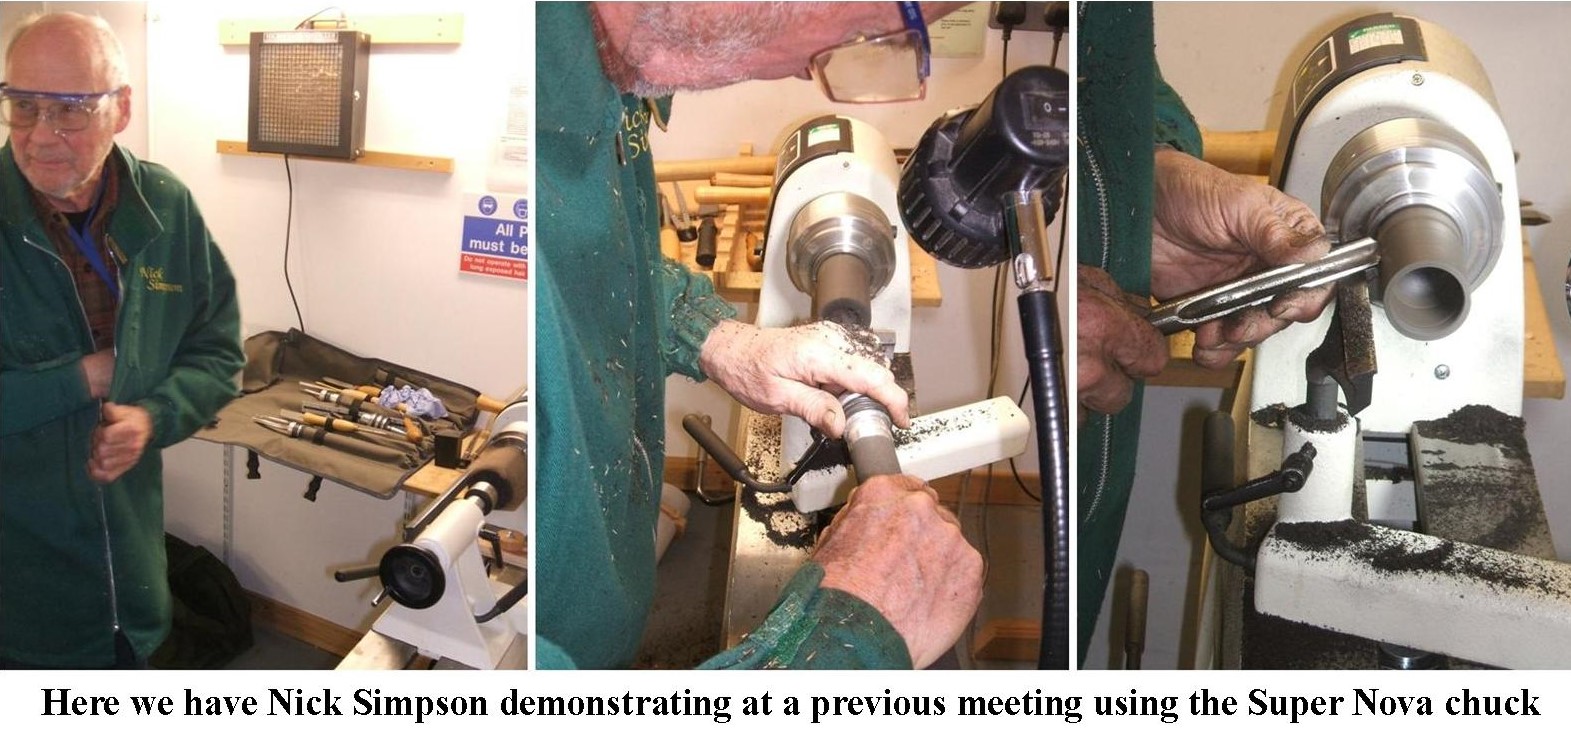
As most of you will be aware some servicing of some of the club equipment has been carried out whilst under lockdown. This is being done by Nick Simpson who brought all the bits of equipment back to his own workshop to do the servicing. Here is his report on the 2nd of the chucks he has serviced, a Super Nova 2 chuck.
Nick’s News – Week 3
Servicing HWC Chucks – #2.
Supernova 2
The SuperNova 2 is
similar in design to the earlier Nova G2 but has a backplate which keeps the
insides relatively free from dust and uses a rack and pinion drive for the
scroll. It is important to clean the chuck regularly and re-lubricate. This is
a simple process, which is illustrated in the accompanying photographs (SN.1-5).
Details of cleaning and re-assembly are shown in the photos G2.D and F from my
previous article posted by Alec on 25th April.
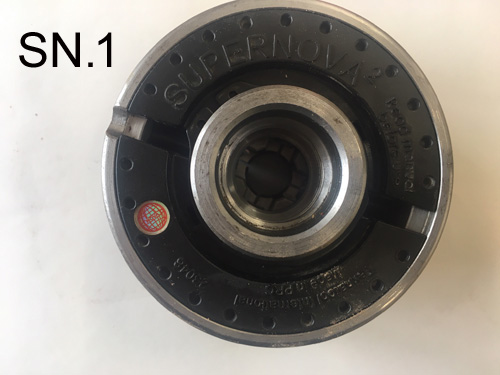
Picture SN.1 shows
the rear view of the chuck when removed from the lathe. The backplate is seen in
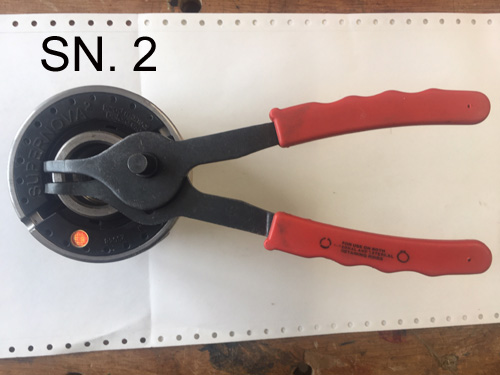
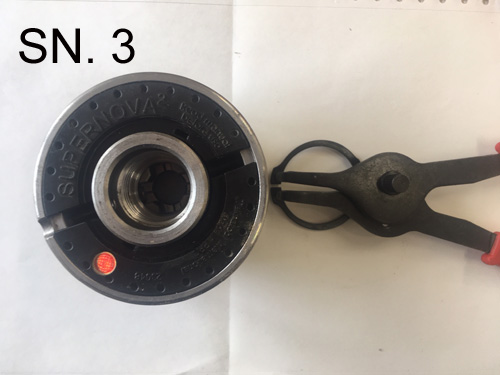
situ and is held in place by a circlip (SN. 2). The next step is to remove
the circlip (SN.3). It is advisable to wear eye protection as the
circlip is made of sprung steel and can ping off the pliers unpredictably. The
back plate should fall out when the chuck is turned over. If it is reluctant to
separate there are 2 slots which can be accessed by 2 small slotted
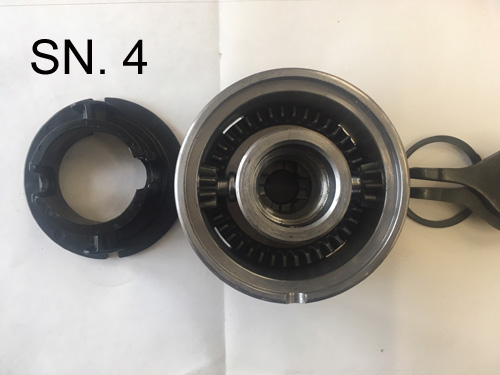
screwdrivers and the plate can be levered off. The 2 pinions should now be
exposed and withdrawn from the housing to expose the back of the scroll (SN.5).
The scroll can now be removed by inverting the chuck. Having removed the scroll, the jaw the jaw carriers
may be slid out of their corresponding slots in the chuck housing. Each carrier
is stamped with a numbers 1-4. For the SuperNova 2 chuck there is no need to
record which slot the individual carrier came from. Now, in a
well-ventilated area withnitrile gloves and eye protection, brush
off all surfaces with a brass wire brush and then steep the parts in a
de-greasing solvent (see G2. D in my previous report). I used paraffin but any
solvent will do. Dry the parts on paper towel and leave to fully dry or to
speed the process blow with compressed air using the above PPE.
Reassembly is the
reverse process with certain caveats. Spray each part with lubricant prior to
assembly. My preferred lubricant is PTFE spray, because it is a ‘dry’ lubricant,
but any fine oil will do. Do NOT use grease of any grade. With the chuck on its
back insert jaw carrier labelled 1 into any slot. Now insert all the other
carriers in order 2-4 into slots in a clockwise sequence. Bring the
carriers together so that their inner edges form a square and turn the whole
over (G2. F of previous). You can now drop the lubricated scroll onto the jaws
and with a little ‘jiggling’ it will engage with the carriers. Now replace the
lubricated pinions and engage them with the teeth of the rack, replace the
backplate locating the recesses over the appropriate pinion and refit the
circlip and the job is complete. JOB
DONE.
Read the text and then use the corresponding numbered picture to understand what Nick has done.You may have to look at the post on the G2 chuck servicing to follow the full procedure.
Nick is now working on the Patriot chuck, details of which will follow shortly. In the meantime I would like to thank Nick on behalf of the club members for all his good work on the servicing.
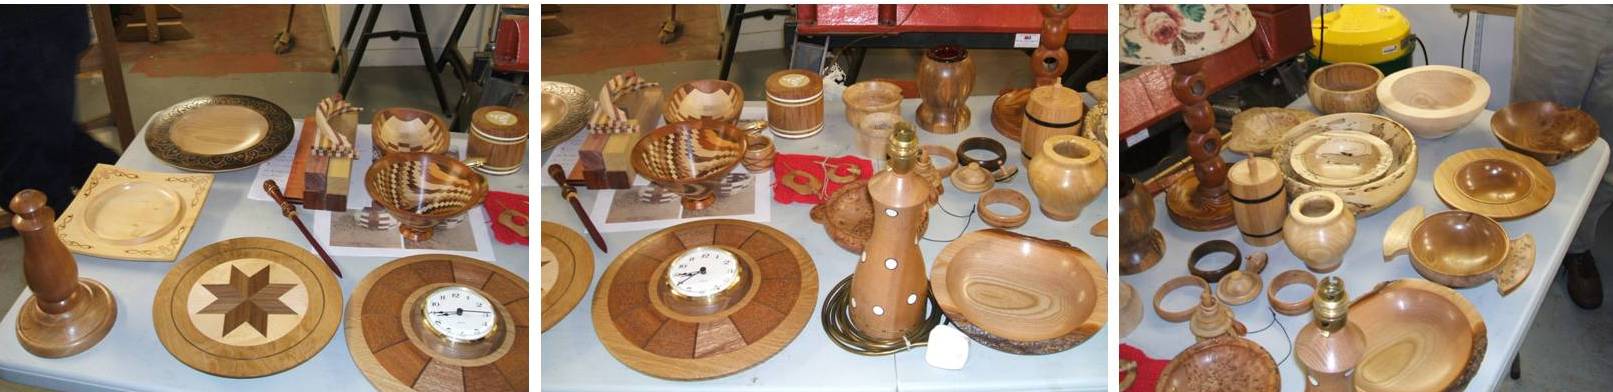
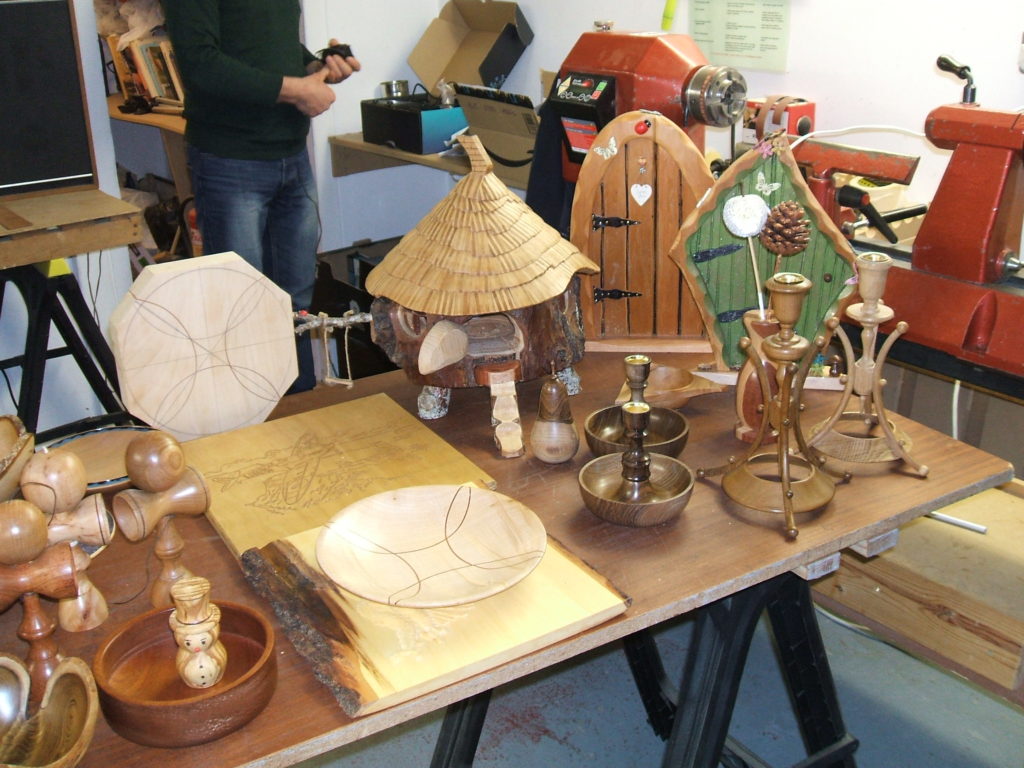
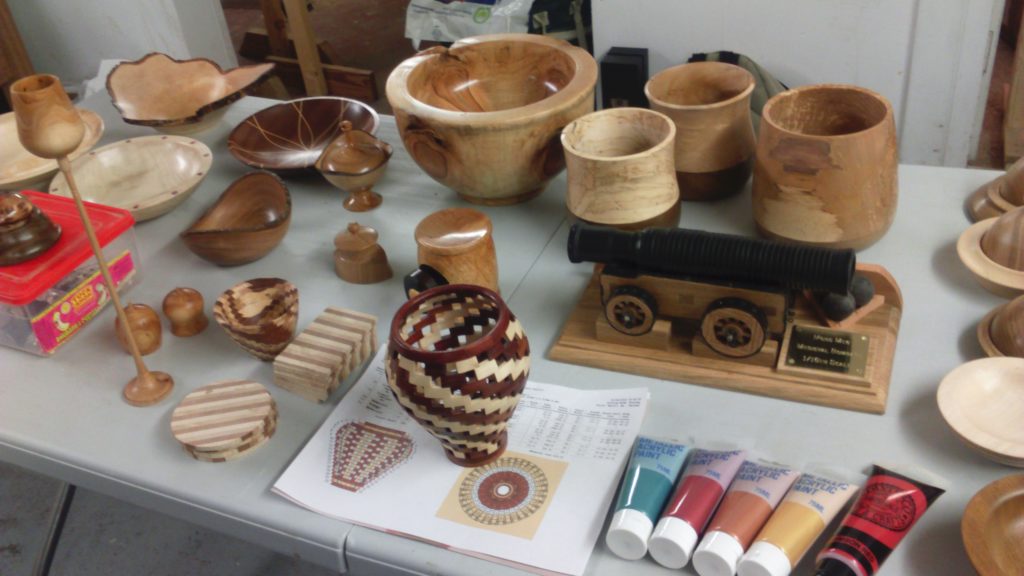
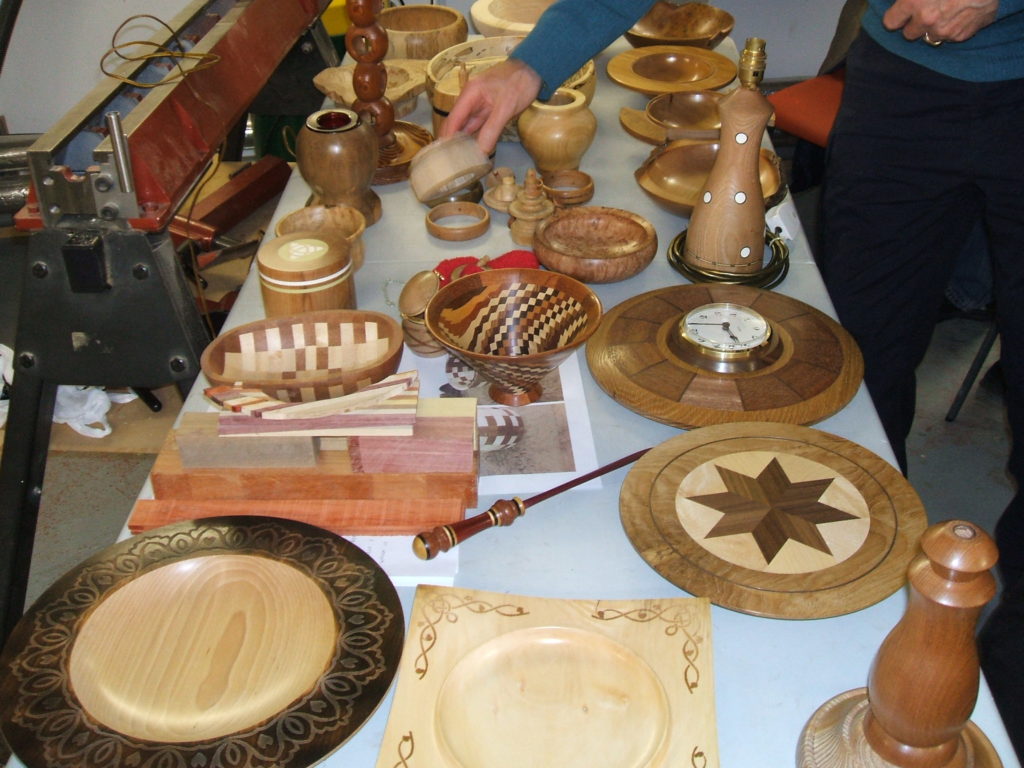
The showtime meeting scheduled for the 30th April 2020 has now become a virtual meeting, (it will not take place at the clubhouse) we will be treating this meeting on line. We need you all to send in your pictures and some text on the items you would have brought to the showtime meeting, you can send in more than one picture, in fact more the merrier. We had a reasonably good response to the last virtual meeting on Natural edged turnings, we had 44 pictures for that meeting, I want to see at least this amount, preferably more for this virtual meeting, remember it can be of anything you have made turned or otherwise, we are looking for a very good response so please send me your pictures along with a bit of information on each item.
Here are some of the items you brought in for the showtime meeting on 15-02-2018.These are some of the items you brought in for the showtime meeting on 21-06-2018Here are some of the item you brought in for our last showtime meeting on 05-09-2019
Get busy in your workshops and produce as many items that you can. we want to see lots of entries.
All entries to be received by Thursday 30th April 2020, and thank you for taking part.
Do remember the clubhouse remains closed.
This website uses cookies to improve your experience. We'll assume you're ok with this, but you can opt-out if you wish.AcceptRead More
Privacy & Cookies Policy
Privacy Overview
This website uses cookies to improve your experience while you navigate through the website. Out of these, the cookies that are categorized as necessary are stored on your browser as they are essential for the working of basic functionalities of the website. We also use third-party cookies that help us analyze and understand how you use this website. These cookies will be stored in your browser only with your consent. You also have the option to opt-out of these cookies. But opting out of some of these cookies may affect your browsing experience.
Necessary cookies are absolutely essential for the website to function properly. This category only includes cookies that ensures basic functionalities and security features of the website. These cookies do not store any personal information.
Any cookies that may not be particularly necessary for the website to function and is used specifically to collect user personal data via analytics, ads, other embedded contents are termed as non-necessary cookies. It is mandatory to procure user consent prior to running these cookies on your website.